From Blank to Box
Global Gear & Machining created a new cell that requires no human intervention.
There was a tremendous amount of skepticism in the boardroom; the members sat in comfortable chairs, listening. They must have been thinking to themselves, “How is this gear company expecting to make a non-gear component, with a brand new concept, in high volumes, in a new cell, with low labor and still produce good quality parts?” The consensus was that these guys are nuts.
Those “nuts” were the top management of Global Gear & Machining LLC (GGM), a company specializing in contract gear manufacturing and subassembly services. Global Gear was founded as a joint venture between a private entrepreneur and a major diesel engine builder in the Chicago area to produce high volume drivetrain gears for various engine platforms.
In 2002, IMS companies, the parent of GGM, purchased the joint venture with the goal to commercialize and grow the company. Early on it was clear that the company was going to be operating in a new world. Without an OEM partner guaranteeing work, it had to get lean and learn how to market its capabilities, and service potential, new customers and new manufacturing opportunities.
Today, they are a concise group of about 100 employees, now with a lean, full bore, three shift flexible schedule operation producing a variety of components in a 130,000 square-foot building surrounded by a quiet suburban area in Downers Grove, Ill.
At first, contracts for the new GGM were almost exclusively gear train components with some shaft work thrown in. As time has gone on, more shaft work has come its way. As happy as the company was with the addition of more gear related work, the leadership of the company wanted to do more precision production machining as the company’s full name implies. With more than 10 million gears and precision components delivered without a single warranty claim, GGM was a proven choice when it came to high volume precision manufacturing.
Shifting Gears
IMS Companies LLC purchased GGM in 2002, giving the company more financial depth and large investment capabilities for branching out into other areas of manufacturing. Through the years, because of high quality and customer recognition, its product lines and services were expanded to include other precision components. This expansion resulted in the addition of value added services such as engineering design and oversight, modular assembly and inventory/consignment management.
In 2007 Mike Chester, president of IMS, brought an opportunity to Cory Ooyen, director of operations for GGM. The part was an air bag end cap for an assembly that would eventually end up in domestic and transplant vehicles built in North America. Both the customer and the end users are considered quality leaders in the automotive sector, so it was going to be a challenge, but this was the type of machining work Mr. Ooyen and Global Gear’s management was looking for.
The part was being produced on a combination of conventional CNC lathes and mills, with extensive manual intervention. With additional deburring, semi-automation inspection, washing, visual inspection and hand packing required on each and every component. “Are you interested?” Mr. Chester asked.
Mr. Ooyen recognized that quality issues were the reason that the prospective client was shopping the part around. He also knew that the current process, with all its steps and handling points, not only wouldn’t satisfy customer expectations for quality; it would simply be too costly for them to produce
the part efficiently.
Mr. Ooyen and the GGM team passed on the current process, and proposed a totally new approach, one that had not been tried before. Corporate management was worried; the old path was proven to work, to an extent. However, Mr. Ooyen, with the full support of Mr. Chester, convinced them otherwise. Now, it was the GGM team’s turn to convince the customer.
With a full attendance of the customer’s quality, engineering and manufacturing personnel at the Mexican facility, the concept was presented to the customer. “Of the ten or so people in the room, at least half thought we were nuts. But a few key people understood our knowledge, they understood that we knew quality systems, and those people essentially agreed that we could do it,” Mr. Ooyen recalls.
In fact, GGM had been automating its gear making processes since 2000, so when the opportunity for them to do the air bag part came up, Mr. Ooyen looked at its gear making cell process and thought, “Why couldn’t we transfer this into a component manufacturing process?” The team’s goal was to move forward with a fully automated cell with all automated handling. They wanted to take the parts from “Blank to Box” without human intervention. It was a complex concept, but with high potential for success and opportunity.
Daunting as the goal seemed, Mr. Ooyen was confident in part because he knew about two things that would become keys to the project’s success. He knew Hydromats, which would be the centerpiece of the cell, and he knew Steve Hayes. Mr. Ooyen had become well acquainted with Mr. Hayes and his skills with Hydromat rotary transfer machines. Now Mr. Hayes is a production manager for GGM and spearheads the Hydromat cell project. He is also actively involved in additional projects at GGM and its maintenance department.
Rotary Transfer and More
“Our concept in the development of this manufacturing cell was to eliminate human intervention to the greatest degree possible as that was our best opportunity to eliminate mistakes and variability in the manufacturing process,” Mr. Hayes says. “We knew we were going to run on Hydromats—we couldn’t see running on CNCs because they are too slow and the loading and unloading process is often a variable—so the Hydromat was our only choice. We really didn’t look at anything else.”
“I had the process in my head, but Hydromat’s ability to do the part at the cycle time needed was the key,” Mr. Ooyen says. In 2007, GGM ordered the Hydromat EPIC rotary transfer machine that the cell would be built around. They made several trips to the St. Louis, Mo.-based company throughout the next several months as they worked closely together on the project. Hydromat engineers designed and built several custom components and specified other units that would be delivered and installed at GGM, including the part elevator, feeding system and robots to correctly handle the forgings in conjunction with the EPIC R/T machine. The blanks are 6061 aluminum impacts.
A bin of impacts are dumped into a hopper that then feeds an elevator that transports them to a bowl feeder. After the parts are correctly oriented, they are transported by a vibratory inline track to a pick-up station where a Fanuc robot takes over. The robot grips the blank, but rather than loading it into the Hydromat’s collet, it places the forging into a custom designed “sliding pocket” hydraulic loading system. The hydraulic loader pushes the blank to a specific depth, then the Hydromat closes the collet on it. There is no hard stop at that point; actually, there is no hard stop before the inverter station.
The impact process is pretty accurate, holding a couple of thousandths, but it can’t hold overall lengths as well. The material needs room to flow end to end, but internally within the die it is very accurate. Mr. Hayes and Mr. Ooyen’s concept was to reference an unmachined face on the interior of the part with a three-pin system. This allows for accuracy from that surface feature to the front or top of the part—a customer accuracy requirement.
“A hydraulic arm comes to a dead stop and grabs the part. A spring loaded plunger in the back seats the part against the three pins, then a gripper closes on it. The distance from the dead stop and this face is a known distance,” Mr. Hayes explains. “The ejector is not present, so we just close the collet on the part. Now we know where the face is in relation to the tooling in the machine.”
The casting then moves from station to station in the Hydromat machining all the features on one end of the part. When the inverter turns and repositions the part into the collet for machining backworking, the first machined end goes against the ejector inside the collet, which is a known distance to the tooling and features on the first side, giving accuracy to the second side and the whole part by design. All features are now accurate in relationship to that unmachined surface that was seated on the three pins in the beginning of the sequence. Brilliant!
“This is not a simple part by any means—it has some tough features. Chip control is an issue with those long stringy 6061 chips, productivity has to be dealt with as well as the surface finish requirements and significant burr issues,” Mr. Hayes explains. Despite those issues, the cycle time is a quick 6.5 seconds. The initial requirement was a 7-second cycle time when quoted, but as time has gone on Mr. Hayes has run it as fast as 6 seconds. “It can run at 6 seconds, but I don’t necessarily produce more parts. It seems to have a sweet spot at 6.5 seconds, so we have less downtime and tool changes at that speed,” he concludes.
It Takes a Village
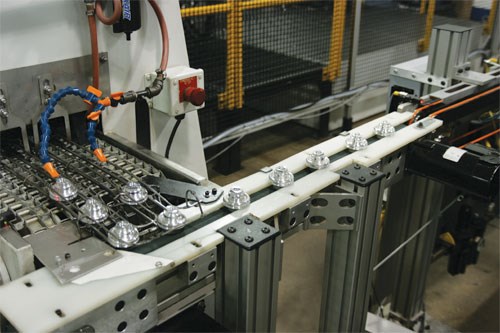
The same robot that starts the machining processes also unloads the parts from the Hydromat at station 16 and places them on a conveyor to be transported to the wash system. But there was a hitch. “We didn’t think about this at first, but when the robot grips the second side, it places it on the part’s front end on the conveyor, back side up,” Mr. Hayes says. “Pocket features on the back side would hold unwanted fluids from the wash system.”
Enter Matrix Engineering. Matrix counts among Chicago’s elite structural engineering firms and provides a range of structural engineering consulting services. It added its innovative ideas to complete the design of the transport and handling system of the parts as they pass through the entire cell. Matrix Engineering developed a “Flip Over” station before the wash, a simple arm that places the part on the washer’s conveyor, front end up, staggering them into two rows and emptying residual fluids.
The Hydromat runs a water-soluble Blaser Lube coolant that helps with the part cleaning process by eliminating oil from the equation. Mr. Hayes is impressed with the coolant. “The Blaser product dries nice, and being water soluble makes it easier to wash parts, and the filtration is easier. The cell has run 3.5 million parts and has not rusted.”
The end caps then enter the Ransohoff aqueous washer that is equipped with a custom guide system that keeps parts from flipping over or moving on the conveyor. The parts exit in the same location on the belt as they went in, an important feature for the next stage of the process. To keep the footprint small, the parts make a hard left and move toward the gaging process on a belt conveyor designed for that process.
Hommell-Etamic created a two-stage gage system with that conveyor for measuring 23 dimensions, 100 percent on all parts. The measurements on each part had to be recorded, stored and saved, not only for in-house quality procedures, but also for tracking purposes in case of failures in vehicles—a customer request. Along with recording all of that data, it does statistical process control as well.
Once machined and cleaned, the parts are very shiny, restricting the type of gages that could be used. “We couldn’t use cameras, couldn’t trust them because of the surface finish, it’s too shiny, so all the dimensions had to be touch-probe measurements,” Mr. Hayes says. “Hommell-Etamic did a great job. At first they wanted to use one station to do all the measurements, but it wouldn’t keep up with the machine tool, so a two station gage was the answer.”
The custom designed and built gages are equipped with Linear Voltage Displacement Transducer (LVDT) probes for accuracy and speed. The strength of the LVDT sensor principle is that there is no electrical contact across the transducer position sensing element which, for the user of the sensor, means clean data, infinite resolution and a very long life.
The data doesn’t feed back to the Hydromat’s EPIC R/T software for automatic offset settings right now, but it’s possible. “Later, we will add an interface and we will do offsets on the Hydromat automatically, but it’s not really needed right now. Everything runs smooth. It would just be adding expense,” Mr. Hayes says.
Both stations of the gage system clamp down on the part and quickly check I.D. and O.D. dimensions before the part is advanced to the next automated operation.
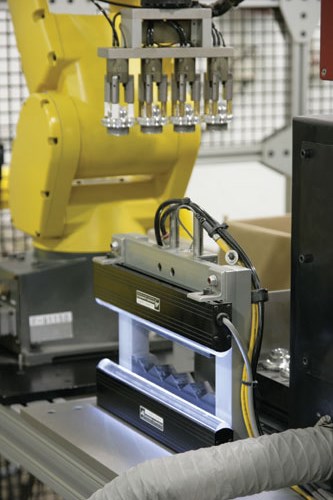
After the part has passed through the gaging stations, the conveyor transports them to a stop. Once four parts are stacked against one another, a laser reads that the last part required for the next process to begin has hit its mark and a signal is sent to the Fanuc robot to swing into action.
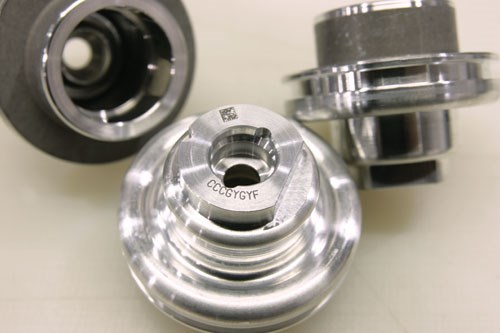
With a custom designed gripper, the robot picks up four parts at once and places them into a one-of-a-kind fixture that displays and lights the tops of the group of parts for a camera array. These cameras check for the presence of the “ears” feature and detect the position of a flat feature on the top of the end cap that was milled away by the Hydromat. The flat determines the positioning of the parts in the fixture, which in turn will determine how the parts will be oriented once the robot picks and places them for the laser marking procedure.
As the cell was being designed, Mr. Ooyen and Mr. Hayes included a laser marking system, and not as a requirement by the customer, at least not at first. “We wanted to mark each part with a serial number for our own tracking purposes,” Mr. Hayes says. “When we asked the customer, they asked if we could also mark the parts with a 2D barcode for them. So we told
them we could.” It seemed that GGM’s customer had previously been adding a sticker to each part with a unique bar code as they came out of the box for tracking purposes. The laser would add a tracking element for both GGM and its customer, eliminating the need to manually affix a sticker at the assembly line.
Once the Fanuc robot grips the parts, the photo fixture unclamps, and the robot places the parts in position for the laser to take over. The positioning data is sent to the laser so the marking is done on the proper area of the flat on the end. The ingenious “camera data to laser” solution kept GGM from having to physically orient all the parts for marking.
The laser needed to be extremely accurate to create a clean mark on a small 2D bar code—a tiny 2.5-mm square. Rofin-Sinar Technologies Inc. was employed as the company that would add the correct laser for the task.
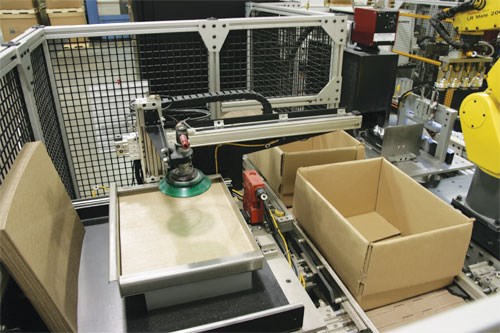
The same robot once again picks up the parts and correctly positions them into the shipping box. Each box holds 240 parts and as one layer is completed in the box, a pick and place unit, using a suction device, picks and places a sheet of heavy paper impregnated with an anti-corrosive compound between each layer of parts, protecting them until the assembly stage at a plant in Mexico. An automated conveyor system loads boxes into the loading area and transports them out when they are full. The boxes are taped shut and put on the pallet by the operator.
Remote Control
GGM is running approximately 2 million parts a year on this cell. As demands change, hours, shifts and scheduled days are flexed to meet the customers’ needs.
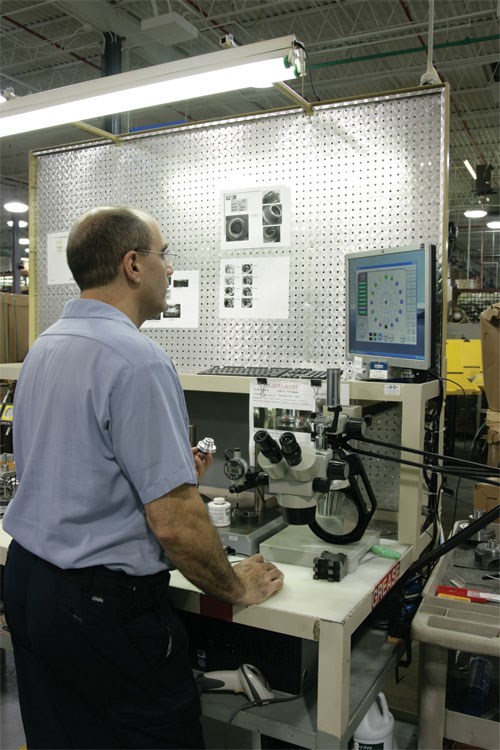
Steve Hayes has interfaced the Hydromat EPIC R/T control and the gaging system software so he can control each system from the inspection bench. Also, with this interface, Mr. Hayes can log on to the system from a remote location via any internet connection. “All I need is the IP address and the password and I’m on. I can see everything that is going on with the production system and the Hydromat,” Mr. Hayes says. “I can even make offsets on the machine’s units, right from home, or New York or wherever I am.” It is apparent that with an operator standing by at the shop, he could entirely run the cell from anywhere an internet connection could be found.
Hydromat engineers can also log on to do updates from St. Louis and provide quick service. “Hydromat has always been a leader in service. It’s all about what they do about it when it breaks—how do they handle it?” Mr. Hayes explains.
Down the Road
The Hydromat cell sits in the corner of a large open area of GGM’s production floor. This is the area that Mr. Hayes and Mr. Ooyen plan to fill with more of these cells in the future. So, why all the fuss to get more production machined parts cells? “The high volume, high output machining cells complement our core gear business and increase GGM’s customer and product diversification. In addition, we feel that the system we have in place is readily expandable to similar components, and that is an exciting opportunity potential for GGM,” Mr. Ooyen says.
— Cleaning Technologies Inc.
— Jenoptik Industrial Metrology
Related Content
Edge Technologies Bar Feeding Solutions Support Range of Production Environments
IMTS 2024: Edge Technologies' product showcase includes a magazine feeder and short loader, as well as a bar feeder, pusher and separation system.
Read MorePMTS 2023 Product Preview: High-Volume Turning
Learn about some of the latest high-volume turning solutions that will be on display at PMTS 2023.
Read MoreIndependent Turning Cell Enables High Concentricity Precision
PMTS 2023: The RV 10 Flexmaster rotary transfer machine’s precision turning cell (PTC) is integrated in the machine as a disconnected turning cell and is free of the drive and machining factors that affect the other stations.
Read MoreEdge Technologies Bar Feeder Provides Optimal Stock Support
The FMB Turbo RS 4-45 bar feeder provides reduced vibration, a boost to maximum rpm, better surface finishes and the ability to hold tighter tolerances.
Read MoreRead Next
Seeing Automated Workpiece Measurement in Real Time
User-friendly inspection software for CNC machining centers was shown at IMTS 2024 monitoring measurements between and after machining while performing SPC based on recorded measurement values.
Read More5 Aspects of PMTS I Appreciate
The three-day edition of the 2025 Precision Machining Technology Show kicks off at the start of April. I’ll be there, and here are some reasons why.
Read MoreDo You Have Single Points of Failure?
Plans need to be in place before a catastrophic event occurs.
Read More

