The Basics of Rotary Broaching
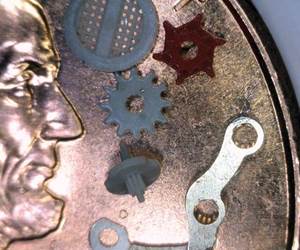
This broaching process creates a non-round shape on the inside or outside of a part with a broach tool.
The rotary broaching process applies a specially designed tool to the workpiece to cut non-round shapes that include splines, keyways and polygons. The process works because the head of the broaching holder is offset from the centerline of the shank on a 1-degree angle. This orientation creates a shearing effect around the edges of the form being cut—essentially only a section of the form is being cut at any given time—which greatly reduces the amount of cutting pressure needed to form the desired feature.
The rotary broach holder has a spindle that rotates independently of the rest of the holder. Thus, when rotary broaching on a lathe or screw machine, when the stationary broach tool meets the rotating part, it begins spinning at the same rate as the part.
The tool acts differently on a mill or rotary transfer machine, where the rotating broach and holder are fed toward a stationary part. When the broach tool meets the part, it will stop spinning.
Materials, Coolant and Coatings
For most applications, the best material for the broaches to be made from is M2 high speed steel, which is typically the most cost effective and is resistant to chipping. However, for machining tougher materials such as stainless or hardened steels or exotics, the broach should be made from T15, because of its better wear resistance compared with M2.
If possible, broaching should be done with an oil-based coolant, which will provide more lubricity to the broaching process and could extend the tool life by as much as 2 to 3 times. If oil is not an option, a high-concentration, water-soluble coolant is acceptable. A 100-percent synthetic is not recommended and will result in poor tool life.
For most common materials, a TiN coating will help the broach. If 100-percent synthetic coolant must be used, then a TiN coating should also be used, as it will make up for some of the lost lubricity.
TiCN will help when machining aluminum, cast iron or brass. TiAlN is recommended for broaching 1144 or nickel. Alcrona or AlTiN are the best for machining Inconel, titanium and stainless steels such as 416 or 17-4.
Speeds and Feeds
The bearings on the smaller broach toolholders (8-mm shank broaches) are designed to run at speeds as high as 3,400 rpm. The bearings on the larger broach toolholders (1/2-inch and 3/4-inch shank broaches) are designed to run at speeds between 800 and 1,200 rpm. Table 1 shows the recommended feed rate ranges for common hex and square broaches.
| Across-Flat Dimension | Hex (IPR) | Square (IPR) |
|---|---|---|
| 1/8" | 0.001"/0.002" | 0.001"/0.002" |
| 1/4" | 0.002"/0.004" | 0.002"/0.004" |
| 3/8" | 0.003"/0.005" | 0.003"/0.005" |
| 1/2" | 0.004"/0.006" | 0.003"/0.005" |
| 5/8" | 0.005"/0.007" | 0.004"/0.006" |
| 3/4" | 0.005"/0.006" | 0.004"/0.006" |
| 7/8" | 0.004"/0.005" | 0.002"/0.004" |
| 1" | 0.002"/0.004" | 0.001"/0.003" |
Centering the Broach
Centering an internal or external broach is a simple process. First, the across-point (OD) of the broach should be measured for an internal broach or the across-flat or ID of the broach for external. The broach can then be installed into the holder and the holder into the machine.
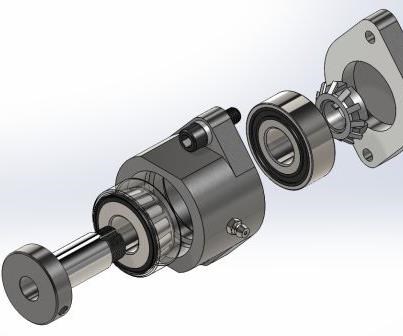
Internal broaches are located on their shank and held in place by a set screw clamped onto a whistle notch.
Next, for an internal broach, a hole that is 0.001-inch larger than the across-point dimension should be drilled and reamed into a piece of scrap stock. For an external broach, the bar end should be turned to 0.001 inch smaller than the across-flat dimension.
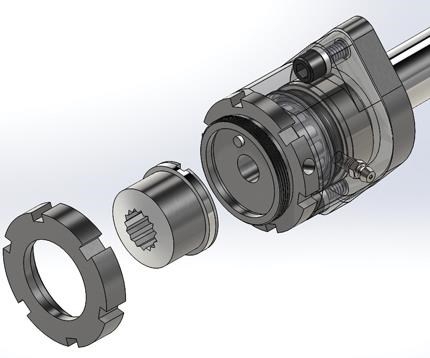
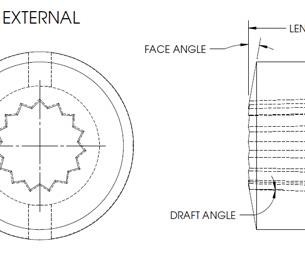
External broaches are located on their outer flange and held in place by a spindle cap and drive pin.
Next, the two cap screws on the holders should be loosened so that the body separates from the shank by about 3/16 inch. The broach head should be manually moved to 0.030 inch of the hole/bar end and then the broach slid into the hole or over the bar end. The turret is then jogged toward the hole until the broach head is no longer separated from the shank.
Finally, the two cap screws should be tightened while making sure that the broach and spindle can still rotate freely. This method centers the broach to within approximately 0.002-inch runout. This is acceptable for most applications, as the broach will generally follow the drilled start hole. However, if a tighter tolerance is required, an indicator and centering pin can be used.
Preparing the Workpiece
For hex and square broaches, the ANSI standard is to allow 20 percent of the flat (Figure 1) to be taken out by the start drill. The quick formula to calculate the start drill based on this specification is 1.0066 × A/F (across flat dimension) for hex broaches and 1.0198 × A/F for squares.
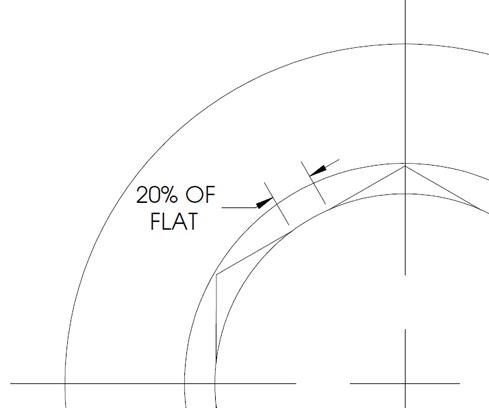
Figure 1. For hex and square broaches, the ANSI standard is to allow 20 percent of the flat to be taken out by the start drill.
If print specs permit, the hole should be drilled up to a 33-percent witness mark, which will lessen the cutting force needed to broach. The formula to calculate the start drill based on this specification is 1.0184 × A/F for hex broaches and 1.0541 × A/F for squares.
There should also be a 90-degree countersink at the start of the hole that is greater than the across-point (OD) of the broach. This countersink is absolutely necessary, so if the print does not allow for it, the part can be made longer so that the countersink can be faced off after the broaching process.
A recess can also be added at the bottom of the hole—again, greater than the across-point. This feature is optional, but it will help the chips to clear out of the hole without having to go back in to drill them out after the broaching process.
For external forms, there are no ANSI-type standards. However, the OD of the bar should be turned to below the across-point or to the OD of a non-polygonal broach. This step will reduce the cutting pressure necessary by creating multiple chips.
At the start of the feature to be broached, a 90-degree chamfer should be added that is less than the ID of the feature being broached. Again, this can be faced off afterwards if it is not allowable per the print. Turning an optional recess smaller than the ID at the end of the broached feature will also help in clearing chips from the workpiece.
The Broaching Tool
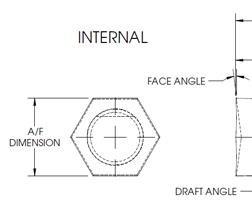
There are a few common features on every broaching tool. First, every broach tool has a draft angle. This feature is ground or cut to be slightly greater than the 1-degree tilt of the holder to provide clearance in case the machine or tool is not perfectly on center.
Each broach tool also has a face angle. This feature creates a sharper cutting edge on the broach face and can vary from one broach to another for different materials.
Internal broaches are located on their shank and held in place by a set screw clamped onto a whistle notch. External broaches are located on their outer flange and held in place by a spindle cap and drive pin.
Other features such as cross-holes or flats can be aligned with a broached feature. On horizontal applications, a driven broach holder can be used to align the features. On vertical applications, a special attachment that stops the broach spindle from rotating can be installed onto the non-rotating part of the tool spindle.
Troubleshooting
Broach is counterboring: Sometimes in softer materials such as aluminum, the broach is not able to grab the material and, therefore, does not rotate at the same speed as the material. This situation can cause a counterboring effect on the part. In such cases, the bearings in the holder can be loosened to produce less resistance. If possible, 0.005 inch to 0.010 inch can be broached into the part with the spindle stopped, and then the workpiece or holder can begin rotation. Increasing the feed rate to 0.004 ipr minimum may also help to produce the desired form.
Broach form is spiraling: “Spiraling” down the length of the cut occurs when the broach and work spindle are misaligned. In an ideal world, the broach would be driven by the leading edge of the hole. However, because of the draft angle on the broach, the slight space that occurs could cause the broach to slip, especially on long cuts. There are a few ways to remedy this effect:
- If the machine is rigid enough, the draft angle can be ground to exactly 1 degree instead of slightly more.
- Reversing the spindle back and forth throughout the cut will create alternating spiraling, providing a somewhat straighter hole.
- In some thin-walled applications, rotating the spindle in the opposite direction from which the start hole was drilled can prevent spiraling.
- A driven broach holder will eliminate spiraling completely.
Lacking power: Broaching keyway forms can create problems for machines with less power. A keyway larger than 1/8-inch wide is one of the toughest forms to broach because of the large chip being taken out without the benefit of a start hole. If the keyway cannot be pre-drilled or milled so that the broach is only taking out the corners, the best way to broach the part is on a machine that can be indexed. The broach should be installed directly into a collet in the turret (not in a rotary holder) and then the machine spindle locked. The form can then be “chiseled” by indexing into the keyway in 0.005-inch to 0.010-inch increments. This process will be less expensive with a standard square broach with an across-flat dimension equal to the width of the keyway, rather than a specially formed keyway broach.
A Useful Solution
Rotary broaching is a relatively easy and economical way to accurately machine polygon forms into the ID or OD of parts. With the right preparation, knowledge of appropriate feeds and speeds, and proper alignment, complex forms such as splines, hexes, serrations and other shapes can be quickly machined on a CNC lathe or mill, manual machine or screw machine.
Related Content
Understanding Micro-Milling Machine Technology
Micro-milling can be a companion process to turning-based production machining. This article looks at some of the technologies that go into a micro-milling machine and why they are important to successful operation.
Read MoreImportant Machining Factors of Carbon Steels
Learn the factors that contribute to carbon steels and their machinability as well as the 1214 steels, 1215 steels and 1018 steels, other grades, and more.
Read More3 Common Filtration Questions Answered
Learn about the variety of filters for removing particulates from a cleaning fluid, how to determine cleaning fluid life and more.
Read MoreCraftsman Cribsheet No. 128: Why Do Machinists Say Tenths Instead of Ten Thousandths?
In machinist parlance, a tenth is a tenth of a thousandth, not a tenth of an inch.
Read MoreRead Next
Skiving Long, Slender Parts with Tight Tolerances
Here's a look at one of the oldest and most efficient methods of screw machine production for parts that are long and slender, with close-diameter tolerances and finishes, or parts that require truly spherical radii.
Read More5 Aspects of PMTS I Appreciate
The three-day edition of the 2025 Precision Machining Technology Show kicks off at the start of April. I’ll be there, and here are some reasons why.
Read MoreDo You Have Single Points of Failure?
Plans need to be in place before a catastrophic event occurs.
Read More


.jpg;maxWidth=300;quality=90)


.jpg;maxWidth=300;quality=90)


