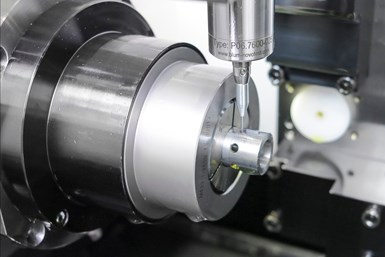
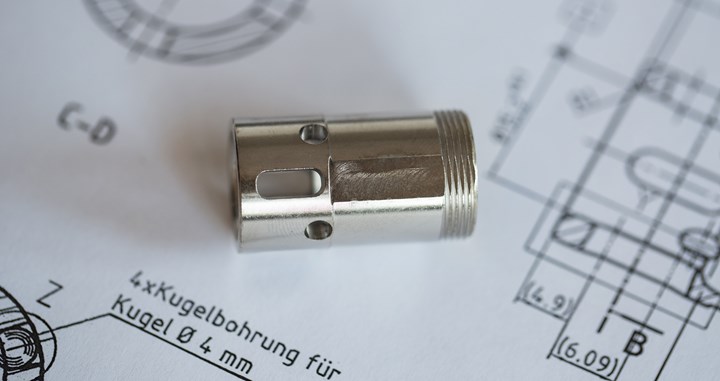
 This on-machine probe scans the complete contour of this component’s slot at a rate of 2 meters per minute to ensure 2-micron slot parallelism. Photo credits: Blum-Novotest.
A number of shops use on-machine touch probes to speed setups or perform in-process measurement of machined features for process control. They are more commonly found on vertical or horizontal machining centers than Swiss-type lathes, one reason being there is limited space inside the workzone of a Swiss-type to accommodate such a device.
These probes are also available in two versions — touch-trigger and scanning. A touch-trigger probe locates discrete points on a part surface, whereas a scanning probe can traverse an entire surface collecting thousands of points per second to measure a feature’s form as well as its size and position. But, does it make sense to fit a Swiss-type with a probe and take up one or more available tool positions? And, if so, to choose a scanning probe over a touch-trigger model to take advantage of the ability to capture a greater amount of measurement data faster?
A manufacturer in Oberwolfach, Germany, offers a case in point that affirms both of these notions.
Karlheinz Lehmann GmbH machines precision, rotationally symmetrical parts using multiple CNC lathes and milling machines. An example is a complex, steel quick coupling for compressed air input for Parker Hannifin GmbH. This was a challenging project given the parallelism required for the part’s four slots. The key components are threads, bores and four lightly tapered slots, explains CEO Timo Lehmann, but he says the slots are the “crucial point of the whole design.”
In fact, the coupling wouldn’t function if the parallelism tolerance of 2 microns for each slot was exceeded. When assembled, the lightly tapered slots contain balls that must not protrude too far, yet must also never fall through the slot. With this design, the quick couplers prevent the otherwise common snapping noise when detaching and also enable single-handed operation.
Just as challenging as the machining process is the task of measuring the slots. Using a Marubeni Citizen-Cincom M32 Swiss-type lathe with a Blum-Novotest TC76-Digilog scanning touch probe, the shop verifies the part’s dimensional accuracy on the machine.
Blum-Novotest notes that analog measurement with a touch-trigger probe is effective for areas or lines. However, if such a probe were to be used for this slot measurement application, a very large number of points on the slots would have to be measured in order to attain an adequate resolution. Instead, the TC76-Digilog scans across the slot surface at a measuring speed of 2 meters per minute, generating an extremely large number of values (50,000 per second) in a fraction of the time of analog, touch-trigger data acquisition.

Thanks to precise slot parallelism, this quick coupler does not have the loud snapping noise common to other such devices when detaching while enabling single-handed operation.
At the start of a production run for this coupling application, a reference part is clamped in the machine, the complete contour of the corresponding slot is scanned, and the master profile is recorded and saved in the evaluation software. Each machined part is measured and compared against the recorded profile. Any of the parts that exceed the tolerance are discarded. Using on-machine measurement in this way enables Karlheinz Lehmann GmbH to perform 100% inspection, while also detecting machining error trends at an early stage via the probe’s evaluation software.

The scanning probe can be positioned horizontally or vertically in the machine, depending on the measurement task.
According to Blum-Novotest, the TC76-Digilog’s increased scanning forces makes it well suited for challenging applications in lathes as well as milling and grinding machines. Neither coolant nor viscous oils impair the reliability of the measurement data, the company says, because the higher scanning force enables the probe to simply push through the coolant. The probe scans parts non-directionally, and measuring precision is said to be attained via the company’s Shark360 technology, which introduces a face-gear measuring mechanism system to perform off-center probing.
Lehmann notes that the company was close to having to refuse the quick coupler order from Parker Hannifin until it implemented the scanning probe process on the Swiss-type. In fact, it now uses this machine for other large production lots ranging from 10,000 to 30,000 pieces in materials such as aluminum, stainless steels, heat-treatable steels and free-cutting steels.
Related Content
Shop Optimizes its Swiss-Turning Flexibility
Paramount Machine uses various Swiss-type lathes, some with a B axis, to produce parts more effectively than it did on conventional chucker lathes. Today, nearly every job under 1.5 inches in diameter runs across those machines even if the batch size is a mere 5 pieces.
Read MoreVideo Tech Brief: Swiss-type Lathe Features High-Damping Composite Casting
A rigid casting design and chip control technology are among the various benefits of this Swiss-type lathe.
Read MorePursuit of Parts Collector Spearheads New Enterprise
While searching for a small parts accumulator for Swiss-type lathes, this machine shop CEO not only found what he was looking for but also discovered how to become a distributor for the unique product.
Read MorePMTS 2023 Product Preview: Swiss-Types
Learn about some of the latest Swiss-type solutions that will be on display at PMTS 2023.
Read MoreRead Next
Probing for Quality
Committed employee owners are the foundation of this company’s achievements in high precision manufacturing.
Read MoreTouch Points on Touch Probe Measurement
Touch probe measurement handles a variety of applications, but has some limitations when it comes to technology and applications. Consider specific features when selecting an appropriate measuring method.
Read MoreVIDEO: Blum-Novotest Offers Array of Measurement Probes
A visit to Blum-Novotest Inc. in Erlanger, Kentucky, offered a chance to learn about an array of laser probes, touch probes and split system probes, including a probe with a laser for milling tools and a touch probe for static turning tools.
Read More


