Determining Levels of Cleanliness
For precision parts that need to have some type of finish applied to them, inadequate cleaning and pretreatment is the biggest cause of defective painting or plating.
For precision parts that need to have some type of finish applied to them, inadequate cleaning and pretreatment is the biggest cause of defective painting or plating. Skip plating, blistering and delamination are only some of the most common defects caused by poor cleaning.
Good cleaning is essential in almost all branches of surface finishing. Though it is money well spent, good cleaning is not without its own cost and over-cleaning is a waste of time and money, and, in some cases, machinery.
So how clean is clean and when is a part clean enough? At Sam Houston State University (SHSU), and in collaboration with our colleagues in the industry, we are running an ongoing program to develop more affordable cleanliness test methods. We are by no means the first with this aim. Back in the 1950s, the AESF sponsored H.B. Linford at Columbia University with this task. His research was published in Plating magazine at that time.
Modern Image Analysis
Half a century later, what has changed? Not a lot in terms of the physicochemical principles that underlie cleaning, but in terms of low-cost hardware and software tools, one could say everything has changed. Today, digital photography, spreadsheets and measurement software are available and portable, using the miracle that is today’s camera-equipped, network-connected cell phone. Our group has recently demonstrated the utility of cell phones in making contact angle measurements using the Bikerman method.
In 1941, J.J. Bikerman developed a new approach to contact angle measurement. A droplet of known volume (v, typically 5-10 µL) is placed on a horizontal surface and viewed from above. The diameter (d) of the base of the drop is measured using a calibrated microscope or similar imaging device. The ratio d3/v is a function of the contact angle as reported by Bikerman.
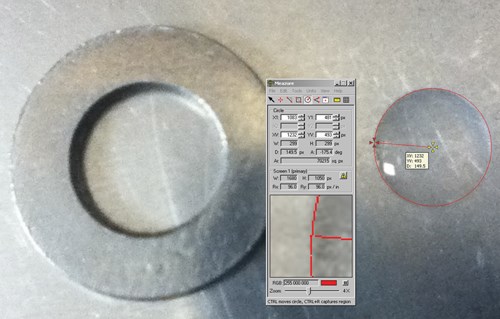
This approach was used by R.N. Miller, who derived a family of nomograms for solving the equation. At SHSU, a cell phone (Fig. 1) is used to capture the image of the sessile drop (Fig. 2) and a calibration object of known dimensions. A free software program called Meazure is used to measure the droplet diameter. The measured values of d and v are entered along with the pixel calibration information into a spreadsheet (Fig. 3) that has been programmed to look up the corresponding contact angle.
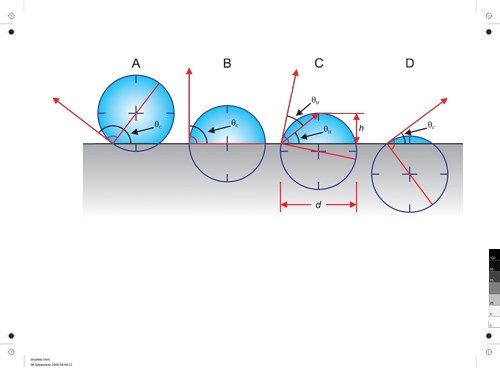
Side-on imaging allows viewing of the contact angle directly. Ubiquitous image processing software, such as Photoshop, CorelDraw or Meazure, enables image analysis measurement of the contact angle. Figure 4 shows an idealized implementation of this process. A circle (or part of) is fitted to the profile of the droplet, and then, by drawing a radius to the point of contact with the solid surface, the contact angle can be easily determined. Alternatively, image C in Figure 4 shows the height (h) and the base diameter (d) that allow the half-angle method to be used.
These modern image analysis techniques mimic an elegant means of measuring contact angle disclosed in a 1993 patent. In this instrument, the drop image was viewed as a profile on a screen. An adjustable pointer was centered on the edge of the drop and used to measure the angle from the base of the drop to the apex of the drop (Fig. 4C). The contact angle was read directly from the screen, which was calibrated to display twice the angle.
Another measurement method was first reported by the great surface scientist, Irving Langmuir, in 1937. He recognized that, because a droplet of liquid has a shiny surface, one can measure the angle of reflection of an incident beam of light striking the surface of the droplet. The angle of reflection can be used to determine the contact angle. Figure 5 shows a commercial instrument based on this concept from the 1970s. At SHSU, we are expanding upon this concept using state-of-the-art, low-cost technology. Although it is only useful for contact angles ranging from 10 to 80 degrees, the strength of the Langmuir method is that it gives an instant read-out of contact angle; no calculation is necessary.
Apart from being low-cost, some of these methods are not limited to laboratory use. They can also be used on the shop floor, while, thanks to the cell phone, results can be transmitted to the base to be archived there, if necessary.
In the laboratory, the most accurate means of cleanliness testing is the so-called axisymmetric drop shape analysis (ADSA) method, where the profile of a sessile drop is computer-fitted to a mathematical equation. Professor Neumann’s research group in Toronto is foremost in the development of ADSA routines, and ADSA software is sold with up-market goniometers. However, there are three open-source software routines, and we have reported on their performance.
Finishers often have to work to prescribed ASTM (or similar) standards. This body is presently reviewing techniques for contact angle and cleanliness measurement with a sub-committee established under the leadership of Dr. Clifford Schoff. Our results are routinely passed to the sub-committee, who will decide on possible updates to existing ASTM standards (9, 10 and similar).
References
1) Miller, R. N. Rapid Method for Determining the Degree of Cleanliness of Metal Surfaces Mater. Protect. & Perform. 1973, 12(5), 31–36.
2) Linford, H. B. and Saubestre, E. B. Cleaning and Preparation of Metals for Electroplating. I. Critical Review of the Literature. A.E.S. Research Project No. 12, Plating (Paris) 1950, 37, 1265–1269 – and similar publications over the subsequent 20 years.
3) Williams, D. L.; Kuhn, A. T.; O’Bryon, T. M.; Konarik, M. M.; Huskey, J. E., Contact Angle Measurements Using Cellphone Cameras to Implement the Bikerman Method, Galvanotechnik, 102(8), 1718-1725, (2011).
4) Bikerman, J. J. A Method of Measuring Contact Angles, Ind. Eng. Chem. Anal. Ed. 1941, 13(6), 443–444.
5) Roberts, B. Meazure Ver. 2.0 Build 158, http://www.cthing.com/Meazure.asp (Accessed December 15, 2011), C-Thing Software, 2004.
6) Wright, R.; Blitshteyn, M. Method and Apparatus for Measuring Contact Angles of Liquid Droplets on Substrate Surfaces. U.S. Patent 5,268,733, Dec. 7, 1993
7) Langmuir, I. and Schaefer V. J., The Effect of Dissolved Salts on Insoluble Monolayers, JACS 1937, 59, 2400 – 2414.
8) Williams, D. L.; Kuhn, A. T.; Amann, M. A.; Hausinger, M. B.; Konarik, M. M.; Nesselrode, E. I. Computerised Measurement of Contact Angles, Galvanotechnik 2010, 101, 2502–2512.
9) ASTM International. ASTM C 813-90 Standard Test Method for Hydrophobic Contamination of Glass by Contact Angle Measurement. Annual book of ASTM Standards. 2010, 15.02, 254-256.
10) ASTM International. ASTM D 5725-99 Standard Test Method for Surface Wettability and Absorbency of Sheeted Materials Using an Automated Contact Angle Tester. Annual book of ASTM Standards. 2008, 15.09, 293-299.
11) Kanegsberg and Kanegsberg, Handbook for Critical Cleaning – Cleaning Agents and Systems, 2nd Ed, CRC Press, Boca Raton, FL, 2011.
12) Kanegsberg, B. and Kanegsberg, E. Handbook for Critical Cleaning – Applications, Processes, and Controls, 2nd Ed, CRC Press, Boca Raton, FL, 2011.
Related Content
A ‘Clean’ Agenda Offers Unique Presentations in Chicago
The 2024 Parts Cleaning Conference, co-located with the International Manufacturing Technology Show, includes presentations by several speakers who are new to the conference and topics that have not been covered in past editions of this event.
Read MoreEnvironmentally Friendly Model 550 Versatile Parts Washer
PMTS 2023: This washer is useful in a variety of applications, including tool rooms, maintenance operations, low production and precision cleaning.
Read MoreVersatile Sandblasting for Deburring Intricate Geometries
PMTS 2023: Comco’s MicroBlasting sandblasting systems can deburr, texture and clean small, intricate parts.
Read MoreKyzen Solvents Provide Ease of Cleaning for Medical Parts
The Metalnox line of solvent products are designed to improve reliability and increase the ease of cleaning in vacuum and vapor degreasing processes.
Read MoreRead Next
Seeing Automated Workpiece Measurement in Real Time
User-friendly inspection software for CNC machining centers was shown at IMTS 2024 monitoring measurements between and after machining while performing SPC based on recorded measurement values.
Read MoreDo You Have Single Points of Failure?
Plans need to be in place before a catastrophic event occurs.
Read More5 Aspects of PMTS I Appreciate
The three-day edition of the 2025 Precision Machining Technology Show kicks off at the start of April. I’ll be there, and here are some reasons why.
Read More


.jpg;maxWidth=300;quality=90)


