Balancing Function and Cost in Part design
This article looks at some of the ins and outs of carbon and alloy steel grade selection that the designer should consider.
Engineers, designers and machine shops are faced with numerous decisions in the design and manufacture of parts. The parts’ look, how they will work in an assembly, the material to be used, and how the parts will be made are just a few of the major issues that should be addressed. The bigger issue is how the part will be manufactured. More important to the designer is whether he can obtain the necessary design at an acceptable cost.
Designing a part and manufacturing a part, in many cases, can be two opposing forces. The part design may be too complicated to effectively manufacture, thus can raise costs to unacceptable levels. Some other common issues that arise can be, but are not limited to:
Tolerances—tight tolerances of surfaces that are not used for sliding and press fit applications, for example.
Straightness requirements—for thinned, long sections, these parts do not maintain straightness. Or the straightness of the part after a transverse slot can be affected.
Cold deformation—flange-like details crack upon cold forming, or cracks form during subsequent bending/cold forming after a machining operation.
Machining issues—stringy chips, gummy material, smooth surface finishes not attained, tearing, and so on.
Cracking—parts cracking during machining or during use in an application.
Part hardness—inability to meet heat treated hardness levels.
The designer needs to review many aspects of a parts’ journey to an assembly. Many issues can signify a material characteristic that would need to be considered. But where does one go for this information?
Check the Sheet
A material data sheet is the most common document that contains much of the information needed for part design. General chemistry, typical mechanical properties, and other information such as weldability, machinability, and so on, may be contained in these documents. Material datasheets from producer steel mills and bar finishers tend to be more informative and indicative of that mill’s production. However, the information is still very general.
There will be some pieces of information that will be difficult to find without talking to the producer. ASTM and SAE, among others, can also reveal material information that may be beneficial when designing a part. Although, it is important to understand that the mechanical properties included in such industrial documents are generally much lower than what is actually produced and come from more ideal laboratory-like conditions.
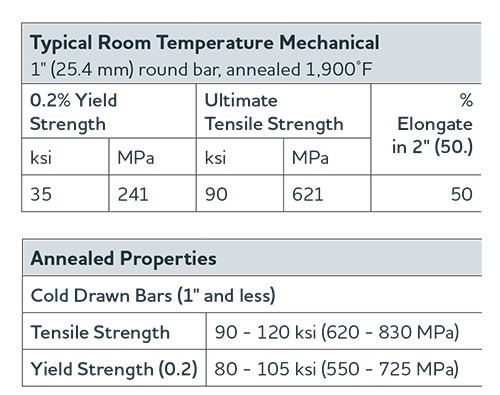
Steel and cold finishing producers will usually develop mechanical properties as a single typical value or value range for their datasheets as shown in two examples (see Fig. 1). This tends to produce property values indicative to what is being processed. What needs to be considered for single values is the range of that value. No producer can make a bar to a single value.
Likewise, mechanical properties are noted as a range; it is actually possible to have values above or below the maximum or minimum stated values. All of these published values are for reference purposes only. When particular mechanical properties, or chemical properties, are needed for a design, these properties need to be specified either through a specification or on a purchase order. Each producer will review those specifications and will assess their ability to meet.
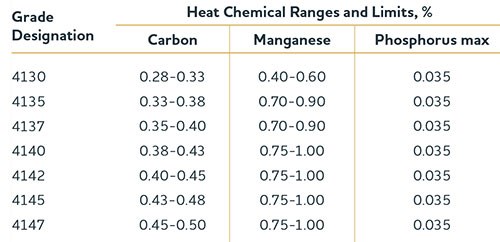
Material chemistry is another seldom reviewed component of the material. ASTM, SAE and EN (European Norms), for example, specify a chemistry of a grade with elemental ranges as shown in Fig. 2. These ranges could be a minimum or a maximum percentage. The elemental ranges used in these industrial specifications are broad, allowing producers to dual certify grades.
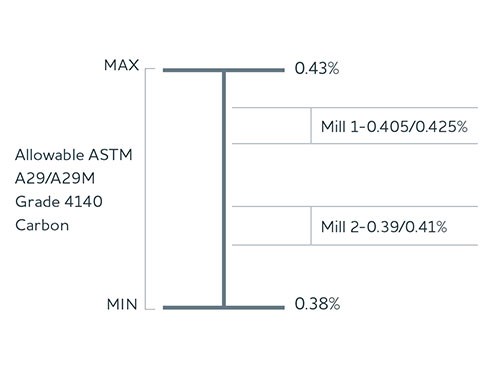
For an example of this, see Fig. 3, page 40. The ASTM A29/A29M carbon level range for 4140 is 0.38 percent to 0.43 percent. Mill 1 may aim the carbon to the high side of the carbon range, allowing the grade to also be dual certified to 4140/4142. Mill 2 may aim carbon lower, 0.39/0.41 percent, only being able to certify to 4140.
When each of these two materials is hardened, both will meet hardenability requirements of 4140. However, if Mill 1 dual certifies its material to 4140/4142, the carbon level will meet 4142, but will be on the low side of the carbon range. And this material may not harden as high as a “typical” 4142. Yet, the material is within specification. It is important to understand, when certain properties are needed, such as mechanical properties, the designer may need to specify a minimum carbon level to ensure the grade hardens to your specification or need.
Making the Choice
What material to choose is always a challenge. If a part is to be machined, it is advantageous to add sulfur to help lubricate the tool surface and help break the chip. On the flip side, if you are going to cold work or cold form a part, you may want a material with no sulfur addition. As one can see by this statement, sulfur added to steel can be both beneficial and/or injurious to the part manufacture.
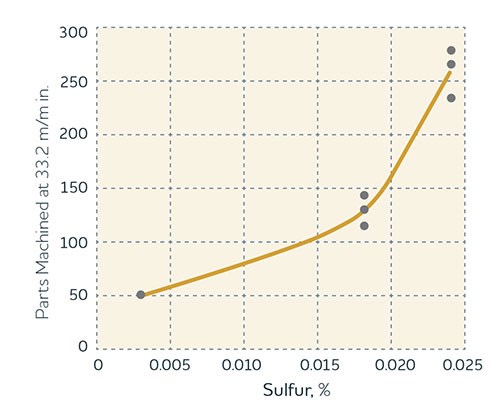
Concentrating on machined parts, sulfur additions can greatly enhance machinability. However, many studies show at the higher sulfur levels, beyond 0.30 percent, machinability increases have decreasing returns. The machinability increase between a 0.31 percent and a 0.34 percent sulfur level is much less than between a 0.15 percent versus 0.18 percent. In fact, studies have suggested enormous increases in machinability between sulfur ranges of 0 percent and 0.030 percent (see Fig. 4, page 41). At these levels, one can expect more than a 100 percent increase between 0.015 and 0.025 percent sulfur level. In general, for the non-resulfurized grades, such as 1018, 1045, and so on, a 0.020 percent minimum sulfur level should substantially increase machinability. And these grades can have as high as 0.050 percent according to ASTM A29/A29M.
Sulfur, though, has a dark side. Numerous industry and academic studies show that while sulfur aids in the machinability of steels, it causes a reduction in mechanical properties, especially in the transverse direction. From a producer standpoint, sulfur affects the hot workability of a steel grade. The resulfurized grades such as 1215 and 12L14 could be prone to transverse tears during production. Hot rolling the material does elongate and break up the sulfides in the structure as shown in Fig. 5, page 41. However, the sulfides do not have any mechanical strength at room temperature and become stress risers in the material.
Typically, carbon and alloy cold finish bars are cold drawn. While cold drawing can be beneficial to machining, this operation increases the internal stresses around the sulfide. Given enough stress, whether internal or external, a crack can initiate at these sulfides, and the crack will have a tendency to run down the length of the bar, following the sulfide stringers. Surface abnormalities, which can exist on cold drawn surfaces, also could act as stress risers. Therefore, these abnormalities may be the initiation point of cracking in these resulfurized grades.
Understanding Manufacturability
It is important that the engineer or designer understand the role of sulfur, as well as the amount present in the grade when designing a part. There are obvious manufacturing benefits using materials with increased amounts of sulfur in the area of machinability, and there are risks with these high sulfur levels. Designers need to critically assess whether a resulfurized material is an appropriate choice in circumstances including, but not limited to:
-
Parts with thin sections
- Parts subject to internal pressures
- Parts used in safety critical applications
- Parts subjected to transverse loads or forces, whether constant or impact
- Parts requiring welding
- Parts requiring cold forming or bending
- Parts that are hardened
Each may contribute toward the integrity of the part during manufacturing or in use in an application. Inspection of parts made from resulfurized grades, after the manufacturing process or before use, should be considered as part of the process.
Inspection of the parts before shipment or use cannot be stressed enough. There are many machining operations that can increase stresses in the part and promote a crack. A dull drill, for instance, can put enough outward pressure on the part to initiate a crack in the part. These cracks may range from a small micro-crack to complete failure. Inspection of these parts may help reduce those that find their way into a final assembly.
One of the big questions is what can be done to stop the cracking tendency of resulfurized grades? The plane answer, short of eliminating sulfur altogether, is steps may be taken to reduce the cracking tendency, but regrettably cannot be eliminated. Removing all surface imperfections on the bar surface is one way. However, the consequence is increasing costs, whether during machining of a part or purchased as a turned or ground and polished product. Requesting a lower “as drawn” hardness may also help, but machinability could be affected. If the parts are safety critical or are cold formed, it is normally suggested to choose a grade with lower sulfur levels.
Cold Formed Materials
Materials for cold heading or cold forming use grades with no sulfur additions. Sulfur levels in cold heading quality materials are 0.005 percent or lower. Upsetting operations and flange-like details rely on materials with high ductility and cleaner structures. At these low sulfur levels, there is virtually no cracking tendency, except when the part exceeds the materials’ ductility limits.
Parts that will require machining after the cold forming operation will require some additional thinking. Small amounts of sulfur can be added to these cold heading materials to aid in machinability. These small additions will limit the deformation or the shape of the part.
However, the sulfides will form initiation sites for cracking. There are cold forming techniques that can counter these effects. For example, keeping the part in compression during cold formation will lessen the chance of cracking. There should be a sufficient amount of sulfur in the material to aid machining. It is possible to use a material with small sulfur levels in the 0.020/0.030 percent range. Care must be taken in the ultimate design of the part to balance the effects of the reduced cold workability in the material.
Cold headed parts are great for producing many parts at a reasonable cost. However, given the life cycle of products and parts these days, cold heading replacement parts may not be cost effective, even if you already have the dies and equipment to make the part. This is when these parts are sent to machine shops for bidding. If these shops are to use the same materials as the heading shops, machine shops will struggle with chips, surface finishes, and tool life to name a few. This only increases the cost of the parts. Consider using machining quality materials that can include at least small amounts of sulfur at 0.020 percent minimum. This may help the machine shops reduce manufacturing costs, while not necessarily affecting the overall integrity of the part.
Part Design Sources
Designing a part involves some thinking and risk management. A few of the considerations were discussed, and there are many more. Materials used for strength, toughness and ductility can be difficult to manufacture into a part, hence increasing manufacturing costs. Likewise, using materials with increased levels of sulfur to facilitate machining could affect the integrity of the part.
Decisions must be made to balance the risk and cost, as well as in the design of the part itself. Understanding some of the basic pieces of information of carbon and alloy data, as well a basic understanding of the steel making process, can go a long way in minimizing the risks and costs. Material datasheets for many materials are available from steel mills, cold finishers, and some industry associations. Many producers can also be a source of metallurgical information. It is up to the engineer, designer or machine shop to make the final decisions.
Read Next
Why Material Performance can be Different
“Variation of sourcing and source processes is more responsible for performance differences than the chemical make-up shown on the test report.”
Read MoreEmerging Leaders Nominations Now Open
Here’s your chance to highlight a young person in your manufacturing business who is on the path to be a future leader moving your company forward.
Read More5 Aspects of PMTS I Appreciate
The three-day edition of the 2025 Precision Machining Technology Show kicks off at the start of April. I’ll be there, and here are some reasons why.
Read More


.jpg;maxWidth=300;quality=90)


