Can You Afford To Ignore Tool Monitoring?
In production, eliminating variability is the key to making good parts consistently. Cutting tool condition is a critical variable in the process. With a return on investment, in many cases, of less than a month, in-process tool monitoring is a cost-effective way to help plan and verify a shop's cutting tool strategy.
The need for continuous improvement will always be a necessity for the unpredictable economic cyclical conditions. There are several compelling reasons for using tool-monitoring equipment, and fast return on investment is one of them. Today’s competitive high volume production facilities demand error proofing where the machining processes do not depend on an operator for monitoring. In-process tool monitoring is a necessary step toward automating the manufacture of precision, high volume parts.
Catching A Break
In general, tool monitors are used to determine the presence of a cutting tool. If the tool is missing or broken, the monitor will not allow the machining process to move forward.
There are two main categories of tool monitors: contact and non-contact. Contact monitors use a probe or wire that is activated by contact from a tool or other moving element. If the tool is broken or missing, the monitor fails to fire, and the machining cycle stops before damage is done to the machine or scrap parts are generated.
Most non-contact monitors use a laser beam in much the same way as a probe or wire. Failure to break the beam results in an alarm on the machine. For the purposes of this article we will discuss justification of positive contact monitors, which are well applied in screw machines.
Contact monitors can also be applied using reverse logic, in which case the absence of a touch would indicate a go condition. Setups where a potential interference from a hung up blank or other intermittent problem are uses for this reverse contact monitor.
Why Tool Monitoring?
Tool monitoring addresses the issue of variability reduction by detecting in-process variation resulting from tool breakage on metal cutting equipment. It should be considered in the following scenarios.
Unattended Metal Cutting Applications
Tool monitoring is a remedy for the unattended machining environment. Large and small facilities are continuously pursuing “lights out” production periods, reducing or eliminating the need for line operators. Error proofing is essential when considering savings opportunities with respect to labor sorting costs. One hundred percent inspection is only 80 percent reliable, per automotive supplier quality specialists.
To Maintain Quality Assurance
For example, all automotive suppliers have to address a non-conformance issue via an eight-step corrective action plan. This plan addresses the problem defect, short-term containment action, root cause of the issue, interim corrective and permanent corrective action. Tool monitoring reinforces quality assurance efforts by demonstrating that the customer is permanently receiving conforming product after a non-conformance issue occurs.
To Protect the Entire Machine From Damage When Tools Break
The forces involved in metal cutting can cause turrets or index tables or machines to go out of synchronization and consequently result in a machine crash.
For example, if one were to check a tap on a multi-spindle screw machine, one would note that these machines are not very different from transfer machines. Like transfer machines, multi-spindle screw machines perform multiple operations simultaneously. Cycle times are very short, and it is usually very difficult to hear a tool break when the machine is in a noisy environment. Screw machines are excellent candidates for broken tool monitoring.
CNC lathes are typically found in today’s modern screw machine shops. CNC lathes generally are bar fed and operate unattended. If a tool breaks, it is important that the machine is immediately shut down to avoid further damage in the machine’s turret. The tools that follow in a CNC turret are no less important than those that would follow in a transfer machine or a multi-spindle screw machine.
To Optimize Machine Up Time and Productivity to Enhance Cost Savings and Gross Savings Opportunities:
Consequences will prevail if broken tools are not detected immediately. Broken tools may cost more than one realizes. The following costs need to be considered to evaluate the justification for tool monitoring:
1. The cost of machine downtime ( _____ hours @ _____/hour )
2. The cost of machine damage
3. The cost of chain reaction cutting tool and holder damage
4. The cost of scrap material
5. The cost of material sorting time (in-house)( _____ hours @ _____/hour )
6. Sorting required at your customer’s site
- Labor time required ( ______ hours @ ______/hour )
- The cost of a return shipment of suspect material from your customer’s site
7. Your total cost of your non-conformance per occurrence without tool monitoring
- Is this non-conformance a repeat issue?
- That would be your annual savings if tool monitoring were to be used to eliminate the non-conformance?
One needs to consider the following issues if there is involvement with an original equipment manufacturer (tier one supplier) to an automotive customer:
- Your customer’s production rate (number of vehicles per hour)
- Your customer’s production cost (number of dollars per hour)
- Your quality rating (excellent / above average/average / needs improvement)
- Does your facility experience significant in-process variation that would affect your current quality rating?
- What is the allowable PPM’s (defective parts per million) to satisfy your customer’s quality requirements?
- What is your current PPM status?
- Would incorporating tool monitoring systemson your production equipment help improve your quality rating and your customer’s satisfaction?
In The Real World
I would like to share my experience as a customer service engineer when I worked for an automotive tier one DaimlerChrysler supplier. My job responsibility was to provide on-site launch support for lockset installation (such as the door, ignition, glove box and trunk locks). I serviced the DaimlerChrysler plants in North America, including the United States, Canada and Mexico. I also serviced the plants in Europe.
The requirements for DaimlerChrysler’s quality rating are quite stringent. A non-conforming part spill would be absolutely disastrous for a supplier whose quality rating is marginal. The “big three” are always in the pursuit of new suppliers if the quality rating falls below the their requirements.
I experienced a reality check in Europe recently. The supplier quality specialists had a special billboard for current suppliers that could not maintain a consistent quality record. This information was available to anyone walking into his office. The following information was posted in the event of a non-conformance. As a supplier, you don’t want to be on this list.
1. The name of the supplier that is on probation.
2. A list of the type of defect either as a first time occurrence or as a repeat issue.
The Europeans scorn repeat issues when the supplier has not conformed to the 8-step corrective action plan. They absolutely do not accept “operator error” as an explanation for non-conformance. They will contact the upper management and ask the supplier quality manager to appear in person and explain how non-conforming parts escaped the plant when the plant is QS-9000 / ISO 9001 certified.
3. The number of non-conforming parts.
4. The number of defective parts per million.
The global economy is increasingly mandating quality improvements. A system of checks and balances needs to be incorporated when producing high volume automotive production parts. Unattended tool monitoring is becoming an integral part of everyday life in the world of manufacturing. Suppliers cannot afford to shut down an automotive assembly plant at a typical $17,000/minute production rate, translating to an excess of $1,000,000 per hour charge back.
Some Reasons For Using Tool Monitoring
Tool monitoring is a quick, reliable and cost effective method to improve profits and quality. Eighteen percent of TPS accounts experience a 1-day return on investment. Understanding the needs for tool monitoring is paramount to the justification process for upper management. Here are some survey results from users of swing arm contact tool monitors.
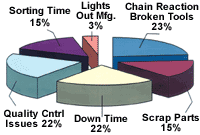
Survey #1: Reasons for Purchasing Swing Arm Monitoring Devices
There are a variety of reasons for purchasing tool-monitoring devices when considering chain reaction broken tools, scrap parts, down time, quality control issues and sorting time. “Lights out” applications are slowly evolving with respect to labor optimization during the economic hardships.
Survey #2: Return on Investment for Swing Arm Monitoring Devices
One hundred percent of TPS International’s accounts received a return on tool monitoring investment within 3 months. An astonishing 82 percent received a return on investment in 1 month or less.
Tool Monitoring Considerations
A shop’s machining applications determine which tool monitoring device is appropriate. Swing style sensors, the most common type in use now, cost less than $1,000 for a complete system. A typical system would consist of a sensor, a control box and a connecting cable.
Another consideration in choosing to use in-process tool monitoring is what level of training and ability there is among the line operators. This is especially important if you are using any type of tool monitoring device for the first time. Tool monitoring devices can directly impact a shop’s operation in a positive way by minimizing scrap, increasing up time, helping with overall quality improvement and increasing existing capacity by better throughput from the machine tools.
Every machining process seems to have a weakness. It may be an angle hole that snaps tools or a difficult blind tap hole. When considering tool monitoring devices, focus on the problem tools first. Approach the tool breakage issue with the appropriate tool monitoring remedy. Know the nature of the problem prior to selecting a tool monitoring application.
You may or may not need to compromise cycle time when considering a particular tool monitoring device. The tool may need to be retracted prior to tool detection. Choosing the correct tool monitoring system will result in higher profits and quality improvement. Also look for warranties, product specifications and return policies, which may influence your decision. Durability, reliability, design modularity and customer service engineering of tool monitoring applications are crucial for improving the efficiency of your metal cutting processes.
Related Content
Precision Machining Technology Review October 2023
Production Machining’s October 2023 technology showcase includes some of the latest technology from Tungaloy-NTK America Inc., Renishaw, Walter USA, Seco Tools and Haimer USA.
Read MoreHack-Proof Your Shop: Production Machining’s 6 Must-Read Cybersecurity Articles
October is cybersecurity awareness month and Production Machining wants to help you make your shop hack-proof.
Read MoreKeeping Watch on Small Parts
From watch parts to exotic medical applications, this shop takes on the world of micromachining.
Read MoreA Small CNC Machine Shop’s Journey to CMMC
Achieving Cybersecurity Maturity Model Certification (CMMC) — soon to be required to do work for the U.S. government — takes time and money. This 10-person shop takes us through some of the challenges it has faced and lessons it has learned on its CMMC voyage.
Read MoreRead Next
Do You Have Single Points of Failure?
Plans need to be in place before a catastrophic event occurs.
Read MoreSeeing Automated Workpiece Measurement in Real Time
User-friendly inspection software for CNC machining centers was shown at IMTS 2024 monitoring measurements between and after machining while performing SPC based on recorded measurement values.
Read More5 Aspects of PMTS I Appreciate
The three-day edition of the 2025 Precision Machining Technology Show kicks off at the start of April. I’ll be there, and here are some reasons why.
Read More


.jpg;maxWidth=300;quality=90)


