Keeping Watch on Small Parts
From watch parts to exotic medical applications, this shop takes on the world of micromachining.
The average mechanical watch movement—say, from a Swiss Rolex automatic with date —contains around 135 individual parts. While some of those parts, such as the main plates, are relatively large (at least in watchmaking terms) the majority of them are quite small, often requiring magnification to see clearly, explains Steve Cotton, owner of Micro Precision Parts Manufacturing Ltd. (MPPM), Qualicum Beach, B.C. “The small parts can be as small as 0.5 mm—too small to hold with your hands. You have to assemble them with fine tweezers and a 10-power loupe.”
He knows. Mr. Cotton is a watchmaker by trade. After completing his apprenticeship in New Zealand, Mr. Cotton traveled to Neuchâtel, Switzerland, where he completed the Watchmakers of Switzerland Training and Education Program, which he says is the most respected and highest-grade course in the world.
For the next 15 years, Mr. Cotton plied his trade as a watchmaker on two continents: New Zealand and Canada. He worked as a self-employed watch and clock repairman in Edmonton, Alberta, established his own clock and watch shop in New Zealand, contracted with various jewelers and watch shops in Alberta, and set up the complete Rolex Service Center at Diamori Fine Jewelers in Edmonton. Mr. Cotton also continued his training during this time, taking courses at Rolex Geneva, Rolex Australia and Rolex Toronto.
An Unplanned Change
In April 2002, however, Mr. Cotton’s life took an unexpected and near-disastrous turn, when his car was T-boned as he drove to work in Edmonton. “I suffered some minor brain damage,” he explains. “I had some memory loss, and lost my fine motor skills.” When much of your work takes place under a 10- to 20-power loupe, losing your fine motor skills is a life-changing event. “I had to set aside my watchmaking, which took some working through,” Mr. Cotton says.
Following the accident, Mr. Cotton accepted a position as sales manager for a software-development company on Vancouver Island. Although successful at the job—taking the company to an international level, and presenting its products to government officials in several countries—the work really didn’t suit him.
What did suit him, however, was living on Vancouver Island. “We came for the weekend and have stayed on the island ever since,” he says. “It feels like I’m on the coast of New Zealand, but I’m still in Canada.”
The island also proved home to a substantial population of clocks in need of restoration and repair, many requiring obsolete parts. It was the perfect opportunity for Mr. Cotton to return to his watchmaking roots. If he manufactured the obsolete parts himself, he reasoned, he could sell them for a profit and get the repair business. In 2004, he founded Micro Precision Parts Manufacturing to tap into the island’s clock repair and restoration market.
Today, MPPM manufactures parts for and repairs high-quality vintage watches, high-end Swiss watches and vintage clocks. It also has become a “go-to” company for micromachining parts for several other industries, including one of Canada’s leading robotics companies, and medical companies in the U.S. and Canada.
Skills Transfer
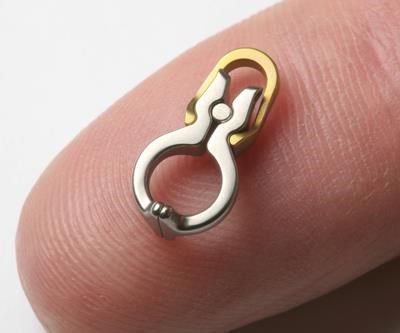
“The skill set of watchmaking is a very good match for micromachining,” Mr. Cotton points out. “If we are working outside of a 1- to 2-inch parameter, it’s a big part for us,” he says. “Typically, parts are so small that 50 of them can be placed on a penny. But making small parts, he explains, is not simply a case of dealing with smaller dimensions. All the elements of the machining system “have to work together.”
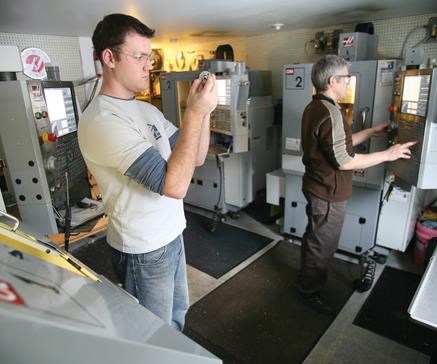
MPPM’s quiver of machine tools currently includes three machines from Haas Automation—two OM-2A office mills and an OL-1 office lathe – as well as a Sherline benchtop mill and lathe, which served as Mr. Cotton’s entrée into CNC. Mr. Cotton’s son, Matt, does the lion’s share of design work and toolpath generation using Mastercam software.
While MPPM handles some production orders, much of the shop’s work is single-digit runs of custom parts, and replacements for obsolete items. “Mass production for us is ten units at a time, but we have bigger contracts starting to come through,” Mr. Cotton says. Right now, we’re setting up one machine to run 300 units; that’s a good production run for us.”
In addition to watch and clock parts, the shop produces miniature gears and gearboxes for the robotics industry, lens-drive gears for cameras and a variety of other tiny, precise components.
If you Can’t Buy it, Make It
“We started out servicing old clocks and vintage watches,” Mr. Cotton says. “For half of them, you can’t get parts anymore, so I investigated CNC machining to make some of the obsolete parts.” The benchtop CNC mill and lathe served Mr. Cotton’s needs for about a year, but even though it was automatic to a certain point, he says, it was still labor intensive.
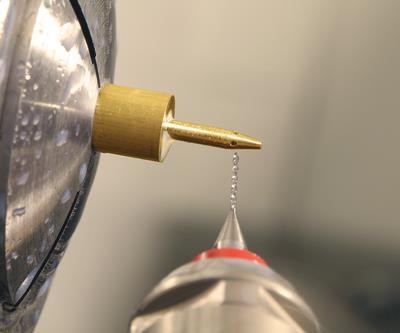
Looking to reduce tool change time and labor, Mr. Cotton contacted the Haas Factory Outlet in Richmond, B.C., about acquiring a CNC machine with an automatic toolchanger. He settled on a Haas OM-2A office mill, with 12-inch by 10-inch by 12-inch travels, 30,000-rpm spindle and 20-pocket automatic toolchanger. To cut efficiently with tiny tools—some as small as 0.016-inch diameter—Mr. Cotton also acquired a 200,000-rpm NSK pneumatic spindle to mount in the mill’s standard spindle.
To further boost consistency, Mr. Cotton had a Renishaw laser toolsetting probe installed on the office mill. “It sets every tool to the same standard,” he explains. Mr. Cotton uses the tool probe to adjust offsets to minimize scrap as tools wear and to ensure that replacement tools cut identically. When grinding a ceramic part, he says, “We put 20 tools in the carousel and tell the machine to run for 1 hour and then change the tool. The new tool has been ‘lasered’ as being exactly the correct size.”
Branching Out
Mr. Cotton was immediately pleased with the Haas machine. “Once we set up all the tools in the toolchanger, a gear that took me about 45 minutes on our benchtop machine dropped off the new mill every 8 minutes,” he says. “But what I didn’t realize was that the scope of these machines is huge. The first year, we were doing probably 80 percent clock work and 10 to 20 percent different machined parts. The second year, we went to 80 percent machining and our watch side went to 10 to 20 percent—a huge change in 1 year.
“I found there was a real niche for the small micro parts,” he continues. “Once people found out we could hold and machine such small stuff, we had everything from precision gears for ships’ autopilots, to tiny camera bodies, to small optical and medical parts, to ceramics for aneurysm clips.”
The success of the first office mill quickly led Mr. Cotton to purchase a second machine as well as a Haas OL-1 office lathe for turning work. The office lathe has a 5C collet spindle that spins to 6,000 rpm, a full C axis and 8- by 12-inch (X-Z) travels. Like the office mill, it easily fits through a 36-inch doorway, which is a good thing, as the three machines are tucked tightly into the basement of Mr. Cotton’s Qualicum Beach home.
“The lathe is a perfect match for the mills,” Mr. Cotton explains. “We have it set up with axial and radial live tooling. Having a machine that can turn parts and mill secondary features in one setup really completes our shop.”
MPPM machines parts from a variety of materials, including standard ferrous and nonferrous metals, as well as titanium and other exotic alloys, plastics and ceramics.
“We’ve cut medical-grade titanium and a variety of ceramics, including alumina, silicon boron, cubic boron nitride and extremely hard silicon nitride,” Mr. Cotton says.
“Ceramics are ideal for medical applications, but they are difficult to machine, and expensive to manufacture,” he says. “A part we can produce in titanium in 4 days takes 7 to 10 days in ceramic to achieve the same accuracy. Titanium and other materials are machined with carbide tools, but ceramics require diamond-impregnated grinding burrs. We tried a range of cutting tools—some PCD, CBN and cubic zirconia—and they couldn’t touch ceramic. It just blew them up,” he says.
Making Time for Medical
Mr. Cotton’s foray into ceramic machining came courtesy of Concept Solutions Inc. (CSI), a Vancouver-based technology development company specializing in mechanical devices. “We were developing a highly advanced surgical implant—an aneurysm clip—that required ceramics,” explains CSI Technical Director James Klassen.
Mr. Klassen chose ceramic for the aneurysm clip for several reasons. Like titanium, it is biocompatible and non-magnetic, so it is readily accepted by the body, and unaffected by magnetic resonance imaging (MRI). Unlike titanium, however, ceramic is virtually invisible in an MRI image allowing the surgeon to see the clipped area immediately after surgery and periodically for the rest of the patient’s life. This is a great benefit to the surgeon and the patient, because a small percentage of aneurysms are not completely clipped during surgery, and even when they are, some aneurysms will re-grow months or years later.”
CSI’s ceramic aneurysm clips could advance surgical methods by an estimated 30 years, according to industry experts, but they posed serious machining challenges in the prototyping stage.
“The project had been declined by every shop we could locate that worked with ceramics, and we’d finally decided to buy our own CNC machine and do the machining ourselves,” Mr. Klassen says.
Mr. Klassen came across MPPM “by accident,” while researching equipment and tooling online. “I was searching the Internet for diamond burrs, and Steve’s shop came up, so I decided to give him a call,” he says. “He told us he didn’t know if he could do it, but he was willing to try.”
Figuring it Out
“I did some research and knew how hard it [silicon nitride] is,” Mr. Cotton says. I got some agate, which is just under the hardness of silicon nitride, and machined that, so I had an idea what I was in for.”
Mr. Klassen explains, “Silicon nitride is almost as hard as diamond. There is no way to machine it with ‘normal’ cutting tools, but it can be ground using diamond tools. The small features on the aneurysm clip made it extra challenging, because we had to use very small tools, which required a high-speed spindle to achieve the necessary surface speed.
“We sat down with Steve to explain the project and set up a test with one of its Haas office mills to see if a 1-mm diamond burr could remove material from a silicon nitride ball bearing,” he continues.
The test was a success, so with the machining process proven out, Mr. Cotton set to work on the first set of prototypes.
The 1/2-inch-long parts were machined from solid blanks of silicon nitride. They featured complex 3D contours with three contact surfaces, two of which specified zero tolerance. “They had to be perfect,” Mr. Cotton says. The remaining tolerances were ±0.0004 inch.
He used diamond-impregnated tools, including custom end mills as small as 0.016 inch in diameter, with grit as fine as 800 (~25 microns) for finish passes. “With a drill or end mill that small, you really need to be up about 200,000 rpm,” he says. The small-diameter tools require high rpm to produce sufficient surface speed.
Mr. Cotton machined the ceramic parts on the company’s office mills with the NSK air-driven supplementary spindle. “We use an M19 to orient the main spindle and hold it in position, and then we put in the NSK unit,” Mr. Cotton explains. “We push the spindle to its 200,000-rpm limit, and use a feed rate of probably 15 mm per minute for the roughing, and 10 mm per minute for the finish, with a stepover of 0.02 mm.”
Before machining the contours, Mr. Cotton ground the ceramic stock to a zero-tolerance surface on two sides. Those surfaces enabled him to clamp the part in a vise and establish datum points. Accuracy concerns led the customer to specify that the part be flipped in the vise to machine each side rather than using a fourth axis, which was “hair-raising,” Mr. Cotton says. “They wanted us to datum the flip. It sometimes took 2 hours to dial it up.” Because large temperature changes would alter the setup dimensions, MPPM has a temperature-controlled atmosphere, and the machines are run up to operating temperature before machining the parts.
Such attention to detail pays off in the accuracy of the finished product. “The first set of parts sent for testing were within 10 microns of the actual drawing specifications,” says Mr. Cotton. “We had a 20-micron tolerance, so they were pretty happy.” CMM inspection of a run of titanium springs—a critical part of the aneurysm clips showed that the shop held a 5-micron tolerance on every part, he says.
“We’ve now developed a process to machine the silicon nitride ceramics reasonably efficiently for prototyping,” Mr. Cotton says. “We grind away the ceramic very accurately, leaving a really nice machined finish. The first set of aneurysm clips took us almost 4 weeks to make. But by experimenting with speeds, feeds, coolants and tool deflection, we’ve narrowed that down to about a week.”
Mr. Cotton adds that issues such as tool wear and tool deflection are much greater concerns when making such tight-tolerance parts. “We do some parts that are so small that you can hardly see them,” he says. “They look like dust on your bench.”
What MPPM has learned and continues to apply to the watch part business and the medical device business is confidence that small size, tight tolerances and difficult materials can be effectively manufactured. “When we get a part with a tolerance of 2 to 3 thousandths, we just love it, because it is so simple by comparison,” Mr. Cotton says.
Related Content
Verisurf Probing Suite Provides Flexibility in Quality Inspection
Verisurf’s Machine Tool Probing (MTP) suite is an in-process automated inspection solution for CNC machine tools, offering inspection and reporting capabilities.
Read MoreHow to Start a Swiss Machining Department From Scratch
When Shamrock Precision needed to cut production time of its bread-and-butter parts in half, it turned to a new type of machine tool and a new CAD/CAM system. Here’s how the company succeeded despite the newness of it all.
Read MoreLone Shop Machinist Benefits From Five-Axis CAM Modules
This California shop owner applies five-axis strategies for more efficient milling of parts with challenging geometries, free-form surfaces and deep cavities.
Read MorePrecision Machining Technology Review: August 2024
Production Machining’s August 2024 technology showcase includes some of the latest technology from SW North America, Tsugami, Siemens, Select Manufacturing Technologies, Hurco and ECI Software Solutions — all on display at IMTS 2024.
Read MoreRead Next
5 Aspects of PMTS I Appreciate
The three-day edition of the 2025 Precision Machining Technology Show kicks off at the start of April. I’ll be there, and here are some reasons why.
Read MoreDo You Have Single Points of Failure?
Plans need to be in place before a catastrophic event occurs.
Read MoreA Tooling Workshop Worth a Visit
Marubeni Citizen-Cincom’s tooling and accessory workshop offers a chance to learn more about ancillary devices that can boost machining efficiency and capability.
Read More


.jpg;maxWidth=300;quality=90)


.jpg;maxWidth=300;quality=90)


