Craftsman's Cribsheet: Honing and Lapping — Special Finish Processes
Cribsheet provided by PMPA member Pioneer Service Inc., Addison, Illinois

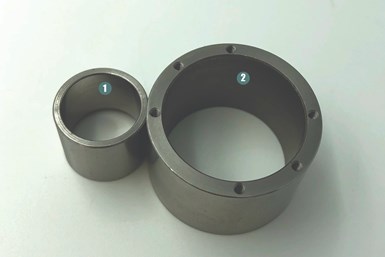
Item (1) shows an ID that has gone through a honing process for a polished finish. Item (2) shows a turned part with a standard finish on the ID.
Standard grinding (both centerless and centered) produces a finer surface finish and/or more precise dimensions than can be achieved during the turning process on a CNC Swiss or CNC Turning Center.
Additionally, there are two types of specialty grinding services that are used for finishing ID (internal diameter), specific feature (tapers, slots, flats, holes) and extremely fine finish and tight tolerance requirements on an OD (outside diameter). These processes are honing and lapping.
What Are the Differences Between Honing and Lapping?
With standard grinding, a wheel with varying levels of grit (sharp particles) is rotated against the surface of the machined component. Material on the component is removed during the process to achieve a specified finish or dimension.
Honing and lapping are more like polishing processes than grinding processes. Much less material is removed during the process, but the surface of the component achieves an extremely fine finish or tight dimensional tolerance. They are often specified when the application requires a tight fit between mating parts, which is common in the aerospace and medical industries.
Are Honing or Lapping Needed?
In the honing process, a stone (called a hone) with a specified grit level is rotated against the component with a controlled pressure and in a specific pattern. Lapping involves moving the component past stationary plates that have been treated with a grinding “paste.” Visually, lapping usually produces a matte finish and honing produces a mirror finish. These finishes and tighter dimensional control are the reason for honing or lapping critical parts.
There are a variety of types of equipment used to achieve honing and lapping finishes depending on the required component features:
- Flat (to achieve a specified flatness and parallelism requirement)
- Cylindrical (for both ID and OD surfaces to achieve a specified size, straightness, roundness, concentricity and micro-finish)
- Taper (for ID and OD tapered surfaces)
- Holes and slots (both open ended and closed) can be honed to achieve a specified micro-finish
- Counter bore (to achieve a specified straightness or micro-finish)
- Dual surface (produces both a smooth and textured surface simultaneously (aka plateau honing)
Machines have automated many of these processes, but sometimes small quantity runs are completed by hand.
— Precision Machined Products Association
Related Content
-
Onshoring Weather Report: Strong Tailwinds!
Onshoring, reshoring, nearshoring: these terms are showing up with increasing frequency in the news and online. But is there evidence that these are real?
-
Do You Have a Quoting Process?
The only way to have repeatable results is to have a process.
-
Cold-Drawn Steel Barstock: How It Is Manufactured, Benefits to Your Shop
Understanding the benefits provided by cold-drawn steel barstock can help you optimize the work you quote by maximizing benefits to your manufacturing process and customer.


.jpg;maxWidth=300;quality=90)


