Craftsman's Cribsheet No. 60: Decarburization and Your Precision Machine Shop
Most defects in steel workpieces encountered in precision machine shops are longitudinal in nature. While their presence alone is enough to concern us, for the purposes of corrective action, it becomes important to identify where in the process the longitudinal imperfection first occurred.
Decarburization on surface layers can affect heat treatment and hardness attained on parts. Decarburization also provides evidence of where in a process a defect or imperfection occurred.
Most defects in steel workpieces encountered in precision machine shops are longitudinal in nature. While their presence alone is enough to concern us, for the purposes of corrective action, it becomes important to identify where in the process the longitudinal imperfection first occurred. Visual examination alone is not enough to confirm the source. Did it occur prior to rolling? During rolling? After rolling? Understanding decarburization and how it presents in a sample can help us to identify where and when in the process the imperfection first occurred.
What is Decarburization?
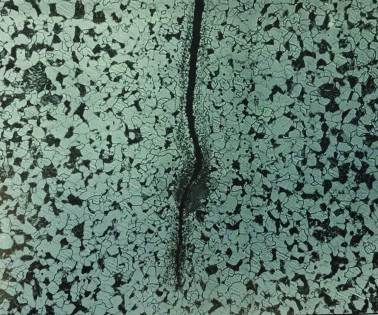
The light area (ferrite) surrounding the dark intrusion is decarburization. Note the lack of pearlite in this decarburized (lighter) zone. There is no evidence of scale, indicating that this defect was created during, rather than prior to rolling.
“Decarburization is the loss of carbon from a surface layer of a carbon-containing alloy due to reaction with one or more chemical substances in a medium that contacts the surface.”
– Metals Handbook Desk Edition
The carbon and alloy steels that we machine contain carbon. In the photo, the carbon is contained in the pearlite (darker) grains. The white grains are ferrite. In an etched sample, decarburization surrounding a defect is identified as a layer of ferrite with very little, or none of the darker pearlitic structure typically seen in the balance of the material. The black intrusion in the photo above is the mount material that has filled in the crevice of the seam defect.
What is Subscale?
The gray material adjacent to defect within the white decarburized area is subscale. This subscale is evidence that the crack was present on the bloom prior to reheat for rolling.
Subscale is a reaction product of oxygen from the atmosphere with various alloying elements as a result of time at high temperatures. The presence or absence of the subscale is the indicator that helps pinpoint the origin of the defect. For a subscale to be present, the time at temperature must be sufficient for oxygen to diffuse and react with the material within the defect. According to Felice and Repp, 2,250° F and 15 minutes is necessary to develop an identifiable subscale. Lower temperatures would require longer times. Typically, rolling mill reheat cycles offer plenty of time to develop a subscale in a prior existing defect. However, for defects that are created during rolling, the limited time at temperature and the decreasing temperatures on cooling make formation of subscales unlikely.
Reading Decarb and Subscale to Understand the Defect
Decarburization is time and temperature dependent. This means that its relative depth and severity are clues as to time at temperature, though interpretation requires experience and understanding of the differences in appearance from grade to grade based on carbon content.
Symmetrical Decarburization
If the decarburization is symmetrical this is an indication that the defect was present in billet or bloom prior to reheat and rolling. Oxygen in the high temperature atmosphere of the reheat furnace depletes the carbon equally from both sides of the pre-existing defect.
Asymmetrical Decarburization
Decarburization that is obviously asymmetrical indicates that the defect is mechanical in nature and was induced some time during the hot rolling process.
Continuous improvement requires taking root-cause corrective action. Identifying the root cause is critical. When we encounter longitudinal linear defects in our steel products, using a micro to characterize the nature of the decarburization and presence or absence of subscale provides important evidence as to when, where and how in the process the defect originated.
— Precision Machined Products Association
Read Next
A Tooling Workshop Worth a Visit
Marubeni Citizen-Cincom’s tooling and accessory workshop offers a chance to learn more about ancillary devices that can boost machining efficiency and capability.
Read More5 Aspects of PMTS I Appreciate
The three-day edition of the 2025 Precision Machining Technology Show kicks off at the start of April. I’ll be there, and here are some reasons why.
Read MoreDo You Have Single Points of Failure?
Plans need to be in place before a catastrophic event occurs.
Read More


.jpg;maxWidth=300;quality=90)


