Ensuring Zero Defects in Internally Threaded Fasteners
New high-speed sorting technologies, including vision-based hole and thread detection, are making traditional methods obsolete.
It is critical to inspect formed metal fasteners to ensure zero defects, either for safety, critical performance, or to optimize the manufacturing process. Conventional methods to do this exist, such as sorting mechanically for size or hand sorting with optical comparators. Yet traditionally, it has been difficult to inspect internal threads for tiny defects such as chips, tears, weld splatter, and short or missing threads.
Inspecting the vertical walls of a fastener hole and its threads is difficult for the human eye because of its small size as well as lighting and viewing issues. Not only is such an inspection process slow, labor intensive, and subject to interpretation, but also it is prone to human error, particularly over long periods when fatigue can degrade accuracy.
“Because many of our parts such as small fuel fittings and unions for the auto industry are safety parts, our customers will not accept anything but 100-percent quality, so we carefully check key areas including internal threads,” says Chuck Abbate, V.P. of operations at H&L Tool (Madison Heights, Michigan), a manufacturer of precision turned and cold formed fastener products. “We needed a way to make sure that all the internal features were perfect and within the print.”
However, even typical cameras and laser-based equipment have difficulty detecting required features inside of parts, and the deeper the hole or recess, the more challenging this becomes.
“One of the problems that arises when looking at internal features on a machine is the different color in the plating and different lighting,” Mr. Abbate says. “It is important to get a machine that determines what it is looking at; that it is truly looking at the part and not at glare or a shadow.”
To help manufacturers ensure zero defects in their fasteners, a number of advanced high-speed sorting technologies are making slower, less reliable, traditional methods obsolete.
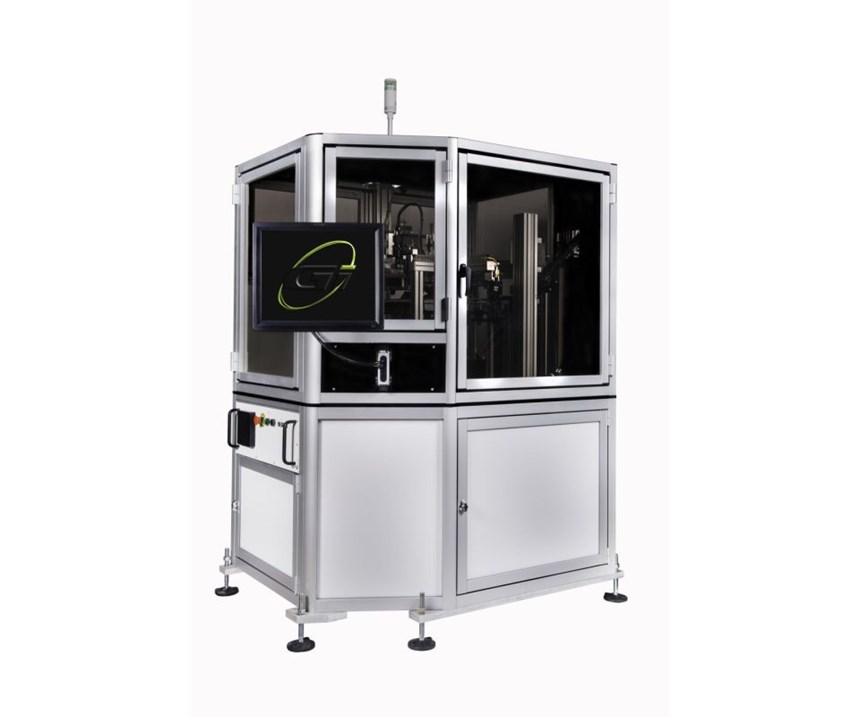
To ensure his company’s couplers, tube nuts and internal female nuts contained zero defects, Mr. Abbate turned to a high speed vision-based measuring machine called the GI-100DT from General Inspection, a developer of high speed measuring and sorting fastener inspection systems.
The device uses a series of front and backlit cameras to calculate a part’s height, profile, ID and OD. The device also has a number of advanced options, including cameras to check for internal threads, an axial viewer that detects surface imperfections on multiple sides of a part at once, and eddy current capability, which enables checking for metallurgical defects along with plating or hardness variations.
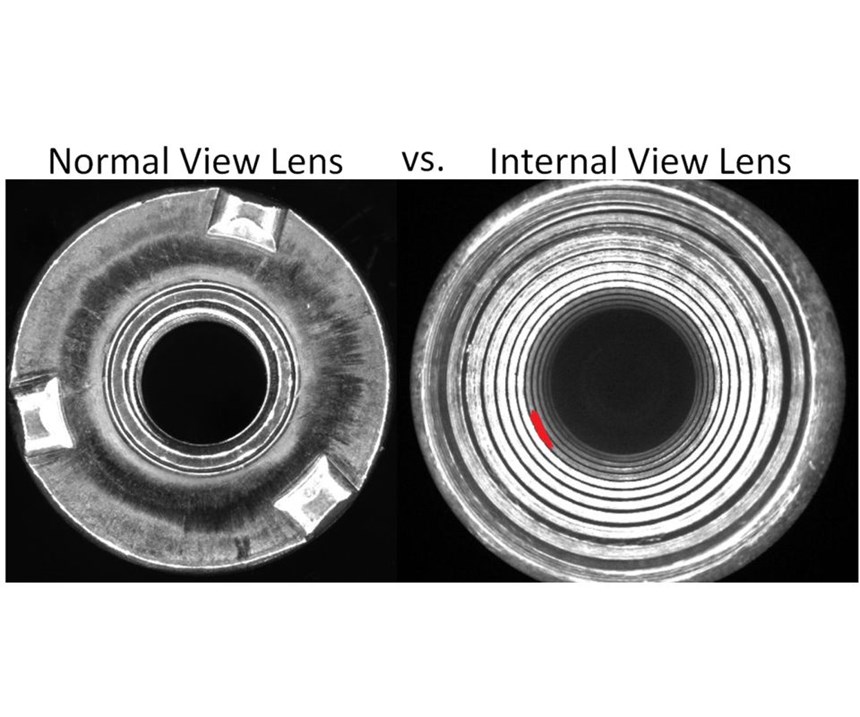
With 360-degree internal thread inspection capability, the General Inspection device incorporates hole inspection optics to specifically image and measure both the bottom of a hole and its vertical walls. This allows inspecting ID threads in detail and the detection of small defects such as weld splatter, torn threads, reamed threads, chips in threads, short or missing threads, as well as a single damaged thread.
“It is the only sorting machine I have seen that has the capability to totally look inside the part,” Mr. Abbate says. “The different types of special lenses on these cameras are good at looking at all the internal features, which we could never get on a machine before.”
According to Mr. Abbate, the machine does a good job of distinguishing the interior part features from glare or shadow. He appreciates a dial table-style glass top, which stabilizes the parts during inspection while allowing viewing of the top and bottom simultaneously. Such part stability improves image analysis, data capture and precision, while simultaneous top and bottom viewing speeds the process.
“It is all about the presentation—how the machine presents the part to the cameras,” he says. “Because the parts stand straight up on the glass dial-style table, cameras with convex lenses can look straight down at the parts and see 360 degrees from either side. With 100-percent sorting, you don’t miss anything.”
Mr. Abbate says a conventional V-track model inspection machine, with a 30-degree incline to drop the part, would have limited how much of the part interior is visible.
“Other machines cannot look at the sealing surfaces of a coupler, for instance, because they view it at an angle,” Mr. Abbate says. “You have to be able to see down in it, which the General Inspection machine is able to do.”
“With the glass dial-style table on which the parts ride around, we can view the top and bottom of a part at the same time,” he adds. “On a double-featured piece such as a union, this allows us to run it through once instead of twice.”
According to Mr. Abbate, an axial viewer also allows detection of any surface discontinuities on six sides of a part at once. With such a capability, the camera could, for instance, simultaneously “see” the top and sides of a fastener.
Along with the device’s eddy current capability, which detects any metallurgical defects including plating or hardness variations, he has found the measuring machine provides the efficient, zero-defect fastener sorting required.
“We have found our new system to be at least 10 times faster than hand sorting and much more effective than typical sorting machines that look only on the outside of a part,” Mr. Abbate says. “It is a must for those who make internally threaded fasteners or connectors.”
For more information from H&L Tool, call 248-585-7474 or visit hltool.com.
Related Content
In-Machine Probing Possibilities for VTLs
A manufacturer of vertical turning centers uses a “push/pull” optoelectronic probe with custom bracket to enable its machines to perform effective, in-process measurement of shafts and related automotive components.
Read MorePMTS 2023 Product Preview: Measurement
Learn about some of the latest measurement solutions that will be on display at PMTS 2023.
Read MoreDoes a Scanning Probe Make Sense on a Swiss-Type?
Swiss-types have limited tooling capacity, but there can be advantages to giving up some of that capacity to take advantage of a touch probe — in fact, a scanning probe — to enable in-process part measurements.
Read MoreVideo Tech Brief: Quality Control is Using the Right Software
This machine shop’s mapping software program runs on its gaging system to increase the accuracy of the probe’s tolerance measurement on the thin-walled aluminum tube machined by the shop.
Read MoreRead Next
5 Aspects of PMTS I Appreciate
The three-day edition of the 2025 Precision Machining Technology Show kicks off at the start of April. I’ll be there, and here are some reasons why.
Read MoreDo You Have Single Points of Failure?
Plans need to be in place before a catastrophic event occurs.
Read MoreSeeing Automated Workpiece Measurement in Real Time
User-friendly inspection software for CNC machining centers was shown at IMTS 2024 monitoring measurements between and after machining while performing SPC based on recorded measurement values.
Read More


.jpg;maxWidth=300;quality=90)


