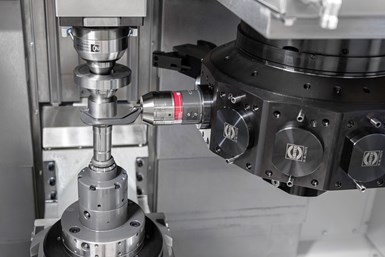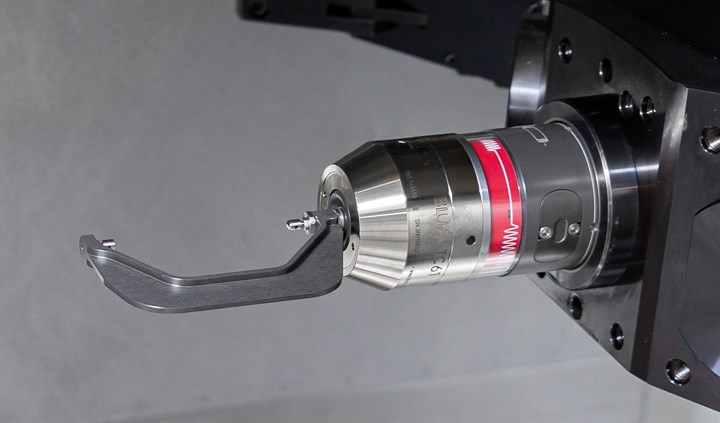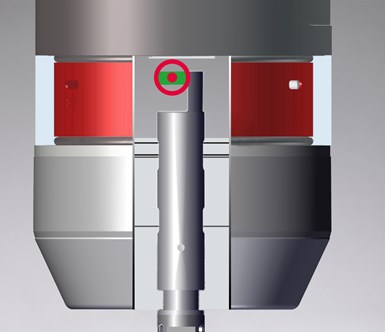
Bidirectional, optoelectronic measurement capability enables two-point measurement using pushing and pulling movements with styli housed in a C-shaped clamp. (Photo Credits: Blum-Novotest)
Vertical turning centers from Denklingen, Germany’s Schuster Maschinenbau are primarily used to manufacture gear shafts, camshafts and balancer shafts for the automotive industry as well as complex motor shafts for electric drives. Depending on the part, the machine’s main spindle, counter spindle or center turning unit might be used. Machines can be fitted with as many as two turrets or milling or grinding units to enable turning, milling and grinding in one workpiece setup.
That said, performing measurements in the working area is an integral component of its machining processes, notes Christian Moser, project manager at Schuster Maschinenbau. “In many production processes, a diameter is first pre-machined with an allowance and then ground or turned to the final dimension. That is why it is necessary to automatically measure the current diameter between the two steps and adjust the grinding or turning process as required.” So as not to measure any concentricity errors or the temperature curve of the machine, he says a two-point measurement routine such as one using a handheld micrometer is typically necessary. However, because many Schuster machines are not equipped with a Y-axis, there is no way to automatically probe the workpiece at two points at the front and back with a standard stylus to measure the current diameter.

Schuster Maschinenbau has been using production measurement technology from Blum-Novotest for many years. For example, the TC61 touch probe is used on the company’s flexible F40 turning cell.
The in-process measurement solution Schuster found was the TC61 touch probe with specially designed C-shaped stylus from Blum-Novotest. What is unique about the TC61 is the bidirectional, optoelectronic measuring mechanism guided in two axes. In contrast to typical touch probes, this enables two-point measurement using pushing and pulling movements with styli housed in a C-shaped clamp.
To do this, a TC61 with custom clamp mounted in a machine’s turret is first swiveled in horizontally and then pulling and pushing measuring movement are performed via X-axis movement. In addition, in some systems, a probe ball is attached to the outermost end of the bracket to make it possible to measure lengths, zero points or steps, for example. Blum-Novotest offers its steel measuring brackets with measuring diameters of 35 mm to 73 mm in various increments. Larger versions made of aluminum are also available.

The TC61 probe installed in the machine’s turret is swiveled in horizontally and one pulling and pushing measuring movement is conducted via X-axis movement.
Measuring the diameter during allowance grinding is required for maintaining tight tolerances. Precision glass scales on the machine’s X axis is said to ensure precise probe positioning. The two-point measurement can be conducted very fast, achieving accuracy repeatability of 1.5 to 2 microns. Measurement routines with the probe enable compensation of the temperature gradient as well as the unavoidable wear of the grinding wheel. Such in-process measurement helps ensure that parts machined in high volumes remain in tolerance while greatly minimizing the chance for scrap.

The TC61 is the bidirectional (pushing and pulling) measuring mechanism guided in two axes with wear-free, optoelectronic switching signal generation. The trigger signal is generated via shading of a miniature light barrier which is said to enable higher measuring speeds (5 m/min) and accuracy of conventional probes while offering reliability even when exposed to cutting fluids inside a machine tool. The TC61 uses Blum-Novotest’s BRC broadband radio signal transmission technology which offers high interference resistance while not influencing other radio transmission systems.
The optoelectronic design of the TC61 touch probe also offers protection against the rigors of a harsh machining environment that includes exposure to chips, grinding dust and coolant pressure that can reach 60 bar.
“The movement of the turret itself, which is fixed in an interlock every time the tool is positioned, also generates considerable impact on the entire turret and thus on the touch probe,” Moser explains. However, he says the TC61 tolerates these while ensuring precise measurement results with the newly developed measuring bracket, noting that the touch probes from Blum-Novotest have proven their worth under such adverse conditions.
Related Content
Automated High-Production Welding of EV Rotor Shafts
This cell is able to perform joining, preheating and welding operations for rotor shafts used in electric vehicles.
Read MoreT&H Lemont Reaches Quality Assurance Milestone
The company’s quality management system has provided a solid year with no defects, rejects or recalls.
Read MoreReinventing the Wheel with Robot-Automated CNC Multitasking
One race team discovers how to efficiently manufacture a new wheel nut design for the next-generation NASCAR stock car with the help of a CNC mill/turn and a built-in robot.
Read MoreOvercoming 3 Common Challenges With Automated Particle Counting
Facing difficulties while performing particle analysis is normal but should not be discouraging. Here are some ways to handle the most prevalent issues that can arise.
Read MoreRead Next
Do You Have Single Points of Failure?
Plans need to be in place before a catastrophic event occurs.
Read More5 Aspects of PMTS I Appreciate
The three-day edition of the 2025 Precision Machining Technology Show kicks off at the start of April. I’ll be there, and here are some reasons why.
Read MoreA Tooling Workshop Worth a Visit
Marubeni Citizen-Cincom’s tooling and accessory workshop offers a chance to learn more about ancillary devices that can boost machining efficiency and capability.
Read More


.jpg;maxWidth=300;quality=90)


