Overcoming 3 Common Challenges With Automated Particle Counting
Facing difficulties while performing particle analysis is normal but should not be discouraging. Here are some ways to handle the most prevalent issues that can arise.
Cleanliness analysis relies on the measurement of random particles that are unwanted byproducts of the manufacturing process. Every contamination sample is unique in terms of the number, size and shape of particles. Therefore, there are inherent challenges that are frequent among many automated particle counting systems.
These obstacles are not impossible to surmount. By following some tips from experts in the field of particle analysis, solutions can be found for most applications. This article addresses only a few of the most common issues.
1. Measurement Repeatability and Reproducibility
All quality gage measurements must prove to be repeatable and reproducible when completed by a trained person. when qualifying a light-optical particle counting microscope, the process refers to the use of a particle standard.
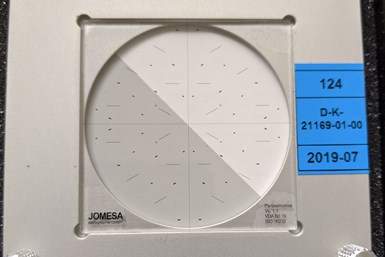
A particle standard should contain a range of objects in different sizes (according to ISO 16232) that the microscope must measure and count within tolerance. The objects’ dimensions should be traceable to ISO 17025 to ensure they are accurate. All automated microscopes that perform ISO 16232 analysis measure these standards accurately and repeatably, regardless of the operator using the system.
All particle counting microscopes should have the calibration verified using a particle standard. The standard should include a range of particle sizes (according to ISO 16232) that must be measured within tolerance. Photo Credit: Jomesa North America
A real filter sample can also be used to test for repeatability and reproducibility. However, there are many more variables to consider with this type of sample and therefore the results should be evaluated differently. For example, particles/fibers can shift or appear slightly different when measured by a camera if the sample is rotated or moved between evaluations.
These slight changes should not have a drastic effect on the result; however, changes should be considered when using statistical criteria such as the Gage Repeatability and Reproducibility process.
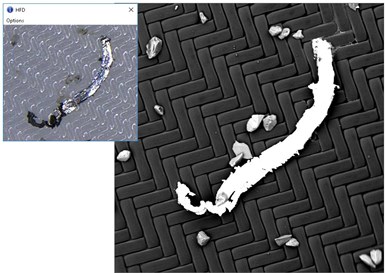
Some features of automated light-optical analysis have yet to be standardized across the industry such as the detection of metallic particles. Most, if not all, automated microscopes attempt to separate metal particles from the rest of the contamination.
The method for identifying particles as metallic is unique to each manufacturer. Therefore, it should not be compared among different microscopes for that reason. The total particle count is more appropriate.
2. Fibers Detected as Metal Particles or as Nonfibers
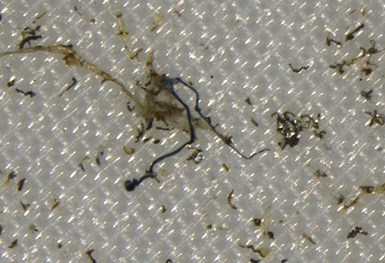
When there are too many fibers present in a filter, they overlap and are measured along with other particles they are touching when the image is taken. Therefore, it is critical to keep the test environment as free from fibers as possible. Photo Credit: Jomesa North America
Fibers are always an enemy of cleanliness analysis. They are ubiquitous in manufacturing environments and can cause errors when found on a filter membrane. Fibers are often not controlled or have much less restrictive limits regarding cleanliness specification. Because of this, automated microscope software should segregate these types of particles into another category so they can be evaluated separately or ignored.
3. Incomplete Detection and Measurement of Some Particles
Particle mismeasurement is the opposite of the overlapping particle problem. Some particle materials (glass, silicon, aluminum oxide, some plastics and so on) will not be detected or measured completely when analyzed with the ISO 16232 settings due to the particle’s color or brightness. The standard filter membrane for analysis is white/translucent. Any particle that appears the same will be difficult to detect.
Light brightness and “thresholding” is the most prominent reason that some materials are not detectable or only partially detectable. The ISO 16232 standard is designed in a way to capture most of the contamination that would be found in a typical manufacturing process.
When standardizing an image analysis process, there must be limits placed on the detection criteria so every microscope can have a basis for comparison. Due to these limits on detection, some materials will not be easily or fully measured when analyzed by an automated microscope. In those cases, the analysis settings must be customized to measure these special particles, or another technology should be implemented to measure and report the contamination. A SEM/EDX microscope is best suited to detect and measure glass, silicon and aluminum oxide particles.
Jomesa North America | 248-457-0023
About the Author
Peter Feamster is the product manager for Jomesa North America in Troy, Michigan. Feamster has been working in the manufacturing cleaning industry for more than 10 years and specializes in cleanliness analysis.
Related Content
Kyzen Solvents Provide Safe Parts Cleaning
The SLV901 and SLV803 solvents are formulated to maintain cleaning efficacy while providing a safe, environmentally friendly alternative to processes that use PFAS and HFCs.
Read MoreKyzen Solvents Provide Ease of Cleaning for Medical Parts
The Metalnox line of solvent products are designed to improve reliability and increase the ease of cleaning in vacuum and vapor degreasing processes.
Read MoreEnvironmentally Friendly Model 550 Versatile Parts Washer
PMTS 2023: This washer is useful in a variety of applications, including tool rooms, maintenance operations, low production and precision cleaning.
Read MoreSita’s CleanoSpector Measures Part Cleanliness
PMTS 2023: Handheld measuring device checks for cleanliness of parts to assure product quality as well as prior to follow-up processes.
Read MoreRead Next
Dealing with Failed Cleanliness Limits
Markus Rossler, vice president, Glaeser Inc., offers guidelines for ensuring parts cleaning standards.
Read MoreCleanliness Compliance is Critical for Automotive Suppliers
Although not every shop has been affected by cleanliness specifications, many suppliers to automotive OEMs are already complying with stringent cleanliness standards. In Ford Motor Co.’s case, it has created its own cleanliness standards in order to save money and credibility.
Read More5 Aspects of PMTS I Appreciate
The three-day edition of the 2025 Precision Machining Technology Show kicks off at the start of April. I’ll be there, and here are some reasons why.
Read More


