Fixed Abrasives Take Lapping Into Another Dimension
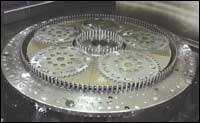
Many companies have discovered the benefits of replacing their traditional flat-lapping operations with a newer technology called flathoning—a process commonly known as clean lapping.
Traditionally, the grinding process known as lapping has been employed in stock removal of metal and ceramic workpieces to achieve a desired concentricity or “flatness.” Flat lapping typically involves a slurry of loose aluminum oxide, silicon carbide or other abrasive grains flowed across a rotating lap plate in either a water-based, synthetic or oil-based vehicle. This creates an abrasive film between the plates and the workpiece that enables stock removal from a single side or from both sides simultaneously, of regular or irregular shapes, without distortion from clamping or heat. The loose abrasives leave a dirty residue that must be rinsed clean after lapping. Controlling this loose abrasive process in most cases has to rely on the experience of machine operators.
Many companies have discovered the benefits of replacing their traditional flat-lapping operations with a newer technology called flathoning—a process commonly known as clean lapping. Flat-honing replaces the “black magic” associated with the intense operator involvement for consistent finished product with today’s abrasive technology and CNC machinery.
By using bonded CBN or diamond particle in a fixed medium that replaces the loose abrasive process, flathoning achieves the same or greater precision with fixed abrasives than those accomplished through conventional flat lapping.
Consider a tungsten carbide insert application. Inserts might first be ground on a traditional lapping machine with special fixtures holding up to, for example, 200 units.
After grinding one side, the inserts are un-fixtured, turned over, re-fixtuxed and ground on the other side. Throughput averages between 200 and 300 parts an hour. Removing the typical 0.020 to 0.025 inches of stock from a tungsten carbide insert with a flat-lapping machine usually requires 2 to 3 hours because the material is so hard.
But flathoning machines are unlike conventional fixed abrasive grinders used for sizing components. Clean lapping far exceeds the 0.0002- to 0.0003-inch tolerances of conventional grinders, and it takes that 0.025 inch of carbide stock off both sides simultaneously within 4 to 5 minutes. On a smaller machine, 100 to 150 inserts can be finished within 7 to 8 minutes, a rate of 700 to 1,000 parts per hour. Speed is a primary reason double-sided flathoning is replacing conventional grinding and flat lapping in numerous applications across many industries. One flathoning machine can often replace three to four grinders and their associated labor and overhead, or reducing it can decrease high tolerance lapping cycles to a few minutes. Stock removal rates are multiples of 10 to 20 faster than lapping, and certain tolerances being achieved now exceed those being lapped.
Flathoning can hold thickness variations within 0.6 micrometers (0.000024 inch) in a single batch, with overall batch-to-batch tolerances of ±1 micrometers (0.000040 inch) on a 24-hour basis. That capability comes from using a fixed, bonded material (as opposed to a loose material),with the added ability of removing stock faster. Traditional grinding still makes sense for a high-volume single part that holds 0.0002- to 0.0003-inch tolerance and doesn’t require retooling. But flathoning should be considered when:
- Parts exceed the 0.0002-inch tolerance threshold.
- Retooling a variety of jobs is necessary. Flathoning, with the proper wheels on the machine, takes less than 5 minutes to retool, compared to several hours for traditional grinding machines.
- Components have uneven surface areas between the top and bottom.
- Lapping tolerances are required, but higher throughput is necessary.
Working nonferrous or nonmagnetic materials. - With lower abrasive costs, increased throughput, superior accuracies and reduced labor, the technology in flathoning can be the solution for many traditional grinding applications.
Related Content
Meeting Stringent Cleaning Goals With Modular Ultrasonic System
A knee implant manufacturer implements an advanced cleaning system that meets its tight cleaning requirements, including documenting, validating and tracing the entire cleaning process.
Read MoreParts Cleaning Sector Shifts Energy Toward Regulatory Changes
With changes in EPA regulations regarding the use of some popular cleaning fluids, cleaning suppliers and end users are readjusting business strategies and/or cleaning processes to meet new requirements.
Read More3 Common Filtration Questions Answered
Learn about the variety of filters for removing particulates from a cleaning fluid, how to determine cleaning fluid life and more.
Read MoreCool Clean’s Omega 1500 Provides Powerful, Portable Cleaning
PMTS 2023: By selecting the appropriate nozzle and making the necessary propellant pressure and temperature adjustments, the Omega 1500 can clean to a variety of surface cleanliness levels.
Read MoreRead Next
Do You Have Single Points of Failure?
Plans need to be in place before a catastrophic event occurs.
Read MoreA Tooling Workshop Worth a Visit
Marubeni Citizen-Cincom’s tooling and accessory workshop offers a chance to learn more about ancillary devices that can boost machining efficiency and capability.
Read More5 Aspects of PMTS I Appreciate
The three-day edition of the 2025 Precision Machining Technology Show kicks off at the start of April. I’ll be there, and here are some reasons why.
Read More


