Buelent Tasdelen learned about the advantages of piezoelectric sensors while working for global bearing manufacturer SKF AB. Since 2020, he has been business development manager for Kistler, a leader in piezoelectric measurement technology. The company specializes in dynamometers and equipment for capturing cutting forces in research and development applications. Tasdelen used his experience to develop new products that bring piezoelectric measurements into machining monitoring, such as a package consisting of a sensor, cable and a special process-monitoring system for automated manufacturing.
In this Q&A, Tasdelen speaks about the new solution and the advantages and limitations of piezoelectric measurements.
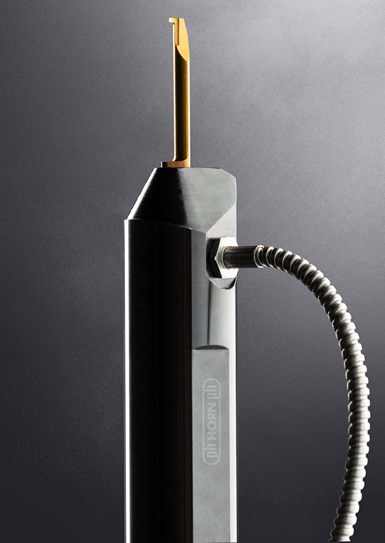
Toolholders, such as this from Paul Horn, with integrated sensors can monitor highly dynamic machining processes accurately. By integrating the sensor technology at the tool manufacturer, the installation effort for the user is reduced to a minimum. (Photo credit: Horn/Sauermann)
Q: You know machining from both the perspective of the manufacturer and supplier of measurement technology. What are the current challenges in the industry?
A: Like in most industries, companies must focus on their competitiveness now more than ever. Coming from the bearing industry, I know that the need to ensure the high quality of parts has been increasing. Automation is an important tool to achieve this and to become more efficient at the same time. At Kistler, we also see that our customers — across industries — feel increasing pressure to manufacture sustainably. One important lever to do this is to reduce scrap to the absolute minimum. In machining, the cutting tool plays a significant role in part quality. Changing it too late will lead to a higher scrap rate. Changing it too early, however, results in unnecessarily costs. The employee only has limited insight into the state of the tool, so production monitoring is a necessity.
Q: How do you see Kistler and yourself positioned in the field of process monitoring for machining processes?
A: Elaborate yet robust sensors are the basis for automated processes. As manufacturer of piezoelectric dynamometers, Kistler has vast experience in machining research and development. We also have a lot of experience with machine monitoring in other applications, such as injection molding and joining systems. It feels only natural to combine these areas and have our customers benefit from the synergies. What I brought to Kistler, coming from SKF, is the experience of moving from the research and development stage to the industrial application, and a wide and in-depth application knowledge, combining process and machine behavior competence.
Q: What are the advantages and limitations of piezoelectric measurement technology for machining processes?
A: The measuring principle is based on the piezoelectric effect. There is a special quartz crystal at the heart of every piezoelectric sensor, which emits a small electric charge when force is applied. Charge and force are in direct, proportional relation to each other. What’s more, the quartz is very stiff and has a high natural frequency. This enables us to measure a wide range of extremely dynamic forces accurately, which is a huge advantage for measuring machining forces.
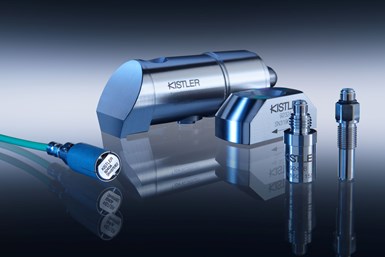
Strain sensors can be an appropriate solution to monitor forces indirectly by measuring the stresses on the machine structure. (Photo credit: Kistler Group)
In research and development applications, we mainly use dynamometers, which can precisely measure machining forces in all three dimensions. For monitoring purposes, however, you rarely need such an elaborate sensor. Also, the dynamometers are generally not cost effective for certain industrial applications and do not easily fit into production machines in which there is little space and machine constructional changes are not allowed.
By concentrating on the essentials, Kistler offers a cost-efficient alternative to dynamometers. We use comparatively simple and compact force or strain sensors which can be integrated inside toolholders or mounted on machine surfaces such as spindle housings. Our customers have been using these types of sensors in other process monitoring solutions for years. We are now building on this experience for machining processes.
Q: Dynamometers measure the absolute cutting forces. How does the measurement of machining processes with piezo sensors work?
A: In research and development applications in which dynamometers are being used, absolute force measurements are required. This means measuring and calculating all force vectors and torques by using several sensors. Conversely, for process monitoring, piezoelectric sensors usually enable users to draw conclusions about relevant process properties by monitoring the main force vector.
For instance, an increase in tool wear causes higher cutting forces or cutting dynamics. These can either be measured directly in the toolholder or on adjacent machine components via forces that affect the material. Thanks to the integration of force or strain sensors, users can compare process cycles and detect irregularities. The cooperation between tool manufacturer Paul Horn GmbH and the Kistler Group is an example of what such a solution can ultimately look like. Together, we offer ready-to-use sensory toolholders for turning applications. This reduces integration efforts to a minimum and ensures that the sensory tool systems have the same properties in use as the original non-sensory systems. During integration, the force sensor is positioned optimally in the force flow so that the data enables us to make relative statements about the force conditions in the process.
With such solutions and a connected Kistler Maxymos process monitoring unit, processes can be monitored and automated. In the event that the measured forces are outside the intended range or have other deviations, the process monitoring system can provide feedback to the machine or process control system. By doing so, the monitoring solution offers an easy way to obtain data for process optimization. It also helps to extend tool service life, minimize changeover operations, detect rejects at an early stage and avoid machine crashes as well as unplanned downtimes.
Q: In case process forces cannot be measured via the toolholder, you mentioned that a strain sensor on the machine structure might be an alternative. What characterizes the ideal position for the strain sensor to deliver exact measurements and how can users find it?
A: The best position strongly depends on the machine. You need to consider the total stiffness of the machine and the way the forces move from the cutting point into its structure. Another aspect is the behavior of the cutting forces, which depends on the direction of the cut and on what you are cutting. Luckily, our international service has many years of experience in installing these sensors. Combined with the expertise from our machining department, we can support each customer’s specific needs.
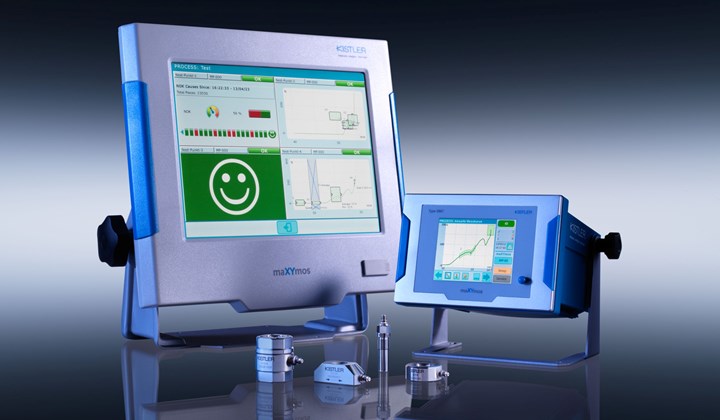
The Maxymos process monitoring systems can be integrated directly into the production line, enabling real-time monitoring and quality assessment of a specific manufacturing step in a production process. (Photo credit: Kistler Group)
Q: Besides tool wear, what else does the system monitor?
A: Monitoring the tool is our solution’s main focus. But there are, of course, other valuable side effects. For instance, the system can protect the machine even when it isn’t cutting; sometimes the tool moves without actually cutting during tool positioning with very high feed rates. The force of the machine might then lead to a collision of the tool with the machine, which results in severe damages. Our solution recognizes this fast movement and stops the machine before anything happens.
Another example: one of our customers recently noticed that the measuring signal was very small, much smaller than the defined window. There had to be something wrong. The company checked and found out that the dimensions of the parts that had been loaded were slightly off. In other words, monitoring systems are an indirect way of controlling the incoming and produced part quality. Therefore, other pre- and post-quality measurements in place can be reduced, thus lowering costs.
Q: Your system is not the first on the market to monitor machining processes. Can you tell us what differentiates the Kistler solution from other tried and tested options?
A: The biggest difference lies in the high frequency that is inherent to piezoelectric sensors. Strain-gage technology is another cost-effective and established option. However, there are shortcomings in capturing the high dynamics of many machining processes. A tool, of course, wears with time. Yet the moment it breaks might come very suddenly. Recently, a customer sent us some data and an image. The company saw that all of a sudden, and only for a very brief moment, the measuring curve exceeded the limit. It was just a small peak, after which the curve went back to normal. But since the alert went off and the machine stopped, they looked at the tool, and, indeed, it was chipped. In cases such as this, the piezoelectric sensor really plays out its strengths.

Buelent Tasdelen uses his experience from working in the bearing industry to develop new solutions that introduce piezoelectric measurements to machining monitoring. (Photo credit: Kistler Group)
Q: Machining is part of many manufacturing industries. Who would profit most from this solution and who wouldn’t?
A: With our first package consisting of a sensor, the monitoring system, cables and accompanying software, we focus on clients that produce small- to medium-sized parts, such as bearing components, automotive components, medical parts, small mechanical parts such as screws and watch components in mass production. A limiting factor here is cycle time. We can measure fast, but even a piezoelectric sensor has its limits. The age of the machine, in contrast, is never an issue. Of course, when planning a new line or buying new machines, including automation technology is the standard nowadays, and there will be room for measurement technology. But with our package, we can also retrofit older machines. Our solution is flexible and it does not matter which manufacturing execution system (MES) a company uses. The goal is to make the advantages of automation available at comparably low entry costs.
Q: What is the next step? Are you already planning to offer your solutions to clients that produce bigger parts as well?
A: Yes, we are already preparing a corresponding package. Another idea that we are working on is to make the system more intelligent and go beyond measuring and monitoring. In some specific cases, we already aim to also enable the system to compensate for certain errors of the machine, for instance by regulating the cutting speeds, feeds and cutting depths. This will enable our customers to achieve even better product quality.
Related Content
PMTS 2023 Product Preview: Toolholders
Learn about some of the latest toolholder solutions that will be on display at PMTS 2023.
Read MoreTips for Choosing the Right Toolholder for High-Speed Machining
Here is some advice for shops hoping to maximize their efficiency performing high-speed milling operations.
Read MoreFlexible, Quick-Change Tool Adapter System for Live Tools
The system significantly reduces inventory and changeover time for lathe users.
Read MoreTungaloy Grooving Toolholders Provide Stable Turning
TungHeavyGroove includes an enhanced insert clamping design for maximum tool rigidity.
Read MoreRead Next
5 Aspects of PMTS I Appreciate
The three-day edition of the 2025 Precision Machining Technology Show kicks off at the start of April. I’ll be there, and here are some reasons why.
Read MoreDo You Have Single Points of Failure?
Plans need to be in place before a catastrophic event occurs.
Read MoreEmerging Leaders Nominations Now Open
Here’s your chance to highlight a young person in your manufacturing business who is on the path to be a future leader moving your company forward.
Read More.png;maxWidth=970;quality=90)


.png;maxWidth=300;quality=90)


