Predicting Size Change from Heat Treatment
While a precise forecast of a steel part’s size change during heat treating cannot be expected, by considering potential factors, a heat treater can provide a reasonable estimate that can help the shop prepare for final machining operations.

In most situations, volumetric size change during heat treatment of steel cannot be accurately predicted. However, by considering the different variables involved, a heat treater can provide a reasonable estimate that can help the shop prepare for final machining operations.
One of the questions a commercial heat treater is most frequently asked is, “How much, if at all, will my part shrink or grow?” While the heat treater would love to be able to give a precise answer to this question, in most situations volumetric size change during heat treatment of steel cannot be accurately predicted (at least not accurately enough to allow for final machining and/or grinding to close tolerances prior to heat treatment).
The answer to the dimensional change question is extremely complicated and involves hundreds of variables. Heat treating can add its own set of unique variables as well that will affect part size change. While a precise forecast of a part’s size change cannot be expected, by considering each of these potential factors, a heat treater can provide a reasonable estimate that can help the shop prepare for final machining operations.
Estimating Size Change During Heat Treat
Heat Treating Steel Chart: Fig. 1. An Uddeholm data sheet shows that when D-2 tool steel, 3.15" x 3.15" x 3.15", is austenitized at 1,870 degrees F for 30 minutes and quenched in a vacuum furnace with 2 bar nitrogen overpressure, it grows in one dimension while shrinking in the other two.
Experimental work has been done on many materials to show the effects of heat treatment on size change. The effects are different for every material grade. Figure 1 shows how part size changes on a 3.15-inch cube of D-2 tool steel during hardening. Notice that the part size grows by 0.08 percent in one dimension, while shrinking in the other two directions. This graph demonstrates how knowing the part orientation from the mill-supplied bar is important when trying to plan for size change during heat treatment.

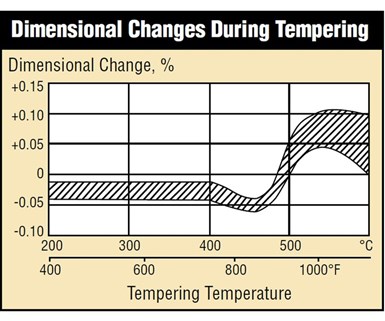
Heat Treating Steel Chart: Fig. 2. The dimensional changes on hardening and tempering should be added together. The minimum recommended machining allowance is 0.15 percent per side, assuming that stress relief is performed between rough and semifinish machining, as recommended. If not, machining allowances must be increased accordingly.
Figure 2 shows the dimensional change of D-2 tool steel during tempering. D-2 is a transformation hardening tool steel that requires both a hardening and tempering step during the heat treating process. The dimensional changes on hardening (Figure 1) and tempering (Figure 2) should be added together when trying to estimate total size change. Final part hardness is determined by tempering temperature. Figure 2 demonstrates why the hardness requested by the customer will have a drastic affect on size change.
In another example, according to a Latrobe Steel data sheet, 17-4 precipitation hardening stainless steel can typically be expected to shrink by 0.0004 to 0.0006 inch/inch (size change per unit of length) when aging from Condition A to Condition H-900 and 0.0018 to 0.0022 inch/inch when aging from Condition A to Condition H-1150.
Communication with the heat treater, experimentation and process control can help to provide fairly accurate, consistent/repeatable size change estimates.
Consistency is Key
Recently, a manufacturer embarked on a project to help minimize its post heat treatment machining costs. The company is a tooling manufacturer that designs and supplies round dies made of 440C stainless steel in sizes ranging from 2-inch diameter × ½-inch thick to 8-inch diameter × 1-inch thick. The company’s first step was to meet with the heat treater to discuss its needs. Discussion during the meeting helped to clarify that the amount of size change during heat treatment was not important. What was important was that it needed to be consistent part-to-part, load-to-load and batch-to-batch.
The manufacturer and the heat treater proceeded to list all of the variables that would affect size change during heat treatment. From that list, a shorter list was made of variables that could be controlled during the process. These factors included the steel supplier (both mill and service center), chemistry, condition of the steel, manufacturing sequence, heat treatment and required hardness.
Within the heat treatment process, the heat treater committed to precisely controlling the parameters for load size, load configuration (spacing/racking/fixturing), ramp rates, soak times, preheat temperature, austenitize temperature, quench rates and tempering temperature.
By controlling all of these variables, and repeating the process on a weekly basis, the tooling manufacturer is now able to predict the size change during heat treatment of dies (all sizes) to within ± 0.001 inch, which provides a significant time and cost savings in post heat treatment processing.
Related Content
Important Machining Factors of Carbon Steels
Learn the factors that contribute to carbon steels and their machinability as well as the 1214 steels, 1215 steels and 1018 steels, other grades, and more.
Read MoreWhen a CNC Turn-Mill Doesn’t Turn
A shop in Big Sky Country uses a B-axis multitasking machine to produce complex, prismatic medical parts that require no turning complete from barstock.
Read MoreMicro-Drilling: 9 Questions to Answer Before Beginning
Applications for micromachining continue to grow. Successful machining with small tools calls for a different set of process skills on the shop floor.
Read MoreVideo: Why a Production Machine Shop Started a Baseball Bat Company
A 153-year-old manufacturer of precision, metal pins recently started a side business creating custom wooden baseball bats. The reasoning behind establishing this new company is intriguing, as is how it has helped create a stronger bond with the local community.
Read MoreRead Next
Craftsman's Cribsheet: Distortion in Heat Treatment
There are two kinds of distortion that can result from a heat-treating process in steel: dimensional distortion and shape distortion.
Read MoreVariables in Heat Treating
Changes in dimensional sizes are a big concern for parts with tight tolerances. This complicated issue involves many variables. When heat treating is brought into the equation, the picture can become even blurrier.
Read More5 Aspects of PMTS I Appreciate
The three-day edition of the 2025 Precision Machining Technology Show kicks off at the start of April. I’ll be there, and here are some reasons why.
Read More


.jpg;maxWidth=300;quality=90)


