Tooling Up For Hard Turning
Hard turning isn’t hard to do. However, it does require an understanding of the process dynamics and a systematic approach to the tooling involved. This article looks at how proper preparation will deliver consistent, predictable hard-turning results.
Think of hard turning as another process arrow in your quiver. When applied correctly, it can produce machining results akin to grinding without the need to grind and at speeds significantly faster than grinding. When grinding must be done, hard turning can serve as an efficient pre-grind process that removes the majority of stock so the grinder only needs to finish the part to size.
Because hard turning is similar to “soft” turning, shops looking to try the process will find it creates minor impact on the shop floor once a few operational changes are made. For example, sometimes the same machine tool can be used for both soft and hard turning.
The overarching difference between soft and hard turning is hard turning requires a setup that provides maximum dynamic stiffness. The critical elements include the machine tool, cutting tool, cutting toolholder, coolant delivery system (when cutting wet), workholding and accuracy.
To find out more about the operational issues involved in hard turning, we talked to Tom Sheehy, applications engineer, for Hardinge Inc. (Elmira, New York). Tom has worked in the trenches of hard turning for many years and has learned his lessons through experience.
What Is Hard Turning?
Generally, hard turning is applied to workpieces that are 45 Rc and higher. In practice, hard-turned work is typically found in the 58 to 68 Rc range. Before the development of hard turning, grinding was necessary to cut workpieces in a hardened state.
When hard turning is correctly set up and executed, it can produce surface finishes of 0.00011 inch and roundness values of 0.000009 inch. Workpiece size control ranges of 0.00020 inch are achievable. These precision specs can be done at production rates that are 4 to 6 times faster than comparable grinding
processes.
Benefits of hard turning that shops should consider include reduction of operational steps by dropping parts complete off a single machine and eliminating or reducing grinding operations from the production process. Hard turning enables shops to accomplish one or both of these goals.
Raw Materials
Often, hard-turned materials include tool, bearing, stainless and case-hardened steels, as well as Inconel, Hastelloy, Stellite and other exotic metals. For production applications, it’s important to ensure that the hardening process used produces a variance of no more than two points on the Rockwell scale.
Until recently, the majority of hard-turning applications involved machining the blank in a green state, leaving 0.005 to 0.015 inch of stock on the surface to allow for heat-treat-created warpage. After heat treating, the part is hard turned to finish size. This process eliminates grinding, but still requires handling the part at least twice.
“In the last year or so, we’ve helped some customers develop processes that allow them to machine parts complete using through-hardened barstock,” Tom says. “In this application, the shop rough and finish turns, drills and cuts off parts from barstock hardened between 52 and 55 Rc. They do this by using 3-foot bars because of length restrictions from the heat-treating facility, which can only handle lengths up to 3 feet. Our experience has been that hardened stock above 1.5 inches in diameter generally doesn’t require straightening. Smaller diameters may need straightening because they run at higher rotational speeds and could induce chatter.”
Tom adds, “Two important caveats for processing a workpiece complete from barstock is the need for a subspindle or pickoff spindle and use of high-pressure coolant. The pickoff or subspindle is necessary as a support for cut-off operations. Without it, during parting, the workpiece will break the bar off prematurely with the potential of damaging the machine and a part. High-pressure, through-the-tool coolant should be used for successful drilling. High-pressure coolant is also necessary for the cut-off operation, and flow should be directed into the cutting tool/workpiece interface.”
Tooling Considerations
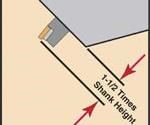
Most shops’ best practices recommend that tooling overhang be kept to a minimum for almost any metalworking operation in order to minimize chatter. This close coupling of the cutting edge, toolholder and axis slide is critical for successful hard turning. According to Tom, “The shorter the distance from the turret to the tool tip, the better.” A rule of thumb he recommends is keeping overhang to no more than 1.5 times the tool shank.
The optimum cutting tool material for hard turning is CBN. Although it is relatively expensive compared to other materials such as carbide, it performs well in interrupted cuts and offers long tool life for continuous turning operations. It also delivers tolerance and surface finishes that are second only to grinding.
Ceramic inserts can easily perform hard turning and the associated cost is closer to that of carbide, but the material is not as tough as CBN and tends to be easily affected by thermal shock. It is generally applied in dry cutting operations and on applications with tolerances no less than 0.001 inch.
Solid titanium carbide (cermet) performs well for continuous turning operations, especially on case-hardened workpieces. It doesn’t wear as well as CBN, but it tends to wear evenly without a tendency to break.
Tool geometry is dictated by the material. Hard turning generates higher heat and cutting forces than soft turning. Negative rake tooling has an advantage in hard turning because it presents a stronger cutting edge. However, it consumes about 20 percent more horsepower than positive rake tooling. The idea is to use a geometry that is best matched to the machine tool that will be used for hard turning.
Like grinding, hard turning in some materials can produce a “white layer” or amorphous zone on the surface of the workpiece. This surface defect is invisible to the eye and must be measured using instruments. The white zone usually forms in hard turning because the cutting tool is dull and, hence, delivers too much heat to the workpiece rather than the chip. Checking parts periodically for white zone formation can serve to help calculate a tool life guide in production.
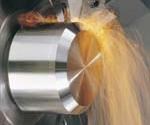
Coolant, applied with a mist or with high pressure, creates a longer tool life. Oil is not used in hard turning because of the cutting zone temperatures (1,700° F). Chip checking is an accurate way to determine if the process is in balance. In continuous cutting, chips should flow like a ribbon and glow orange. When cool, if the chips can easily be crushed in the hand, the correct amount (80 to 90 percent) of heat is being carried by the chip.
“We have had success with cryogenics applied to ceramics,” Tom says. “Hardinge has a joint venture with a company called Air Products (ICEFLY) to use liquid nitrogen applied directly to ceramic inserts at -275° F. This process freezes the insert, making it tougher, so it is able to compete in performance with CBN.”
Tooling is vital to the successful use of hard turning. It’s important to note that developments are ongoing in this area; therefore, the best advice to shops considering hard turning or those already doing hard turning is to periodically ask respected vendors about new developments.
OD Cutting
A key consideration for any hard-turning application is the length-to-diameter ratio. Tom puts it this way: “If you have a shaft 0.5 inch in diameter and 10 inches long, grind it. On the other hand, if you have a part 10 inches in diameter and 0.5 inch long, hard turn it. The key is deflection, and that’s where spindle stiffness, bearing condition and spindle overhang all play a role in successful hard turning. We generally look at a 3:1 or 4:1 ratio without a tailstock and 6:1 up to 8:1 with a tailstock.”
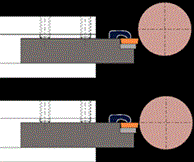
For OD cutting tool setup in hard materials, the center line position is very critical for accurate results. The tool alignment should range from on-center to a little below center. In OD hard turning, a tool should never be fed above the workpiece center line. The rotational direction of the part should direct cutting forces toward the bed of the machine tool. To help direct hard-turning forces into the mass of the machine tool, cutting direction for OD tools should be at 90-degree angles to the workpiece surface.
For cut-off operations in hard materials, Tom has had success using a deep grooving tool with a CBN tip. “To preserve tool life,” he says, “when parting from a solid bar, we might feed the CBN tool down to 0.200 inch, and as we lose surface speed near the center line, then we come in with a carbide tool to finish the cut-off.”
ID Cutting
Bearing in mind that chatter is the enemy of hard turning, boring operations require adherence to length-to-diameter ratios. In hard turning, forces are increased. In an ID cut, torsional forces try to twist the bar in its holder while tangential forces try to bend the bar away from the work.
To accommodate these forces, especially tangential forces, the boring bar should be set on-center or slightly above center line. In doing this, the bar is allowed to counter the effect of the tangential forces trying to deflect it.
Reduction of these forces can be accomplished using positive rake insert geometry and sharp, 35- to 55-degree inserts with a small nose radius. Further, the depth of cut (two passes instead of one) as well as the feed rate can be reduced, and the spindle speed can be increased.
“Boring in hardened materials, we find best results in a 3:1 length-to-diameter ratio,” Tom says. “The outside envelope, while still holding good finish and dimension, would be about 5:1.” Here again, however, boring bar developments are ongoing, so trying new toolholders as they become available may improve hard boring results.
The Purpose Of Hard Turning
Hard turning has been around for a while, and in numerous applications, it has proven to be a viable and cost-effective processing technique. Within its application range, hard turning can replace or augment grinding and help shops migrate toward the goal of streamlining manufacturing by eliminating or consolidating manufacturing steps.
“In general, a shop has the best chance of successful hard turning if it picks the right workpiece, uses a good, rigid machine tool and follows the basic setup considerations,” Tom explains. “Any deviations from these will simply produce less-desirable results. You can hard turn on a 25-year-old flat bed lathe, but holding accuracies and surface finishes will be compromised.”
Grinding will always have its role in metalworking, but the idea behind hard turning is an alternative to the investment in capital equipment and skills associated with the process. A turning shop that can use hard turning as an extension of soft turning, in the right applications, can perform more value-added service to its customers. That’s never a bad idea.
Related Content
Keeping Watch on Small Parts
From watch parts to exotic medical applications, this shop takes on the world of micromachining.
Read MoreCAM-Driven Lathe Questions
There can be hidden issues using legacy cam-driven lathes that can be overcome using new CNC technology. Here are three to keep in mind.
Read MoreLaser Technology "Turns" into a Turning Tool
This new technology uses a laser to act as a cutting tool to "turn" parts from solid barstock. This high-speed precision turning machine is especially useful for micromachining, enabling high accuracy for small, complex parts that are often delicate and difficult to machine when implementing conventional turning processes.
Read MoreVideo: Why a Production Machine Shop Started a Baseball Bat Company
A 153-year-old manufacturer of precision, metal pins recently started a side business creating custom wooden baseball bats. The reasoning behind establishing this new company is intriguing, as is how it has helped create a stronger bond with the local community.
Read MoreRead Next
Do You Have Single Points of Failure?
Plans need to be in place before a catastrophic event occurs.
Read MoreSeeing Automated Workpiece Measurement in Real Time
User-friendly inspection software for CNC machining centers was shown at IMTS 2024 monitoring measurements between and after machining while performing SPC based on recorded measurement values.
Read More5 Aspects of PMTS I Appreciate
The three-day edition of the 2025 Precision Machining Technology Show kicks off at the start of April. I’ll be there, and here are some reasons why.
Read More


