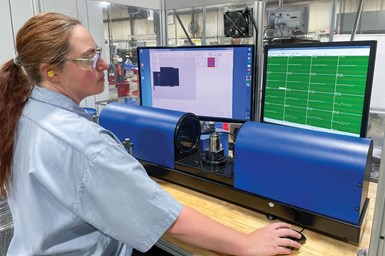
In the case of Mitotec Precision, automated vision inspection systems such as this help alleviate measurement bottlenecks created when CNC multi-spindles significantly increase production volumes the shop must handle. (Photo credit: PM)
Some shops view their quality control department as a necessary evil that eats into the company’s profits. I’ve had QC personnel tell me they feel like manufacturing’s red-headed stepchildren. One QC person even told me his department had been compared to police internal affairs. Ouch.
Machine tools make chips, meaning they make money. Adding faster, more advanced machining equipment and investing in new technologies can improve production and boost profits. The return on investment for those purchases often can be easily measured. Conversely, investing in inspection equipment is a harder pill to swallow, in part because it’s difficult to quantify how improving measurement capabilities improves the overall process.
Perhaps it’s time to flip the script. Adding modern measurement equipment and rethinking QC strategies can ultimately minimize the QC department’s seemingly adverse impact on the bottom line by giving inspection personnel, as well as machine operators, the tools they need to better do their jobs. This is especially important if CMM measurement has become a process bottleneck.
For instance, CMM software is becoming more intuitive to use, meaning it’s possible that machine operators can check some parts on a CMM by executing an existing measurement program, freeing QC personnel to tend to other duties.
It also helps to think outside the box to simplify and streamline part measurement. For example, PDQ Inc., a Rocky Hill, Connecticut, shop I wrote about a few years ago, developed an interesting lights-out approach to CMM inspection, leveraging CMM and quick-change fixturing technologies to enable unattended measurement of multiple parts.
Shopfloor CMM technology also is becoming more advanced, meaning machine operators can accurately measure parts right at the machine. First-article inspection is still likely to require measurement on QC’s CMMs, but a shopfloor CMM can reduce the number of subsequent trips to QC as a process is dialed in or maintained.
Noncontact vision systems can significantly reduce measurement time. For example, although Mitotec Precision in Necedah, Wisconsin, has benefited from the boosted machined parts production and other advantages its recently added CNC multi-spindles offer, that higher production from two individual machines has caused bottlenecks with regard to part inspection and cleaning that it has worked to open. This is where its automated vision systems shine. “We certainly don’t want to have to halt production on a CNC multi-spindle that might be dropping completed parts every 8 seconds to manually inspect them at specific intervals throughout a job,” says Clinton Pouillie, general manager. “Fast, automated inspection processes enable us to satisfy quality reporting requirements while keeping these machines up and running.”
Finally, on-machine probing is valuable for speeding setups, and many shops use their probes for that reason. However, fewer use the probes for in-process part measurement. A part that fails post-process inspection by CMM or gaging typically results in rework, repair or scrap costs. In-process inspection via a probe with the part still fixtured in the machine offers the opportunity for process feedback and correction to avoid part rejection.
In any case, when employees see that you’re investing in advanced measurement tools and processes that will make their lives easier, they’ll be more apt to look for other ways to become more efficient to minimize the cost of inspection.
Related Content
Precision Machining Technology Review: December 2023
Production Machining’s December 2023 technology showcase includes some of the latest technology from Sandvik Coromant, Nikon Metrology, The L.S. Starrett Co., Walter USA, Kennametal and SolidCAM.
Read MoreZoller Event Shines Lights on Shopfloor Connectivity
The company’s open house event highlighted smart manufacturing solutions from CAM to part.
Read MoreReplace Repetitive Measurement With DIY Robotic Automation
After minimal training, a shop can learn how to use this robotic inspection system configured for a shopfloor application to supersede repetitive, time-consuming, high-mix gaging processes. It can then be redeployed for another application somewhere else in the facility.
Read MoreThe Value of CMM Controller Retrofits
In this case, new controllers for two coordinate measuring machines — one 26 years old — with new programming software offers the possibility to enable multisensor inspection of critical, turned aerospace components.
Read MoreRead Next
Do You Have Single Points of Failure?
Plans need to be in place before a catastrophic event occurs.
Read More5 Aspects of PMTS I Appreciate
The three-day edition of the 2025 Precision Machining Technology Show kicks off at the start of April. I’ll be there, and here are some reasons why.
Read MoreA Tooling Workshop Worth a Visit
Marubeni Citizen-Cincom’s tooling and accessory workshop offers a chance to learn more about ancillary devices that can boost machining efficiency and capability.
Read More


.jpg;maxWidth=300;quality=90)


