Expanding On Honing Options
While available both in horizontal designs and vertical designs, three different machining methods are used for honing operations. The most common method, effective on a range of diameters and materials, uses multistroke machines to hone with one or more abrasive stones attached to a single rotating spindle.
Honing is often performed as a secondary operation to accurately size and finish bores. A rotating tool, using either a diamond-coated sleeve or stone abrasive, is used to remove metal from an interior surface to create a specific diameter and cylindricity. Compared to internal grinding, honing typically involves low cutting pressure and low velocity. Stock removal in rough honing can be 0.010 inch or more, with finishing removing 0.001 inch or less.
The length of stroke and the size of the abrasive give honing the advantage over internal grinding for workpieces with a length-to-diameter ratio of 2:1 or more. The tool and the abrasive itself determine the accuracy of the operation, often with tolerances less than 0.000040 inch.
While available both in horizontal designs (for small and lightweight workpieces) and vertical designs (for larger-diameter, heavy parts), three different machining methods are used for honing operations. The most common method, effective on a range of diameters and materials, uses multistroke machines to hone with one or more abrasive stones attached to a single rotating spindle. This process is able to remove material quickly while providing highly accurate finish diameter, cylindricity and surface finish.
In place of an oscillating tool, Single Stroke honing (a technology developed by Sunnen Products Company, St. Louis, Missouri), uses a tapered arbor assembled with a sleeve plated with an abrasive. The tool hones the bore, with the positioning of the sleeve on the tapered tool arbor determining the diameter. While these operations are limited by the amount of material removal per pass of the tool, they provide high production rates with rotary table index machines and promote long tool life. The process does not generate a crosshatch pattern like multistroke honing, but leaves a uni-directional spiral pattern in the bore. The crosshatch pattern of multistroke honing has been found to work better in parts used for bearing surfaces, particularly for needle and roller bearings.
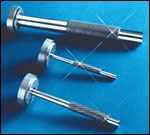
Krossgrinding is a third method of honing, also developed by Sunnen. This process combines benefits of both single and multistroke honing and features an expanding tool and long tool life. The split tubular design has a plated diamond abrasive on the outer surface with a tapered inside surface. A wedge is precisely moved inside the tool to expand the plated diamond abrasive. Standard tooling allows bores from 0.236 inch to 1.260 inches, operating at speeds of almost 300 sfm. Smaller and larger sizes are also available.
Advantages
In the Krossgrinding process, the tool rotates, and the workpiece, with the freedom to center itself by floating, follows the existing bore centerline, producing the roundness of the diameter. Diametric straightness of the bore, then, is produced by the reciprocation of the tool, with constant cutting pressure applied throughout the contact area. With CNC, the expanding mandrel increases the diameter of the tool in the bore, in programmable increments of one millionth of an inch. Positioning is controlled by a motor-driven ballscrew with encoder feedback.
Stroke and rotation of the tool are also programmed into the CNC. The angle of the crosshatch pattern left by the honing process is determined by these settings. This pattern is often desired because it provides an ideal surface for lubrication to be channeled effectively between the bore and its mating part.
The expanding tool design includes a mandrel that consists of a sleeve with a horizontal slit. The sleeve is electroplated with diamond grit, one grain thick. Depending on surface finish requirements, rough, semi-finish or finish grits can be specified. The diamond-plated layer does experience some slight wear that must be compensated for. After initial setup, the CNC can be set to automatically adjust for this wear. Bore size and taper gage feedback can also be programmed into the CNC. The expansion range of the tool varies by its size.
Krossgrinding is promoted as a method to provide precise size and bore geometry control with relatively easy setup. With little honing experience, operators can still produce high-tolerance parts continuously. This method is often used to replace internal grinding and manual honing operations because of production volume, cost advantages and precise size control.
Delivery Systems
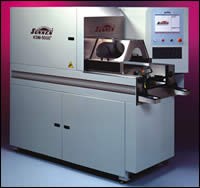
Sunnen offers a line of honing systems to perform the Krossgrinding operations. One model, a vertical honing system, is designed for high-production bore sizing and uses components such as columns and spindles to accommodate individual application requirements. As many as three or more columns can be combined to create a system for both rough and precision honing.
Another model, the KGM 5000 Krossgrinding system, for low- to mid-production applications, is designed for consistent bore size control and holding tight tolerances. The horizontal, single-spindle system uses both Krossgrinding, plated diamond tooling (for higher accuracy and long tool life) and TurboHone single-stone or multistone tooling (for fast stock removal).
It Works
One particular application where Krossgrinding technology has an impact is in medical component manufacturing, where it can help obtain the extreme bore-sizing accuracy and surface finish necessary for medical devices. Consistent with the requirements of medical components, the honing process used with the KGM-5000 system does not generate intense heat, thus improving bore tolerances and eliminating metallurgical heat damage to the parts. The system is capable of holding straightness and roundness tolerances to within 0.000010 inch in a production environment, thus delivering the accuracy needed. The KGM is also capable of honing extremely hard or exotic materials common in the medical industry.
Read Next
5 Aspects of PMTS I Appreciate
The three-day edition of the 2025 Precision Machining Technology Show kicks off at the start of April. I’ll be there, and here are some reasons why.
Read MoreEmerging Leaders Nominations Now Open
Here’s your chance to highlight a young person in your manufacturing business who is on the path to be a future leader moving your company forward.
Read MoreA Tooling Workshop Worth a Visit
Marubeni Citizen-Cincom’s tooling and accessory workshop offers a chance to learn more about ancillary devices that can boost machining efficiency and capability.
Read More


.jpg;maxWidth=300;quality=90)


