Fast Inspection Adds Dollars to the Bottom Line
Putting out good products and being profitable are what it’s all about in the machining business.
Putting out good products and being profitable are what it’s all about in the machining business. Companies strive to become more efficient with their resources, always watching the bottom line. But what happens when quality control becomes the bottleneck that is wasting time and money, pinching an already thin profit margin? Many precision machined part manufacturers find this to be the case, as did American Turned Products (Fairview, Penn.), until the company started using the OASIS inspection system, manufactured by George Products Company.
American Turned Products (ATP) is a third generation family-owned business that started in Erie, Penn., in 1984. Throughout the past 26 years, ATP expanded its operations to two plants in Erie County, Penn. As a high volume contract precision machining manufacturer, ATP specializes in the machining of millions of complex components used in the automotive, fluid power, aerospace, medical, and other diverse markets.
“We operate the most sophisticated machines in the world. All of our equipment is designed to be flexible to allow us to serve diverse markets.
We can supply parts for any number of different industries and be cost competitive,” says ATP’s CEO Scott Eighmy. And, Harry Eighmy, COO of ATP, is well aware of what it takes to be successful in today’s business climate. “Lean manufacturing, process controls and mistake proofing allow us to exceed our customer’s demands. We look for any opportunity to take cost out of what we are doing and share those savings with our customers.”
Julian Torres, quality manager for ATP, knows that machine downtime means losing money. “If our machines aren’t running and producing quality parts, then we’re directly losing the income potential and profits from the machine downtime,” Mr. Torres says. “When we initiate a product change-over on a machine, the longer it takes, the more money it costs. One of our biggest factors in reducing setup time is minimizing time required to verify the change-over.” Quality control verification is required to approve the first-run parts before production can start, so a slower inspection process can mean dollars down the drain, he adds.
“But that’s not the only place where inspections can cost us money,” Mr. Torres continues. “It’s also with in-process inspections performed by our machine operators.” The longer it takes to complete an in-process inspection, the higher potential for larger quality spills because of operator’s attention away from the actual machining process. Clearly, faster inspection means more in-process inspections can be done during a shift, allowing processes to be monitored much closer, thus minimizing our risk for producing non-conforming parts and having to perform a potential 100-percent sort.
Nobody likes to sort buckets full of parts (good from bad), but most shops have to do it every once in a while. Time is of the essence when sorting parts, as it is with most things in a fast-pace production machining environment. Consider the fact that while inspecting parts, employees are taken away from other critical tasks. For example, if a machine operator is taking time for slow, in-process inspections, he doesn’t have that time to monitor the process of making chips on his machine. In some cases, ATP found that operators simply couldn’t keep up with the time demands of slow inspection processes while running its machines.
The company needed a solution to its slow inspection problem: It needed a fast inspection system that is also accurate, repeatable, saves money and ensures quality parts. It found that solution in the OASIS inspection system from George Products Company.
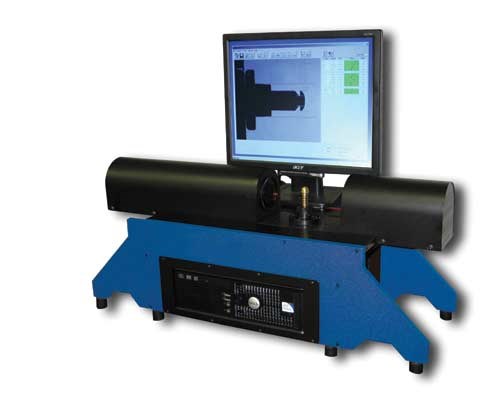
The OASIS is a machine vision system that creates a shadow of small parts and then measures every dimension on that image at the same time, all to a repeatable accuracy of ± 0.0001 inch. Measurements are instantly compared against process control limits and tolerances, with an immediate visual display of whether any and all dimensions are good, bad or showing a warning level. With a single button click, all the data can be exported to SPC, saved on the OASIS’ on-board computer or imported into an Excel inspection report.
The inspection system is driven by its own software that powers the system to operate at very high inspection speeds. That software controls the strobe light source, which creates the part’s profile shadow, in micro-second light pulses that stops motion. At a strobe rate of 6 bursts per second, synchronized with the shutter on the digital camera that pulls the image into the software, the result is the system’s ability to measure all external dimensions in less than a second, all without the part ever needing to stop.
“It truly is lightning fast,” says Erik Adams, sales manager at George Products Company. “You set the part down, and as soon as you get your hand out of the way, the OASIS has already finished measuring every dimension.” The system is programmed to inspect a part by telling it which dimensions are to be checked and setting the limits and tolerances. Once completed, the program is saved in the system and can be called up at any time to inspect the parts.
“Programming is simple, fast and extremely user friendly,” Mr. Adams adds. “In the time it would take you to measure one part the old fashioned way, you could have programmed it in the OASIS. After that, you can measure parts faster than you can make them.”
With more efficient use of quality control time, fewer rejects, less machine downtime, improved processes and additional business from customer satisfaction, ATP found the return on investment in the inspection system was not a matter of years, but the ROI was more like months, maybe weeks, according to the company.
The inspection system addresses the bottleneck of inspection created by conventional quality control methods on precision machined components that have numerous outer dimensions by performing numerous inspections within a matter of seconds. “This allows our operators and other quality personnel to quickly and accurately complete necessary inspections during change-overs, as well as in-process inspections,” Mr. Torres explains. “Quick, approved change-overs save time, which allows our machines to keep running and create value. These days, companies are looking to do more with less, and the system allows us to do exactly that.”
He adds, “One simple example is a part that would require five manual gages to perform all outside measurements; the OASIS now does it all in a second, which really helps minimize downtime.”
According to ATP, the benefits of fast in-process inspection are more parts can be checked in less time, with fewer resources. This can be taken all the way to reaching 100-percent inspection. The result is fewer rejected parts produced, machines that run with more uptime, and satisfied customers, which ultimately help our business grow.
In addition to all the cost benefits of speed, Mr. Torres has also seen an increase in the accuracy of the company’s inspections. “Subjectivity of manual gaging is eliminated when using the OASIS system, taking the appraiser variation down to zero in a typical gage R&R study,” he says. “Anybody can use it and expect to get reliable numbers.”
The impact of adding the OASIS inspection system to ATP has been very positive, and it’s been well received by management, inspectors and operators.
It quickly became obvious that the company could greatly benefit from another OASIS for its other facility, so it purchased another system and put it right to work.
Related Content
PMTS 2023 Product Preview: Measurement
Learn about some of the latest measurement solutions that will be on display at PMTS 2023.
Read MoreHow Well do You Know Granite Surface Plates?
Here are some tips for choosing, maintaining and customizing a granite solution that will best meet your shop’s particular inspection needs.
Read MoreThe Value of CMM Controller Retrofits
In this case, new controllers for two coordinate measuring machines — one 26 years old — with new programming software offers the possibility to enable multisensor inspection of critical, turned aerospace components.
Read MoreZoller Event Shines Lights on Shopfloor Connectivity
The company’s open house event highlighted smart manufacturing solutions from CAM to part.
Read MoreRead Next
Taking No Chances With Quality
A shop's good reputation is hard to build and easy to loose. Consistent quality is key to keeping customers. In its 30-plus year history, this Chicago specialty grinding job shop has never taken quality for granted.
Read MoreSeeing Automated Workpiece Measurement in Real Time
User-friendly inspection software for CNC machining centers was shown at IMTS 2024 monitoring measurements between and after machining while performing SPC based on recorded measurement values.
Read More5 Aspects of PMTS I Appreciate
The three-day edition of the 2025 Precision Machining Technology Show kicks off at the start of April. I’ll be there, and here are some reasons why.
Read More


.jpg;maxWidth=300;quality=90)


