Finding Significant Increases in Honing Accuracy
Single Stroke Honing is a single-pass process that sizes and finishes a bore with a series of progressively larger superabrasive tools adjusted to a preset diameter.
Single Stroke Honing is a single-pass process that sizes and finishes a bore with a series of progressively larger superabrasive tools adjusted to a preset diameter. The honing tools rotate while passing through the bore one time and then withdrawing.
Sunnen Products Company has introduced this process, achieving cylindricity/straightness less than 2 microns in bores up to 10 times longer than diameter. Developed by Sunnen’s Swiss subsidiary, Sunnen AG, to meet leak-free requirements for high pressure hydraulic systems, the high precision, single-pass process is almost 200 percent more accurate than other methods used for long, small-diameter, tandem bores, according to the company.
“European mobile equipment hydraulic systems established this cylindricity specification to reduce internal leaks and achieve higher valve performance,” says Juerg Huber, managing director, Sunnen AG. “The precise fit between the sliding spool and valve body maintains the internal seal in this area. Precision cylindricity and straightness in this bore ensures uniform clearance between the moving parts from top to bottom in the valve, allowing free movement of the spool, without leakage around it.”
The Cylindricity Tolerance
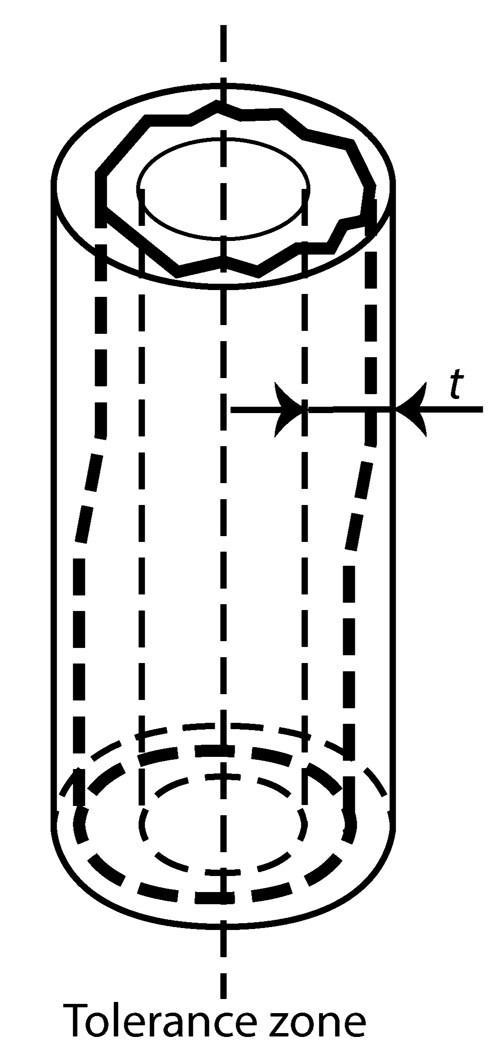
Cylindricity is a function of overall roundness, straightness and taper. It can be described as the condition of a bore in which all points of the surface are equidistant from a common axis. The longer the bore, the harder it is to achieve a low straightness value and, therefore, a low cylindricity value. The cylindricity tolerance can be defined as the allowable difference in radius of two coaxial cylinders that encompass all the bore’s data.
Maintaining Stability
The machine’s servo-controlled stroking system provides flexibility with adjustable speed and various feed profiles, such as pecking, short stroke, dwell, and so on. Column feed and spindle speed can be varied throughout a cycle using the machine control.
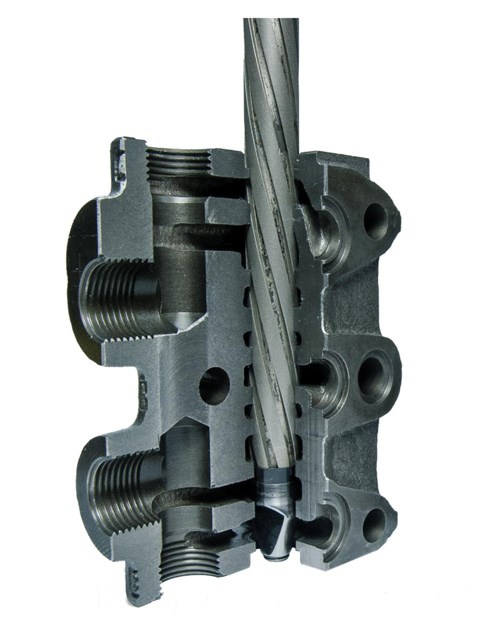
The honing tool consists of a tapered arbor with an expandable diamond-plated abrasive sleeve mated to it. The external profile of the sleeve is customized for the application. Single-pass honing is ideally suited for solid bore parts with L/D (length/diameter) of 1-to-1 or less. Parts with much larger length-to-bore ratio can be honed under certain circumstances. Bores that have interruptions allow better chip flushing and reduce the load on the abrasive sleeve. In the case of cast iron valve bodies, bore length-to-diameter ratios of 10 or larger can be successfully single-pass honed.
“Single-pass honing is a stable, high production process that can achieve 1-micron cylindricity in a short bore—one with L/D less than 1—assuming the part has a sufficiently rigid wall,” Mr. Huber says. “However, as the bore length increases, it becomes more difficult to achieve good straightness and cylindricity. Among other reasons, the honing tool’s sizing land tends to follow the bore. A typical part suitable for this process might have a 16-mm bore, more than 160 mm long, with 11 lands. This type of part can now be honed to less than 2 microns cylindricity, less than 2 microns straightness and 1 micron roundness.”
The process utilizes a combination of proprietary tool processing, toolholding, workpiece fixturing and process parameters, without sacrificing cycle time.
Machine Details
Sunnen offers this honing method on three different VSS-2 Series models that incorporate as many as six spindles to progressively size and finish part bores. The machines are designed for precision sizing of bores 3.9- to 50-mm (0.149- to 2.0-inch) diameter in stamped parts, hydraulic valve bodies, gears and sprockets, parking pawls, rocker arms, turbocharger housings and similar parts. Ideal materials include cast iron, powdered metals, ceramic, glass, graphite, and other free-cutting materials.
The VSS-2 features accurate spindle alignment, combined with flexible, easy-to-use controls. Spindles are factory aligned independently for precision centering over the tooling plate to produce better bore geometry than possible when using an “average” alignment for all the spindles.
The machine utilizes a spindle carriage with a 724-mm (28.5-inch) stroke and as high as 105-mm/sec (250-ipm) stroking speed for increased flexibility with a variety of parts and tooling combinations. The servo-powered stroke system provides process flexibility and is hand-wheel-controlled for quick setup.
The menu-driven touchscreen control allows the column feed and spindle speed to be easily varied throughout the cycle. Process flexibility is enhanced by the use of six available profiles, including pecking, short stroke and dwell, which are easily added to a setup. More than 100 setups can be stored. Additional I/O and memory are standard for integration with auxiliary equipment, such as robots or part loaders.
The three models include the 84 (with eight stations and four spindles), the 86 (eight stations, six spindles) and the 64 (six station, four spindles), designed to meet various mid- to high-production needs. Spacing between spindles is 190 mm (7.48 inches). The 7.5-kW (10-hp) spindle drive provides a speed range of 100 to 2,500 rpm.
When properly applied, this quick, cost-effective method provides a precise bore size, geometry and surface finish. Parts made of cast iron, powdered metals, ceramic, glass, graphite and other free cutting materials are ideal for the process. Single-pass bore sizing is also appropriate for splined bores or long L/D ratios as long as cross holes or other interruptions are present to allow chip flushing.
Read Next
Tool Feed Technology Enhances Production Honing
Nothing throws a wrench into a production machining operation like variation in the incoming parts.
Read MoreEmerging Leaders Nominations Now Open
Here’s your chance to highlight a young person in your manufacturing business who is on the path to be a future leader moving your company forward.
Read More5 Aspects of PMTS I Appreciate
The three-day edition of the 2025 Precision Machining Technology Show kicks off at the start of April. I’ll be there, and here are some reasons why.
Read More


