In-Machine Gaging Automates Part Inspection
SPC Innovations' line of in-machine gages may provide an automated solution to some of the issues with post-process inspection.
Inspecting machined parts is a critical function in the machine shop. It’s also a nuisance and represents additional manufacturing cost in labor, equipment and time.
All too often the gaging and inspection function is a post-process operation that occurs after a batch or run of parts has been machined. The obvious problem with post-process gaging is that it occurs post-process.
Any out-of-spec dimensions are already produced and depending on severity, may require reworking or scrapping all or some of the part run. Moreover, post-process inspection makes tracing process errors to the original source more difficult because it is often removed from production by time and place.
In the many shops that must work on close margins and tight delivery schedules, there is simply not enough profit or time to mess with a job more than once. According to Dave Phillips, director of engineering at SPC Innovations (Stevensville, Maryland), the company’s line of in-machine gages may provide an automated solution to some of the issues with post-process inspection.
Placing the gage inside the machine tool permits 100 percent inspection of parts as they are cut. In addition to eliminating human intervention in the inspection process, this method also eliminates potential errors from statistical sampling of parts, which can miss a particular defective part, especially if the defect is an anomaly rather than expected variation.
In customer applications that demand zero defects, this makes good sense. “In many cases, the cost of correcting only one rejected shipment of parts would pay for the entire cost of an automatic gaging system,” Dave says. The elimination of the need to inspect incoming parts is a cost-saving benefit that automated in-process inspection brings to the shop’s customer.
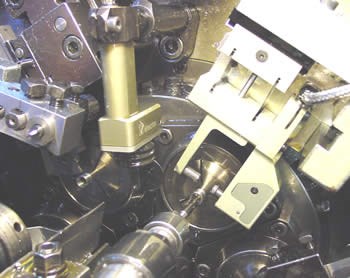
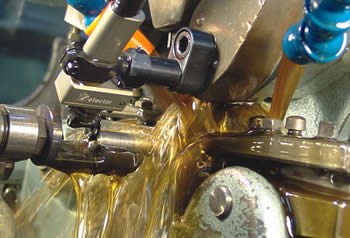
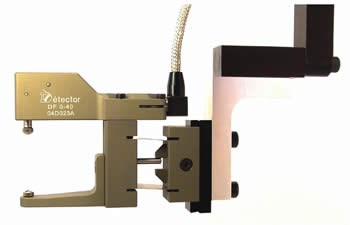
SPC’s gaging system consists of a mechanical gage probe with an internal transducer and a separate electronic controller/amplifier. The mechanical gage probe is designed to be used inside multi-spindle automatic screw machines and measures parts as they index from one station to another.
By gaging parts during the index cycle on a multi-spindle, the cycle time of the machine is not affected, so the shop can check 100 percent of its parts with no loss of production efficiency. If a defective (out-of-tolerance) part is detected, it can be diverted through a trap door or other mechanism from the production stream. If the defect is more than random, if parts are missing or if the gage is damaged, an action can be triggered to shut down the machine or set off an alarm.
The gaging system comes in several configurations that can measure length, internal and external diameters and other features. The length gage repeatability is accurate within 0.0002 inch (5 microns). Internal and external diameters can be gaged within 0.0004 inch (10 microns).
In operation, one or more gages are mounted on the machine so the indexing part can pass through the probes. Length and ID gages generally mount on the end-slide platen while OD gages can be mounted on cross slides. “We’ve seen shops use as many as four different gages to measure various part features,” Dave says.
To calibrate the gage, a known article is used to set the probes. A tolerance band for the measured feature is input into the controller and as long as the parts fall within the set tolerances, the job continues to run. Production data from the gages can be used for SPC and trending analysis to anticipate the need for tooling changes or
adjustments.
On CNC multi-spindles, the gaging controller can be linked to the machine’s CNC using an RS 232 serial port. The programmed tolerance bands can then be used to automatically compensate the tool slides for wear using closed-loop feedback between the probe and the CNC.
Inspection is a necessary evil for precision machined parts manufacturers. Even if 100 percent gaging in the machine is insufficient for reasons of accuracy or complexity, it can be an effective way to reduce inspection costs by augmenting post-process inspection if it must be done. Automation is a key to competing. SPC’s system is a relatively inexpensive hedge against bad parts.
Related Content
Software Controls Chip Breaking in Thread Turning Operations
This cutting tool manufacturer has developed a software module for chip control of thread turning operations in virtually any CNC lathe, even for older machines, using specific tooling and software.
Read MoreHow to Start a Swiss Machining Department From Scratch
When Shamrock Precision needed to cut production time of its bread-and-butter parts in half, it turned to a new type of machine tool and a new CAD/CAM system. Here’s how the company succeeded despite the newness of it all.
Read MorePrecision Machining Technology Review: December 2023
Production Machining’s December 2023 technology showcase includes some of the latest technology from Sandvik Coromant, Nikon Metrology, The L.S. Starrett Co., Walter USA, Kennametal and SolidCAM.
Read MoreKeeping Watch on Small Parts
From watch parts to exotic medical applications, this shop takes on the world of micromachining.
Read MoreRead Next
Monitoring Improves Machine Up Time And Shop Efficiency
Systems for monitoring the machining process not only allow tool wear and tool breakage to be detected at an early stage, but they also provide a process assessment and optimization functions that can be used to improve machine utilization and thus improve the return on machine capital cost.
Read MoreA Tooling Workshop Worth a Visit
Marubeni Citizen-Cincom’s tooling and accessory workshop offers a chance to learn more about ancillary devices that can boost machining efficiency and capability.
Read MoreEmerging Leaders Nominations Now Open
Here’s your chance to highlight a young person in your manufacturing business who is on the path to be a future leader moving your company forward.
Read More


