Measure Roundness, Roughness And Form With One Instrument
For those in the market for accurate and reliable roundness measuring instruments, here’s a line-up designed to offer the right balance of capability, automation and capacity for a range of applications and budgets.
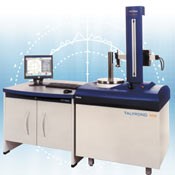
For those in the market for accurate and reliable roundness measuring instruments, here’s a line-up designed to offer the right balance of capability, automation and capacity for a range of applications and budgets. Taylor Hobson Precision (Chicago, Illinois) has introduced a roller bearing measurement system based around the Talyrond 365 platform. It offers roller bearing manufacturers the ability to analyze roundness, form and surface finish on bearing tracks and rolling elements using a single measurement platform. The automatic calibration and measuring cycles of this system are designed to increase productivity through untended operation. The precise routine calibrates the Talymin 5 gage head in less than 10 seconds. This single-bias inductive transducer is designed for high accuracy, range and resolution with maximum range of ±1-mm range, 0.0012-micron minimum resolution, a built-in stop attachment and an ultra-fine force control mechanism.
Roller Bearing Types
Various roller bearing types have been developed for use in different applications. Bearing types include taper, cylindrical, needle and spherical. Cylindrical roller bearings have very low friction torque characteristics, making them suitable for high speed operation. Tapered roller bearings have the ability to carry combinations of large radial and axial load.
Roller bearings typically have a range of measurement and analysis requirements. Critical requirements for taper roller bearings include surface finish, track shape and the included (cone) angle. For cylindrical roller bearings, the critical parameters would include roundness, track shape, harmonics and surface finish.
Roller Bearing System
Equipped with high-specification hardware and specialized software, the Talyrond 365 roller bearing system addresses the demanding needs of roller bearing manufacturers. The system provides roundness, roughness and harmonic analysis with 72,000 data points in the circumferential direction. It has the ability to measure components with large form deviation by using the follow mode feature of the system. Precision glass scales and electronic positioning controls provide high-precision straightness measurement in both the horizontal and vertical axes. Data sampling up to 200,000 points with 0.25 micron resolution is provided.
This platform also has the ability to characterize and monitor the barrel shape of roller bearing tracks using a simple crown height analysis feature in the software or more detailed drop height analysis software. The vertical follow mode feature can be used for cone angle measurement and analysis.
For improved repeatability, the Talyrond 365 provides the capability to automatically center and level the component relative to a high-precision spindle axis. The system also allows for all analysis (track slope, for example) to be made relative to a component axis. During centering, the spindle rotates continuously, providing dynamic equilibrium to speed the centering process. No null point means components can be centered and leveled at any point above the table top without the frustration of finding a “neutral tilting plane.” Pre-defined eccentricity target levels less than 1.0 micron ensure repeatability and consistency between operators.
Vertical follow mode allows measuring beyond the normal range of the gage using a high-precision scale on the horizontal arm. The column and the arm of the TR365 are capable of following the eccentricity and contour of the part outside of the normal gage range. This reduces the need for manual pre-centering or the use of expensive workholding fixtures.
For roughness analysis, a 5-micron stylus and the 200,000 data point logging capability facilitate characterization of surface finish on roller bearing tracks. Roller bearing tracks are designed with barrel shapes that assist in avoiding peak stress buildup. With this platform, it is possible to characterize and monitor the barrel shape using a number of different techniques.
Gage Orientation And Analysis
The Talyrond 365 gage mechanism keeps the center of the ball stylus tip constant regardless of gage orientation. This helps prevent operator errors, simplifies measurement programming and reduces the inspection cycle time. With this design, there is a large volumetric air gap around the stylus tip, improving access capability while reducing the need for multiple styli.
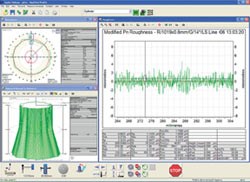
The system allows measurement of rotationally symmetric components in three dimensions. Coupled with Talymap imaging software, cylindrical mapping provides analysis of surface topography and form in detail. All Talyrond 365 instruments are driven by Windows-based Ultra software, with analysis features that include roundness, cylindricity, vertical straightness, horizontal straightness (RSU only), parallelism, flatness (single or multiplane), squareness, concentricity and eccentricity, co-axiality, harmonic analysis, tolerancing, cylindrical mapping, partial arc roundness and partial arc flatness. The programming features enable users to achieve a high degree of automation, saving time and removing operator variability from the measurement process. Other features include full instrument control, software joystick for nudge moves, extensive use of icons, and automated calibration routines.
Related Content
Pursuit of Parts Collector Spearheads New Enterprise
While searching for a small parts accumulator for Swiss-type lathes, this machine shop CEO not only found what he was looking for but also discovered how to become a distributor for the unique product.
Read MoreAutomation Idea for Halloween?
Maybe not. But, the candy-throwing robots at MetalQuest’s Nebraska facility do enable the contract machine shop to stand out at career fairs and similar events.
Read MoreAutomation in the Alps: Studer AG Unveils New Grinding Concepts
Studer AG, member company of United Grinding, held its annual press conference at its Swiss Alps location earlier this month to announce its new automatic loaders to accompany its existing grinding machines as well as other offerings and automation features.
Read MoreUnattended Production Takes More Than the Most Capable CNC Machine
Process planning and reliable peripherals are key to successful lights-out manufacturing.
Read MoreRead Next
Scanning Speeds Simplify Complex Part Inspection
Find out how a producer of precision turned parts found an inspection process that could check numerous features simultaneously and provide results quickly.
Read MoreDo You Have Single Points of Failure?
Plans need to be in place before a catastrophic event occurs.
Read MoreA Tooling Workshop Worth a Visit
Marubeni Citizen-Cincom’s tooling and accessory workshop offers a chance to learn more about ancillary devices that can boost machining efficiency and capability.
Read More


.jpg;maxWidth=300;quality=90)


