Scanning Speeds Simplify Complex Part Inspection
Find out how a producer of precision turned parts found an inspection process that could check numerous features simultaneously and provide results quickly.
You can't use yesterday's inspection methods to measure today's precision machined parts because they are not accurate enough or fast enough. If your new multi-axis turn-mill machine, with its high hourly rate, stands idle for hours at a time waiting for quality people to complete first-article inspections of highly complex parts, you already know that today's inspection machines need to be as fast, flexible and efficient as the machines used to make those parts.
Starro Precision Products (Elgin, Illinois), a producer of precision turned parts, avoids conventional parts and instead pursues complex, highly engineered parts. "We know that our customers can find multiple vendors to do simple parts," explains Starro Vice President Lee Dwyer. "We have avoided simple jobs with open tolerances because we believe that in 10 years that kind of work will be gone to third-world countries with low labor rates.
"We are focused on producing more complicated parts for the aerospace, medical, automotive, hydraulic and other industries," he continues. "Every dollar that we spend on machine tools, tooling, software, gaging, personnel and so forth, goes to meeting the objective of improving our ability to produce those complex parts."
Three years ago, Starro Precision was doing tight tolerance turning and milling and producing parts completely in one setup to eliminate secondary operations. However, the field was crowded with other shops that offered similar capabilities. The firm looked around for additional ways to differentiate itself. It started quoting parts that would normally be considered die/mold work as well as parts that formerly might have started out as a casting or forging and required extensive machining on a mill or machining center.
The shop learned how to machine those parts from barstock on its CNC Swiss and multi-axis turn-mill machines in one setup. However, many of the parts had no square features or location points, which raised the problem of how to measure them. "In the old days, such parts would go through multiple operations, and the results would be checked by an operator or an inspector at every step along the way," Mr. Dwyer recalls. "More recently, we were machining those parts in one setup from barstock, and the machined features were so numerous and complex that inspecting features one at a time using conventional gaging was no longer a viable option. We needed an inspection process that could check numerous features simultaneously and provide the results timely enough to permit us to respond quickly with adjustments to keep our processes under control."
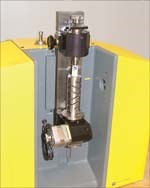
Starro searched the market for such a device and purchased a Profile 20 Lite, an inspection machine made by Brown & Sharpe (North Kingston, Rhode Island) to inspect small-diameter precision parts. The compact, bench-top inspection machine uses scanning technology to measure parts up to 20 mm in diameter by 200 mm long. The part to be measured is secured, typically between centers in a vertical orientation, on a precision slide that moves it along its length at speeds up to 150 mm per second past a stationary light source. The part is illuminated with parallel white light, and its image is projected onto high-resolution, linear CCD sensors, each made up of thousands of light-sensitive pixels.
The composite image of the part captured by the sensors is a precise representation of the part, displaying all external features such as diameters, lengths, intersections, threads, shoulders, grooves, radii, angles, and more, to an accuracy of 1.5 + (0.01 D) microns. Resolution of the inspection machine is 0.0002 mm for diameters and 0.001 mm for lengths; repeatability is ± 0.001 mm for diameters and ± 0.0025 mm for lengths.
The scanning process is not only accurate, but fast: Thousands of measurement points are collected per second. Numerous part details are captured simultaneously, making for very fast inspections of even complex parts.
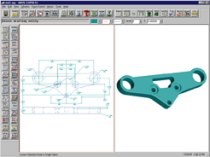
Measurement of the part is fully automatic. An inspection program, derived from a CAD file for the part, can be created in minutes. (Starro typically uses a solid model of the part as the starting point for its inspection program.) A typical part inspection program involving 30 dimensions can be run in less than 15 seconds to 1 or 2 minutes. The inspection results are displayed on a computer monitor alongside the Profile. Any discrepancies with the original CAD data are flagged, immediately alerting the person performing the inspection of any problems.
The aircraft part shown in the photos, which measures about 1 ½ inches in diameter by 4 inches long, is representative of the parts measured on the scanner. Mr. Dwyer explains that, before the shop acquired the scanner, manual inspection of the part required detailed sine plate and surface plate layouts entailing multiple setups. To complete the setup and gather quality measurement data, an experienced layout inspector would have to acquire all of the needed gages, verify the setup and do the layout. The layout itself could take several hours, and the inspector would have to spend another 45 minutes or so completing the first-article documentation.
Inspection of the aircraft part on the Profile begins with preparing an inspection program. According to Mr. Dwyer, inspection programs typically take less than an hour. Part and program are then loaded in the scanner and the inspection begins. Some 75 percent of the part's 75 to 80 features—including the prominent milled helix on the OD—are measured in approximately 2 minutes. Inspection results can be printed out and/or saved on the shop's computer system for SPC applications.
Although Starro keeps its Profile inspection machine in its QA department, the system (monitor, keyboard and other accessories) is compact enough to easily be accommodated in one or more workstations close to the production machines for machine operator accessibility (the unit is designed to work in shop environments and does not need a climate-controlled room). The machine is supplied with a computer, video card, all peripheral devices and software and is ready to begin measuring when installed.
It Checks The Process
While the high-resolution scanner provides fast and accurate measurements of complex parts, it also provides a revealing look at the production processes used to produce parts. "We use our Profile to optimize our machining processes," Mr. Dwyer explains. "For example, if we want to determine which of two tools is better for a particular application, the scanner allows us to measure a number of machined parts quickly to compare tool wear rates and part-to-part consistency. We would tend to go with the tool that makes the process more stable even if it is more expensive. Similarly, the scanning machine can also provide information about the condition of the machine itself—the main spindle and subspindle, the bearings and other critical components. It also gets rid of the voodoo about bad material or residual stresses in the material."
Detailed Documentation
Many of the company's customers require that the shop provide certification of processes. The shop recognizes such requirements as a necessary part of being involved in the production of aerospace, medical and other critical components. However, providing that documentation can be a lengthy, time-consuming task. The shop's Profile inspection machine not only provides the needed part measurements, but also simplifies documenting the results to customers. "In the old days, an inspector would be busy filling out forms longhand," Mr. Dwyer explains. "Now the inspector doesn't waste time filling out reports. Part inspection data created by the scanner is routinely stored by date and part number in our computers. If our customers need to review our inspection results, we can e-mail the data to them in whatever level of detail is required.
"Our personnel have instant access to the same information on our Intranet and can call it up as needed for the purpose of making improvements in the production process," Mr. Dwyer continues. "It should be noted that while we have improved access to needed information for our customers and employees, we have greatly reduced the amount of paperwork usually involved. We are taking advantage of computer technology to reduce paperwork or eliminate it entirely."
A Second Scanner
The Profile scanning machine has proved valuable enough to Starro that the company is considering the purchase of a second, larger-capacity machine. The new scanner will replace the QC lab's existing unit, which will be moved onto the shop floor for use by the operators. "Most of our machine tools are equipped with labor-saving features, such as part exit conveyors, accumulators, chip conveyors and so forth," Mr. Dwyer explains. "We spare our operators from having to do a lot of non-value-added manual tasks. Instead, we require them to perform their own part inspections. We carefully establish and control our production processes, and in most cases, the operator's primary responsibility is to make measurements and adjustments at defined intervals to maintain our capability and control.
"By moving our first scanner onto the shop floor, we will enable our operators to perform more first-article inspections," he continues. "Our QA staff will prepare the inspector programs in advance, so all the operator will have to do is load the part, download the appropriate program and proceed with the first-article inspection. Our operators are already responsible for inspecting their own parts using more conventional gaging equipment. By moving a scanner into the shop, we are simply providing them with a more efficient tool. However, we anticipate that the scanner will reduce the amount of time required for inspections and that our operators will be able to take on additional responsibilities and become even more productive."
Like many shops, Starro has tens if not hundreds of thousands of dollars tied up in traditional inspection gages that are not being used, according to Mr. Dwyer. The shop has already disposed of some of that equipment and will be getting rid of more. "That equipment may be great for other shops, but not for us," he adds. "We'll be inspecting parts faster and easier with our Profile."
Related Content
Zoller Event Shines Lights on Shopfloor Connectivity
The company’s open house event highlighted smart manufacturing solutions from CAM to part.
Read MoreThe Value of CMM Controller Retrofits
In this case, new controllers for two coordinate measuring machines — one 26 years old — with new programming software offers the possibility to enable multisensor inspection of critical, turned aerospace components.
Read MoreKeeping Watch on Small Parts
From watch parts to exotic medical applications, this shop takes on the world of micromachining.
Read MoreReplace Repetitive Measurement With DIY Robotic Automation
After minimal training, a shop can learn how to use this robotic inspection system configured for a shopfloor application to supersede repetitive, time-consuming, high-mix gaging processes. It can then be redeployed for another application somewhere else in the facility.
Read MoreRead Next
Seeing Automated Workpiece Measurement in Real Time
User-friendly inspection software for CNC machining centers was shown at IMTS 2024 monitoring measurements between and after machining while performing SPC based on recorded measurement values.
Read More5 Aspects of PMTS I Appreciate
The three-day edition of the 2025 Precision Machining Technology Show kicks off at the start of April. I’ll be there, and here are some reasons why.
Read MoreA Tooling Workshop Worth a Visit
Marubeni Citizen-Cincom’s tooling and accessory workshop offers a chance to learn more about ancillary devices that can boost machining efficiency and capability.
Read More


