Measuring System Speeds Up and Simplifies Inspections
Fralsen, Timex’s entity in Besançon, France, realizes that in order to run an efficient process to the end, the time it takes to do these things without error is especially important, even during part inspection.
No one knows the importance of time better than a watch maker. Every second counts on the shop floor, even during the critical inspection phase. Fralsen, Timex’s entity in Besançon, France, realizes that in order to run an efficient process to the end, the time it takes to do these things without error is especially important, even during part inspection. This process needs to be simple and quick, ensuring that nothing is slowing down the operation.
“We wanted more modern and more efficient optical inspection equipment,” says Sylvain Scotto of Fralsen’s quality control department. “In other words, we wanted to be able to inspect more parts in less time. We also wanted a machine that could be operated by non-specialists and be able to log measurements.”
Fralsen makes watch movements using three technologies — turning and cutting of parts such as wheels, pinions, arbors and rivets; plastic injection molding of small parts with very fine details; and cutting and coiling of complex springs. These precision parts must be inspected with contact sensors and optical systems.
The tolerances and accuracies are 15 m for concentricity and ± 10 m for center-to-center spacing and distances. There are at least five critical points per part.
“With conventional inspection equipment, measurements took too long,” Mr. Scotto says. “As a result, we couldn’t measure many parts, and there was a risk of overlooking significant variations within batches. Before obtaining the IM Series image dimension measurement system from Keyence, we used a variety of equipment. Our optical measuring device, although accurate, is not practical for quick measurements on a daily basis. Also, it requires a high level of skill to operate.”
The shop microscopes provide accurate measurements, but are tricky to operate and severely limit the number of measurements and parts, Mr. Scotto says. In addition, a reference point for truing up has to be created. Last, because of the sometimes long inspection times, Fralsen’s templates and projectors allow only a limited number of parts to be measured, and there is a risk of misinterpretation.
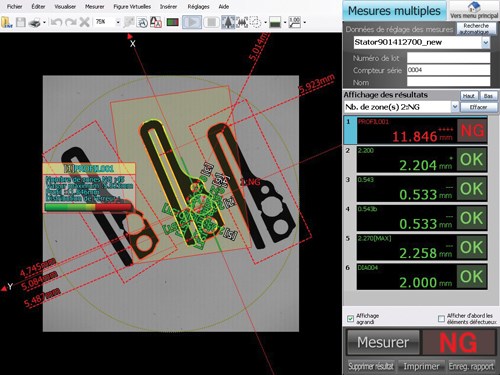
The IM Series is simpler to operate, saves time and eliminates variations of measurement interpretation. Results are conveniently displayed green (for good) or red (for bad). Keyence’s solution allows several parts to be measured simultaneously. The size of the parts and the number of elements making up the program are the only limits. There is no need for manual truing up because the system does it all by itself by recognizing each part’s geometry. Furthermore, results can be saved and statistics tracked. Part profiles can be compared against master profiles imported from CAD files.
“As a result, we no longer need to position templates on parts and measure differences in shape by eye,” Mr. Scotto says. “The machine does so automatically and extracts an image of the contour, showing the difference with the tolerance. All in all, measurements are fast and do not require special skills.”
The IM-6500 Series image dimension measurement system reliably measures features in seconds. According to Fralsen, an operator simply places a target on the stage and presses the button. As many as 99 points are measured in a matter of seconds with a repeatability of ± 1 micron. Targets are found and measured regardless of their position or orientation, and there is no risk of measurements being affected by variations in operator skill levels.
Thanks to the iPass shape detection method, this user-friendly system determines the position and angle of targets, making measurements automatic.
“Getting to grips with the system was easy because all you have to do is adjust the focus and load the program for the part being inspected,” Mr. Scotto says. “All the QC technicians in the quality department use the machine for final inspection of parts before their placement in stock. The operators in the cutting shop also use it to measure certain parts during production.”
With the help of the IM Series image dimension measurement system, three parts can be inspected in less than 1 minute instead of five in 5 minutes at Fralsen, according to Mr. Scotto. The new system also allows the mechanical engineering department to see where parts need reworking.
He says, “The faster inspection times enable us to track dimensions better and thus improve the quality of a large number of the parts we deliver. What’s more, we haven’t received a single complaint from clients about any of the parts measured on the machine.”
Related Content
Video Tech Brief: Quality Control is Using the Right Software
This machine shop’s mapping software program runs on its gaging system to increase the accuracy of the probe’s tolerance measurement on the thin-walled aluminum tube machined by the shop.
Read MoreStreamlining Part Measurement, Data Collection Processes
When collecting measurement data automatically with a wireless data collection system, manual errors can be eliminated ensuring data accuracy and traceability.
Read MoreThe Advantages of Automated Shopfloor Gaging
This “parallel kinematic” gage offers the opportunity to automate and improve machining process control for shops endeavoring to move from sample inspection to 100% inspection.
Read MoreAddressing Machining’s Necessary Evil
Many view quality control as such, but integrating new measurement technologies and approaches can ultimately minimize QC’s impact on throughput and a company’s bottom line.
Read MoreRead Next
A Tooling Workshop Worth a Visit
Marubeni Citizen-Cincom’s tooling and accessory workshop offers a chance to learn more about ancillary devices that can boost machining efficiency and capability.
Read More5 Aspects of PMTS I Appreciate
The three-day edition of the 2025 Precision Machining Technology Show kicks off at the start of April. I’ll be there, and here are some reasons why.
Read MoreDo You Have Single Points of Failure?
Plans need to be in place before a catastrophic event occurs.
Read More


