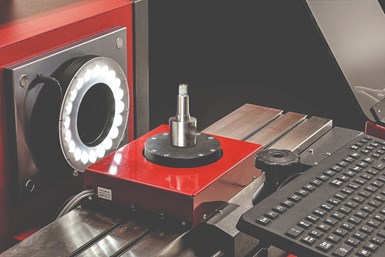
With automatic pattern recognition, 100% inspection is possible, and inspection speed and output can also be dramatically increased due to automating the measurement process. (Photo credits: The L.S. Starrett Co.)
Inspection gages have evolved throughout the years beginning with mechanical, then electronic and now wireless electronic versions. Each type has an important place in today’s quality control and inspection processes.
The first precision gages were mechanical and featured analog readouts, but are still widely used today. For linear and round measurements, those gages vary depending on the size of the dimension, the nature of the work and the degree of accuracy required. Over the last several decades, electronic gages have offered digital readout and the ability to acquire measurement for data collection purposes and for statistical process control (SPC) analysis and documentation. These types of gages make readings faster and easier for machinists regardless of experience, too.
Electronic gages also are capable of transmitting data through cables or wirelessly to collection devices to provide a permanent record for SPC. Properly used, the data collected can be output for analysis and can help a machinist’s control process while predicting and possibly preventing out-of-tolerance conditions.
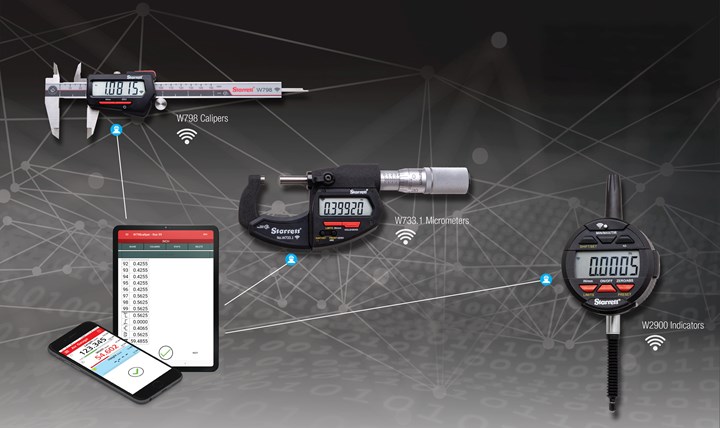
Relatively recently, wireless gages were introduced which can be used as a gage only or within an advanced data collection system such as DataSure 4.0 from The L.S. Starrett Co. When collecting measurement data automatically with such a data collection system, manual errors can be eliminated, ensuring data accuracy and traceability.
Accurate measurement data provides assurance for the end user and insurance for the manufacturer, too. By using wireless tools and an advanced data collection software system, the data can be efficiently integrated into ERP and/or MRP programs.
For example, in a controlled, 100% inspection test to measure the impact of Starrett DataSure on throughput and quality assurance, Starrett made three measurements per part and recorded the data on 500 parts using three different methods.
Methods 1 and 2 involve a time-consuming, manual process to measure and then record data. Also, results can be uncertain due to the measurement value changing while being inspected. Measurement with DataSure wireless data collection software proved to be nearly five times faster than the first method.
Method 1: Measure, handwrite results and enter data remotely. This required 37 time/motion elements, took 28.9 seconds per part and resulted in 62 entry errors.
Factors affecting accuracy and throughput include:
- Measurement must stop so that the machinist or inspector can write down results
- Illegible handwritten numbers, mistakes noted but not corrected, data written in shorthand and inspector’s misread by the transcriber
- Value can change when the gage/tool is released
- Data entry errors at the computer
Method 2: Measure and enter results into computer. This required 20 time/motion elements, took 15.3 seconds per part and resulted in four data entry errors.
Factors affecting accuracy and throughput include:
- Errors due to alternating measuring and data entry
- Gage not seated correctly when released to key-in data
- Missed data entry, incorrect keystrokes and data entered into wrong cell
Method 3: Measure and enter results directly with Starrett DataSure. This required 17 time/motion elements, took 6.6 seconds per part and resulted in no entry errors.
Factors affecting accuracy and throughput include:
- Measurement technique is maintained
- No interpretation or memory errors
- Immediate, direct data entry eliminates errors

Starrett DataSure 4.0 wireless data collection system operates on wireless networking technology that uses short-wave radio frequencies to interconnect cell phones, computers and wireless electronic devices.
High-Volume, Low-Mix Small Parts Inspection
To complement handheld precision gaging practices, CNC digital comparators and vision systems which offer automatic pattern recognition can be extremely productive, especially for a high volume, low mix of parts. Pattern recognition is where inspection routines are created for workpieces based upon the master template complete with tolerances. Precise stage motion and lighting control can be built in as programmable steps to ensure maximum repeatability.
Once the program is created, an operator can place a sample on the stage and initiate the routine. When the routine is initiated, the system will automatically run the inspection, taking all relevant data points and providing accurate results in seconds.
Tremendous amounts of data can be collected quickly and easily from each part inspection in real time and documented with date, time, lot number, job number and so on. This removes potential operator error and provides comprehensive data for SPC and traceability. With automatic pattern recognition, 100% inspection is possible, and inspection speed and output time can also be dramatically decreased due to automating the measurement process.
With automatic pattern recognition, 100% inspection is possible.
For example, Alpha Grainger Manufacturing, based in Franklin, Massachusetts, produces a high volume of intricate, small turned parts and more for a wide range of industries. The ability to capture part dimensions quickly and accurately is critical and helps reduce labor cost and time. According to the manufacturer, part features might need to be checked to ten-thousandths of an inch. Parts also can have more than 20 features, such as on an automotive part, so measurement solution needs to be fast, reliable and as automated as possible it explains.
This spurred the manufacturer to consider Starrett’s Digital Video Measurement Systems, and today Alpha Grainger has 14 systems such as the HDV400. The HDV400 combines the desired features of a horizontal optical comparator and a vision metrology system by using a uniquely mounted 5MP digital video camera, coupled with a choice of quick-change telecentric lenses or 6.5:1 zoom for micron-level resolution. In addition, using MetLogix M3 touch screen software, the HDV can import DXF CAD files over a network and make automatic 2D go/no-go comparisons to an engineering design by using video edge detection. According to the manufacturer, on average, inspections are performed every 20 to 25 minutes so every bit of time saved using a semi-automated inspection process versus a manual one increases its productivity.
Article provided by The L.S. Starrett Co.
Related Content
How Well do You Know Granite Surface Plates?
Here are some tips for choosing, maintaining and customizing a granite solution that will best meet your shop’s particular inspection needs.
Read MoreReplace Repetitive Measurement With DIY Robotic Automation
After minimal training, a shop can learn how to use this robotic inspection system configured for a shopfloor application to supersede repetitive, time-consuming, high-mix gaging processes. It can then be redeployed for another application somewhere else in the facility.
Read MoreAddressing Machining’s Necessary Evil
Many view quality control as such, but integrating new measurement technologies and approaches can ultimately minimize QC’s impact on throughput and a company’s bottom line.
Read MoreAutomated Inspection Transforms Medical Manufacturer’s Quality Control
Manual steps for part inspection have been eliminated with a new CMM process using more advanced software and strategies such as using a combined scanning/touch-trigger probe.
Read MoreRead Next
5 Aspects of PMTS I Appreciate
The three-day edition of the 2025 Precision Machining Technology Show kicks off at the start of April. I’ll be there, and here are some reasons why.
Read MoreA Tooling Workshop Worth a Visit
Marubeni Citizen-Cincom’s tooling and accessory workshop offers a chance to learn more about ancillary devices that can boost machining efficiency and capability.
Read MoreDo You Have Single Points of Failure?
Plans need to be in place before a catastrophic event occurs.
Read More


.jpg;maxWidth=300;quality=90)


