Programmable Gages Help Create Automation Cell
Conroe Machine (Conroe, Texas) is doing what most machine shops only dream of: hard turning a family of parts around the clock in an unmanned cell that operates a “self-controlled” process.
View Conroe Machining’s “Johnny 5” robot automating its early roughing operation.
Conroe Machine (Conroe, Texas) is doing what most machine shops only dream of: hard turning a family of parts around the clock in an unmanned cell that operates a “self-controlled” process.
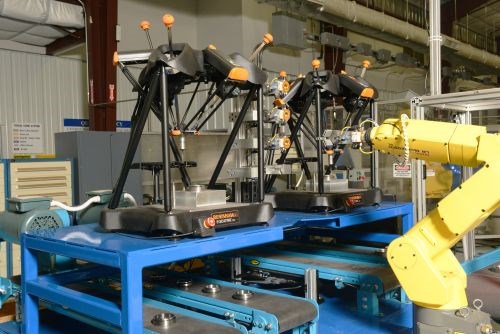
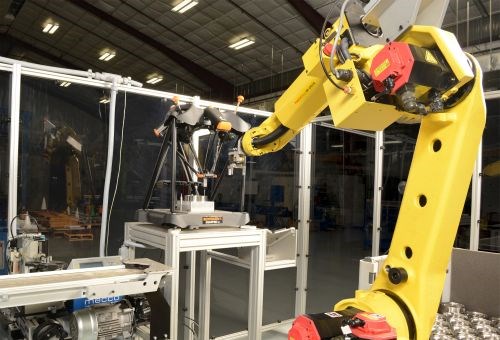
The turning cell, with software and programming developed by CNC Programmer James Wardell and Robotics Technician Jeff Buck integrates a Fanuc robot with Renishaw’s Equator gaging system, using Renishaw EZ-IO software to provide comprehensive communication for part inspection and auto-compensation of a twin-spindle Okuma lathe. The cell also boxes and palletizes finished parts. According to the company, the cell paid for itself in only 18 days.
The same automation team has gone on to create an unmanned part measurement/sorting cell for a customer, this time combining two Equators, a robot, a vision system and multiple lanes of a low-profile conveyor. In both applications, the gaging system demonstrates the value of programmable comparative inspection by quickly measuring a family of bearing races, doing it cost effectively, and without fixturing or problems from a shopfloor environment.
Conroe Machine is a relatively young company, founded by in 2000 with the objective of producing parts with the best manufacturing technology available. The company grew rapidly to about 150 employees operating in a 65,000-square-foot plant. While it is a general-purpose shop, Conroe’s location near Houston results in a high percentage of business from the oil and gas industry, principally for drilling components. One of the company’s continuously running jobs is the manufacture of thrust bearing races for downhole mud motors. These parts are produced by the thousands each week, around the clock.
Moving Up the Automation Ladder
The bearings are currently roughed out on four lathes that originally did both roughing and finishing and were served by four operators. These machines are now split into two cells, loaded/unloaded by robots doing only the roughing operation; these cells were among the shop’s earlier automation projects. The semi-finished parts are sent out to be case hardened to HRC 65 at a depth of 0.070 inch before going through the finish turning operation.
“Our production plateaued at 800 to 1,000 total parts per day with these two cells,” Mr. Wardell says. “We had a single operator loading the machines and inspecting the parts. However, you can rely on an operator to correctly inspect only so many parts with this kind of volume, and we needed even more output.
“For our next step up, we conceived a fully automated process for the finish machining, with automatic part loading, post-process measurement, automatic tool compensation, part engraving and boxing/palletizing the parts,” he adds. “We had pretty good ideas for the components of such a system, except for the part measurement technology, CNC type and software for tool compensation. Inspection must be fast to keep up with the cycle times on the parts, which can be as short as 98 seconds. Originally, we looked at white light laser inspection because of its speed, but the parts are too reflective. We also looked at hard gaging and shopfloor CMMs. Hard gaging was very expensive and required setup attention, and the CMM gave no speed advantage. While working with Renishaw on other projects, we were introduced to the Equator as a possible solution.”
Process-Control Tools and Software
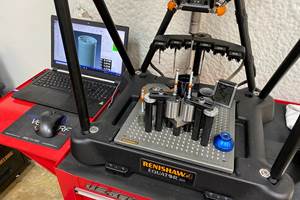
The Equator is a low-cost, flexible alternative to dedicated gaging. It uses the comparison method of measuring. A master part with known measurements taken on a CMM is used to “master” the gaging system, with all subsequent measurements compared with the master. Repeatability is 0.00007 inch immediately after mastering. To compensate for shop temperature changes, the Equator can be re-mastered at any time. It uses an SP25 probe for touch and scanning data collection, at speeds as high as 1,000 points per second. Styli are stored in an integral six-port changing rack, and the system is programmed through MODUS software. The Equator can be used manually with push-button ease, but its software for automation also makes it especially useful for integration into cells such as Conroe's.
“We attended an open house at Hartwig in early 2012 and saw the Equator in action, along with Okuma’s twin-spindle, dual-gantry lathe,” Mr. Wardell says. “Apart from being automation ready for parts of our type, the lathe’s Windows-based OSP dual-path control has an open-architecture, PC-based operating platform, which was important in our plan for developing our own auto-compensation software.”
Gaging as Part of the Automated Cell
Mr. Wardell and Mr. Buck went on to install a cell consisting of a lathe, a single Equator, an engraving machine, and a robot. In practice, the lathe’s two part carousels are loaded with raw workpieces— approximately 300 parts. The lathe’s dual gantry loaders feed the spindles and place finished parts on a chute leading to a conveyor for pickup by the robot. The robot places the part on the Equator for measurement, and if acceptable, transfers it to the engraving machine and finally boxes/palletizes the finished parts.
“We developed our own tool compensation software to run on the OSP control,” Mr. Wardell says. “This software uses measuring results from the Equator, transmitted in the form of a CSV file, to offset the tools when the part deviates from tolerance.” Machining removes about 0.015 inch from each side of the part, with the tightest tolerance at ±0.001 inch and an 8 micro-inch surface finish. Parts range in size from about 3 to 6 inches OD.
“The Equator is easily able to measure within our tolerances with a high margin,” Mr. Wardell says. “Our OD/ID stays spot on, with perhaps a couple of tenths variation on radius. We batch-process parts by size, so change-overs of chuck jaws and other tooling are minimized. The Equator’s speed allows it to easily keep pace with the process. We re-master only once a day, because our shop is climate controlled to 72°F.”
Inspection Principles and Automated Flexibility
The measuring methodology for the parts is simple, according to Mr. Wardell. “We made an aluminum block with a hole in the center, which is placed in the center of the Equator fixture plate,” he says. “We use this to determine our center and set our coordinate system. Each part is placed in the center of that block. We touch to get a center on the part, then surface scan for everything else. We planned the measurement process to work without a part fixture or stylus changing. The robot chooses, through the gage’s software, which measuring program to run for each type of part. We know the critical features we must measure to ensure the part is within tolerance.”
For Conroe’s machining cell, there was no other cost-effective, shopfloor measuring tool comparable with the Equator, according to Mr. Wardell. “We hope that our venture into cell integration for a customer opens a new business avenue in this area for our entire company.”
Related Content
PMTS 2023 Product Preview: Measurement
Learn about some of the latest measurement solutions that will be on display at PMTS 2023.
Read MoreVideo Tech Brief: Quality Control is Using the Right Software
This machine shop’s mapping software program runs on its gaging system to increase the accuracy of the probe’s tolerance measurement on the thin-walled aluminum tube machined by the shop.
Read MoreHow Well do You Know Granite Surface Plates?
Here are some tips for choosing, maintaining and customizing a granite solution that will best meet your shop’s particular inspection needs.
Read MoreStreamlining Part Measurement, Data Collection Processes
When collecting measurement data automatically with a wireless data collection system, manual errors can be eliminated ensuring data accuracy and traceability.
Read MoreRead Next
Do You Have Single Points of Failure?
Plans need to be in place before a catastrophic event occurs.
Read More5 Aspects of PMTS I Appreciate
The three-day edition of the 2025 Precision Machining Technology Show kicks off at the start of April. I’ll be there, and here are some reasons why.
Read MoreA Tooling Workshop Worth a Visit
Marubeni Citizen-Cincom’s tooling and accessory workshop offers a chance to learn more about ancillary devices that can boost machining efficiency and capability.
Read More


.jpg;maxWidth=300;quality=90)


