Work Flow Boosts With CMM Upgrade
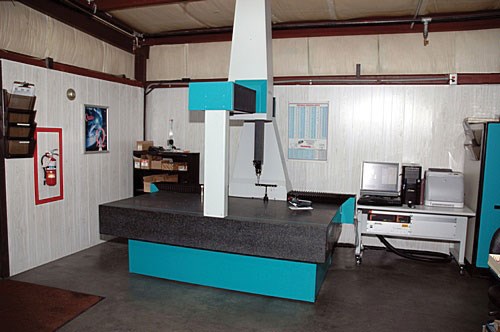
This shop knew that it needed to upgrade its CMM capabilities. It was going to take a couple of DCC CMM machines with varying work envelopes and a common comprehensive software package that the technicians as well as machine operators could easily be trained on. The company initially made some inquires with CMM manufacturers, and Xspect Solutions, the North American representatives for Wenzel CMMs, was the first company to respond.
Today, CMMs are a mainstay in most job shop businesses. It’s the best way to prove out and ensure the highest level of quality and a necessity if ISO certification is to be obtained.
Avans Machine & Tool, a family-owned precision machine shop in Scottsboro, Alabama, is typical of the thousands of similar job shops that are sprinkled across North America. Avans is a 35-man shop that specializes in CNC turning, four-axis milling and 3D machining of parts and components for aerospace, defense, automotive, medical, pharmaceutical and textile industries. Parts are manufactured in small or large quantities with a range of short- and long-term delivery schedules.
Lawrence Ariel, quality manager for Avans, explains, “As a precision machine shop, meeting our customers’ needs is simple—be professional, be fast, be accurate and be competitive. What we were finding, however, is that our manual CMMs began to negatively affect our ability to be fast, and we know that will ultimately cost the company existing as well as new business.”
Mr. Ariel adds, “I knew that we needed to upgrade our CMM capabilities. It was going to take a couple of DCC CMM machines with varying work envelopes and a common comprehensive software package that our technicians as well as machine operators could easily be trained on. In a job shop environment, workflow can be enhanced when machine operators can periodically check the parts themselves.” Mr. Ariel initially made some inquires with CMM manufacturers, and Xspect Solutions, the North American representatives for Wenzel CMMs, was the first company to respond.
Keith Mills, Xspect Solutions president, put the company in contact with a number of other companies with Wenzel machines located near Avans. “We visited those facilities to evaluate the Wenzel equipment and talk to the users. We were immediately impressed with the robust construction of the equipment, and in particular, Wenzel’s use of all-granite construction. In addition, the users we talked to were very pleased with the OpenDMIS software, primarily because of its broad capabilities and ease of use. The software has full CAD capabilities allowing the CMM to be an integral part of the manufacturing process, permitting the generation of inspection programs before manufacturing is performed.”
With the OpenDMIS Xecute interface, unskilled operators can be quickly trained to operate the machine. In addition, with the OpenDMIS QuickMeasure feature, operators have hands-free inspection from the PC. Quick Measure uses the software’s intellect to determine the feature type under measurement and allows for rapid part inspection without the traditional need to instruct the software as to what to inspect next. The part is simply probed, and the software does the rest.
“Talking to Wenzel’s customers sold us on the benefits and features of the equipment and the software,” Mr. Ariel says. “Xspect Solutions worked closely with us to determine the right size machines necessary for us and then worked out a cost that fit our budget requirements.”
Each of the machines is equipped with the standard Renishaw TP200 probing systems and offers volumetric accuracy of 2.5 microns with a maximum 3D measuring speed of 700 mm/sec.
“There were a couple of other unique options that we just had to have,” Mr. Ariel says. “For example, the HT400RC wireless teach pendant is an amazing feature. It eliminates the tedious keyboard interaction necessary with conventional CMM teach pendants. With just one joystick, it basically has everything an operator needs right in their hand.”
The joystick includes programmable fast and slow modes, function keys for probe index, go-to and point record, individual axis locks, even an emergency stop switch. “It allows you to walk around the machine and get your face right in there without having to determine the orientation of the pendant control—it does that for you. Also, when I saw there was a probe change rack that could be mounted right on the granite table, I had to have that as well. It really helps to save time in setup.”
Avans employees are confident that they have CMM capability for their current and future needs and the ability to have timely software upgrades that can be conveniently and cost-effectively downloaded to the OpenDMIS software.
Related Content
The Advantages of Automated Shopfloor Gaging
This “parallel kinematic” gage offers the opportunity to automate and improve machining process control for shops endeavoring to move from sample inspection to 100% inspection.
Read MoreKeeping Watch on Small Parts
From watch parts to exotic medical applications, this shop takes on the world of micromachining.
Read MoreReplace Repetitive Measurement With DIY Robotic Automation
After minimal training, a shop can learn how to use this robotic inspection system configured for a shopfloor application to supersede repetitive, time-consuming, high-mix gaging processes. It can then be redeployed for another application somewhere else in the facility.
Read MoreAutomated Inspection Transforms Medical Manufacturer’s Quality Control
Manual steps for part inspection have been eliminated with a new CMM process using more advanced software and strategies such as using a combined scanning/touch-trigger probe.
Read MoreRead Next
A Tooling Workshop Worth a Visit
Marubeni Citizen-Cincom’s tooling and accessory workshop offers a chance to learn more about ancillary devices that can boost machining efficiency and capability.
Read More5 Aspects of PMTS I Appreciate
The three-day edition of the 2025 Precision Machining Technology Show kicks off at the start of April. I’ll be there, and here are some reasons why.
Read MoreSeeing Automated Workpiece Measurement in Real Time
User-friendly inspection software for CNC machining centers was shown at IMTS 2024 monitoring measurements between and after machining while performing SPC based on recorded measurement values.
Read More


