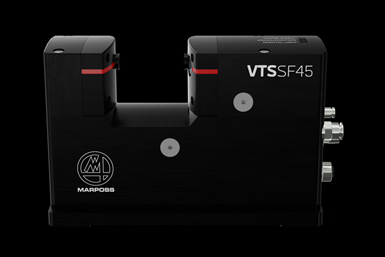
Marposs Optical Tool Setter Measures in Constrained Spaces
The VTS SF-45 is designed for noncontact, optical measurement of small, complex-shaped tools in micromachining, semiconductor or moldmaking applications.
Marposs, a manufacturer of measurement, test and inspection technologies, has expanded its VTS (visual tool setter) family with the VTS SF-45 Compact.
The VTS SF-45 is designed for noncontact, optical measurement of small, complex-shaped tools in constrained working spaces such as micromachining, semiconductor or moldmaking applications. The VTS SF-45 units are installed inside the machine working area to monitor actual tool working conditions without any contact while the tool is able to rotate at full spindle speed (up to 80,000 rpm) during data acquisition. Because there is no need to slow the spindle, presetting time can be reduced and measurement accuracy is increased to better eliminate collision hazards.
The VTS SF-45 acquires a variety of tool dimensions in a single instant using the principle of shadow projection where an illuminated object projects its shadow onto the camera. These measurements include tool length, static and dynamic tool diameter, tool runout and cutting-edge radius. With a resolution of 0.1 micron, the VTS is said to enable measurement of tools with diameters as small as 10 micron with repeatability of 0.2 micron, providing a higher level of accuracy than touch probes or lasers in small applications.
Additionally, the VTS SF-45 uses a frontal light to analyze the tool surface, displaying the illuminated surface on a PC monitor where the integrity of the cutting edges can be evaluated. The graphical user interface (GUI) software for VTS simplifies the measuring cycle process and documents the tool history, helping to quickly reveal damage in advance of the machining operation. The software can be fully integrated into Marposs touchscreen PCs (Nemo or Merlin+) or in a stand-alone version for PCs with Windows or Linux operating systems.
One of the main features of the VTS is its protection system, which Marposs says enables excellent measurement performance even in the presence of coolant or dust. Pneumatic shutters cover and protect the optical lens when VTS is not working, plus Marposs’ air flow solution rejects chips and coolant drops, keeping the shutter side clean and protecting the optical lens when the shutter is open.
Related Content
-
The Value of CMM Controller Retrofits
In this case, new controllers for two coordinate measuring machines — one 26 years old — with new programming software offers the possibility to enable multisensor inspection of critical, turned aerospace components.
-
The Advantages of Automated Shopfloor Gaging
This “parallel kinematic” gage offers the opportunity to automate and improve machining process control for shops endeavoring to move from sample inspection to 100% inspection.
-
In-Machine Probing Possibilities for VTLs
A manufacturer of vertical turning centers uses a “push/pull” optoelectronic probe with custom bracket to enable its machines to perform effective, in-process measurement of shafts and related automotive components.


