Calculating Surface Footage and RPM for Optimum Tool Life
Tech Brief: Calculating Surface Footage and RPM for Optimum Tool Life
Lately, I have found myself engaged in debates with younger people on how to properly calculate rpm from surface speed. The heart of our disagreement is centered on which diameter to use when converting surface speed to rpm. Also, I think much of the misconception comes from programming in constant surface footage.
My understanding of surface speed per minute is the measurement of the linear surface that travels past a given point with every revolution in one minute of time.
I was taught that excessive heat is the primary cause of premature tool wear. When a cutting tool is engaged in a workpiece, the friction generates heat. Some heat is carried away with the chip while some heat is thermally transferred to the tool substrate like a heat sink. With continuous use, as in turning, the heat absorbed by the tool increases and two different reactions can occur:
1) Common molecules between the tool and the hot chip are attracted, and welding occurs. Therefore, cutter clearance is lost, pressure and heat increase exponentially, and the tools fails.
2) Annealing of the tool substrate occurs. The substrate becomes softer than the metal being cut, clearance is lost, pressure and heat increase exponentially, and the tool fails.
A Starting Point
Following World War II, many new alloys were developed. New standards were needed to increase American productivity. Metcut Research Associates, with technical support from the Air Force Materials Laboratory and the Army Science and Technology Laboratory, published the first Machining Data Handbook in 1966. The recommended speeds and feeds provided in this book were the result of extensive testing to determine optimum tool life under controlled conditions for every material of the day, operation and hardness. So, for turning, boring or drilling operations, there is a recommended surface speed that can be used to calculate a suitable rpm. The hard work was done long ago.
With the recommended surface footage determined, the next step is to determine the diameter to use when calculating rpm:
- Drilling and milling: I use the OD of the drill or mill. This is where the most friction and heat occurs, and this is the first area to break down.
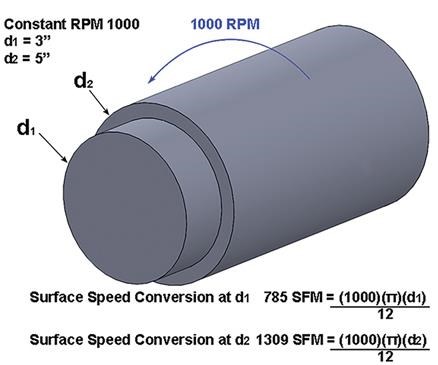
- Turning and boring: This is where the confusion begins. I use the diameter I am turning from, not the diameter I am turning to. This is because the largest diameter is where the most friction and heat occurs. This is opposite of how constant surface footage (CSF) programming function works on the CNC controls.
- Constant surface footage: The use of this programming feature is most suitable for facing and grooving. It automatically varies the rpm based on the diameter where the tool is positioned during a face operation. As the tool moves toward the center of the part, the speed increases and the cutting pressure is reduced. However, when CSF is used for a rough turning operation, the programmer should reduce the surface speed to accommodate the increased heat at the larger diameter, although the tool tip is at the smaller diameter. The difference in surface speed can be demonstrated by calculating the actual surface speed at a larger diameter when rpm is operating at a smaller diameter. The increased surface speed will result in more heat and will expedite tool failure.
- Thread whirling: Another area of confusion is the thread whirling process. Here, the cutters face in, such as on a hollow mill. There is some disagreement about how to calculate the correct rpm, which can be detrimental for optimizing tool life in titanium or stainless. The typical thread whirling ring on a Swiss-type machine leaves a 12-mm (0.472 inch) space between the cutter tips. We call this a flight circle. Usually the thread whirling is done from stock diameter with the tip of the cutters at the finished minor diameter. Generally, the depth of cut per side may be up to 3 mm (0.118 inch). This means the largest diameter spinning around centerline is 12 mm + depth of cut (DOC)(2). I use this calculation to determine the whirling cutter rpm, while others use only the 12-mm flight circle. So my calculation to determine the diameter to use in calculating rpm is D=0.437 inch + (0.118 inch)(2) = 0.673 inch.
The Formula
The same basic formula is used regardless of converting surface speed in metric or inch. In the formula below, I reflect constant surface speed (CSS). In the U.S., we use surface feet per minute or sfm. The rest of the world uses the expression Vc (m/min) or velocity in meters per minute.
rpm = (CSS) (Unit of measure)
π (Diameter)
Since the units need to be expressed the same above and below the division line, the first step is to convert to the lowest common denominator.
In the imperial system, we are given sfm, and the diameter is measured as a decimal of an inch. The unit of measure conversion is 12 because there are 12 inches in a foot. By multiplying the surface feet by 12, we convert the surface feet to surface inches.
In the metric system, the surface meters are given and diameter is given in millimeters. By multiplying meters by 1,000, we convert surface meters to surface millimeters.
Different Formulas
I have heard people say the formula they use is different than the one above. Their formula uses a constant that is not Pi, while someone else has a different constant. Which one is correct? The answer is both. Each is derived from the same formula, and through rules of mathematical manipulation, different constants can be found. I use the rounded up constant of 0.262 inch, while someone else may use the constant 3.82 inch. The difference is which side of the division line was Pi manipulated.
Using the constant 0.262 inch, the 12 was moved below the division line by multiplying Pi/1 by 1/12. Therefore, Pi/12 = 0.26179 inch. Then the formula becomes sfm/(0.262 inch) (diameter). Using the constant 3.82 inch, Pi moves above the division line by multiplying 12/1 by 1/Pi. Therefore, 12/Pi = 3.819 inches. Then, the formula becomes (sfm by 3.82 inch)/diameter. One formula is no more accurate than the other with the exception of how many decimals the constant is carried out to.
Getting to the optimum rpm for longer tool life is the goal. Choosing a sound formula to get there is up to you.
Related Content
Parting Off: The Case for Standardizing on Sawing
The value of rotary saw cutting for parting off operations could boil down to simple economics paired with process efficiency gains.
Read MoreTool Path Improves Chip Management for Swiss-Type Lathes
This simple change to a Swiss-type turning machine’s tool path can dramatically improve its ability to manage chips.
Read MoreBroaching Tool Technology For Lathes Used to Slot Inconel Parts
This shop finds value in using an indexable-insert-style broaching tool to create blind-hole slots in heat-treated Inconel aerospace parts on a CNC lathe.
Read MoreShop Sets its Sights on Precise Tool Alignment
A Wisconsin shop has found that visual tool alignment technology has improved tool life and surface finishes for its Swiss-type lathes while increasing throughput as well.
Read MoreRead Next
Do You Have Single Points of Failure?
Plans need to be in place before a catastrophic event occurs.
Read MoreEmerging Leaders Nominations Now Open
Here’s your chance to highlight a young person in your manufacturing business who is on the path to be a future leader moving your company forward.
Read More5 Aspects of PMTS I Appreciate
The three-day edition of the 2025 Precision Machining Technology Show kicks off at the start of April. I’ll be there, and here are some reasons why.
Read More


