Clamping System Reduces Machining Time and Setup
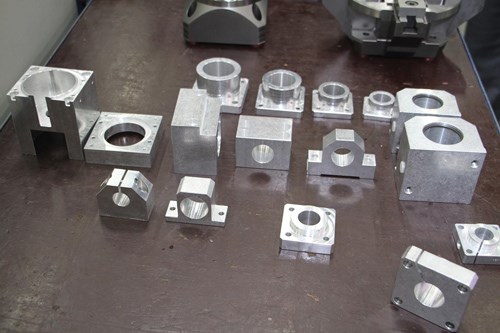
The staff at Rodriquez GmbH in Eschweiler, Luxembourg (Germany), has been relying on a Hermle C40 milling machine equipped with the Hainbuch Quadrok Plus clamping system for the manufacturing of linear technology components.
The staff at Rodriquez GmbH in Eschweiler, Luxembourg (Germany), has been relying on a Hermle C40 milling machine equipped with the Hainbuch Quadrok Plus clamping system for the manufacturing of linear technology components. With this system, the company was able to significantly minimize idle time and increase machining precision.
The company focuses on manufacturing thin-ring bearings and linear technology components. Six years ago, it separated from its American parent company in a management buyout. “It all started with the end machining for precision steel shafts,” explains Andreas Neuweiler, who, as product manager for linear technology, also shares responsibility for manufacturing.
“The turning jobs have been continuously expanded,” he says. “Several years ago, milling operation capacities were also added. Initially, the goal was to manufacture the components for special solutions ourselves.” For the machining of linear technology components, in particular, a three-axis system was acquired in which the components were clamped with vises. “For the range of workpieces that we manufacture, at first this seemed to be a universal solution,” Mr. Neuweiler says. “However, it reached clear limits—on the machine side and also on the workholding technology side.”
Aluminum alloys are primarily machined for these linear technology components. As a rule, sawn blanks come onto the machine. The employees at the machines also program the workpieces themselves.
Previous Solution Reached its Limits
On the previously used three-axis machine, with smaller workpieces, it was possible to clamp multiple parts simultaneously in the work space in order to minimize tool change.
“However, in the long run, the machine was simply too slow, and also it was too imprecise,” Mr. Neuweiler says. “Among other reasons, this was due to the frequent rechucking of the workpieces—with each subsequent setup, the system-related inaccuracies accumulated.”
Overall, three clamping processes were necessary to manufacture a flange shaft bracket: a part with which a shaft is held and on which there can be different possibilities for mounting. As a rule, at Rodriguez, the component is manufactured with diameters between 12 and 80 mm, as well as lengths from 43 to 232 mm. In addition to drill-finishing the opening for the shaft, which requires an H7 fit, mounting bores must be introduced.
Moreover, additional milling tasks, such as workpiece trimming, were also required. For shafts with a 25-mm diameter, there was a pure runtime of 7 min per part for one flange shaft and that did not include the setup times. The workpieces were set up in a triple clamp.
“The machining did not correspond to the standard that we had envisioned,” Mr. Neuweiler says. “We wanted to reduce the number of clamping setups, and if possible, we wanted to completely machine all relevant manufacturing dimensions in one clamping setup. For our parts spectrum, only a five-axis machine can do this. Consequently, we looked around for a solution and finally purchased a high capacity Hermle C40.”
In addition to its performance, the new machining center also scored with high rigidity. “In order to reliably bring the advantages of the machine onto the workpiece, the range of workpieces must be precisely and securely clamped,” Mr. Neuweiler says. “Therefore, we decided on the Quadrok Plus clamping system from Hainbuch. In order to effectively clamp the different dimensions, we use the 120 and 200 clamping units.”
The Quadrok clamping system facilitates setup and, with a single system, a variety of clamping situations can be securely covered. The typical Hainbuch pull back principle also makes allowance for larger material tolerances; the jaws always pull the blank in the middle. Workpieces to 250 mm can be securely accommodated with the two clamping units.
Efficiency at Maximum Precision
“Now the components are machined in a five-sided clamping setup, the shaft capacity is drill finished, and the bores are set. In the second clamping setup, the sixth face is finished machined and additional geometries are introduced,” Mr. Neuweiler says. “Thus, with the 25-mm flange shaft bracket, the machining time is reduced to 5 min, scrap is no longer worth mentioning, and setup times are also significantly reduced.”
With the Hainbuch clamping system, now the operators achieve precise results—the cylindricity of the main bore is tolerated at 4 microns. Likewise, the diameter has a maximum H7 tolerance of 4 microns, and the rectangularity of the location surface for the bore is less than 2 microns. “At higher accuracy, the process time has been significantly tightened with the new Hermle machine and the Hainbuch clamping system,” Mr. Neuweiler says. “At the moment, we still clamp the workpiece manually; this process can be executed significantly faster than was the case with the solution we used previously. However, the clamping system also offers the possibility of hydraulic actuation.”
This option is particularly interesting if the machine needs to be automatically equipped. However, this is not yet planned at Rodriguez. “But we are certainly considering machining an additional parts spectrum on the C40,” Mr. Neuweiler says. “With this clamping system, we were able to implement turning jobs to 50 rpm on the turntable. But for us, this is still a ways off.”
Related Content
What Is Trochoidal Turning? How Might Shops Benefit From It?
While trochoidal milling might be a more well-known toolpath strategy, trochoidal turning can offer similar benefits such as high material removal rates especially for rough-turning operations.
Read MoreThe Value of Swiss-Types Milling Rectangular Medical Parts
High-speed spindle technology was key to effective milling of small cardiac monitoring components complete on a CNC sliding-headstock machine platform instead of running them across two mills.
Read MoreBreaking the Barriers for Small Tool Breakage Detection
This contact-free tool breakage detector, especially useful for machine tools with small tools and small workzones, offers a quick and efficient way to change out broken tools before they cause bigger problems.
Read MoreTool Path Improves Chip Management for Swiss-Type Lathes
This simple change to a Swiss-type turning machine’s tool path can dramatically improve its ability to manage chips.
Read MoreRead Next
5 Aspects of PMTS I Appreciate
The three-day edition of the 2025 Precision Machining Technology Show kicks off at the start of April. I’ll be there, and here are some reasons why.
Read MoreDo You Have Single Points of Failure?
Plans need to be in place before a catastrophic event occurs.
Read MoreA Tooling Workshop Worth a Visit
Marubeni Citizen-Cincom’s tooling and accessory workshop offers a chance to learn more about ancillary devices that can boost machining efficiency and capability.
Read More


.png;maxWidth=300;quality=90)


