Sorting And Inspection...At What Cost?
Suppliers are feeling the heat to achieve zero defects PPM. Old methods are giving way to automated systems. Here’s a look at how lasers are leading the way.
The cost of inspection today is an ongoing issue between the automotive companies and precision parts manufacturers. As the automotive parts manufacturers work to reduce price by means of improving the efficiency of the manufacturing process, their inspection costs have risen dramatically.
Historically, these manufacturers have focused on the production side of manufacturing parts, with sorting as an afterthought. Now, because of the quality demands placed on them, the sorting departments are growing fast. This growth has created new variables for the manufacturer, including cost, time, and—many times—inferior inspection processes.
Are possibilities for reducing costs the same in the inspection area as they are in the production area? Yes, however they are not as easily identified as in the production area. Although the automotive industry recognizes the cost in the inspection of the manufacturer’s product, they aren’t willing to pay higher prices to reduce suppliers’ PPM levels. Suppliers cannot always include inspection costs into the piece price, especially on grandfathered parts. Regardless, the expectations from the automotive industry still remain at zero PPM levels. And, in most cases, the precision parts manufacturer has to incur the inspection cost.
Inspection departments today incorporate a variety of different methods to provide what is called 100 percent inspection. Methods that include hand sorting, roll sorting, acoustic, inductors, vision and single laser inspection all reduce PPM levels to some degree.
The remaining defects that make it through these methods cause the manufacturer additional costs that should not be overlooked. These include chasing problems in the field, flying personnel to customer’s plants to resolve issues, hiring outside sorting companies to manually inspect product on the line, air freighting replacement parts, customer visits, 8D’s, and the potential loss of business due to reputation.
When you add up these costs along with any original equipment investment, the cost of sending product out or buying superior equipment no longer seems as expensive. Another potential cost is the automotive industries’ back charges for assembly line shutdowns due to defective parts. This is becoming more common every day, and it is impossible to factor into a business plan. Line shutdown costs can be enormous and can cripple the supplier’s bottom line.
Multi-Laser Inspection
The industrial laser is well applied in workpiece inspection. It’s fast, flexible and easy to set up to measure a variety of different workpieces. The laser inspection process is non-contact, so accuracies are not affected by mechanical wear.
Like most of metalworking, the sophistication of a laser inspection system is a function of the complexity and requirements of the application. Let’s start with the least sophisticated system.
For basic inspection, inspection equipment manufacturer Mectron Engineering Co. (Saline, Michigan) offers a two-laser inspection unit. This machine provides cross-sectional measurement and is ideal for many screw machine and other precision turned parts.
The system provides inspection and measurement of coordinate points in the X-Y plane on a part. With its two lasers, the unit gives four chords of inspection along the entire length of a part. Its gauge tolerance capability is 0.0004 inch.
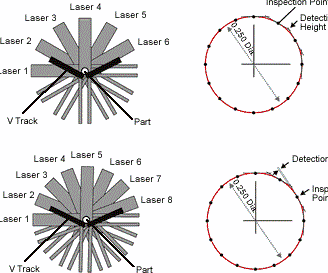
In operation, the laser scans parts as they pass by it traveling down a V-track. The two lasers are arranged at 90 degrees to one another and radially to the workpiece. Measurements on this two-laser system are taken at four points on the cross section over the entire length of the part as it passes through the beam.
In addition to providing part measurements, the system provides inspection for detecting mixed products, oversized and undersized diameters, short and missing threads and some radial part damage. Laser inspection is well applied to eliminate non-functional parts from a run, such as a part that missed a grinding operation. The shortcoming of the two-laser system is that part segments that fall between the four inspection points may not be seen by the laser.
For example, on a 0.25 inch diameter part, a defect that falls between two inspection points may need to protrude at least 0.051 inch before it can be detected by either laser. A defect that is less than 0.051 inch on a 0.25 inch diameter may be missed by both lasers on this basic inspection system. The two lasers system is best applied for sorting mixed parts, over and under sized diameter detection and missing features. More detailed inspection requires more lasers.
The next step in sophistication is complete 360-degree inspection of a part. With the degree of an acceptable defect decreasing all the time, using a system that can detect small defects is becoming more necessary. A damaged thread may mean the difference between a successful assembly and a line stoppage.
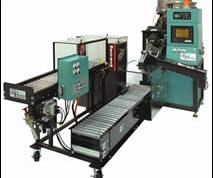
For this level of inspection, Mectron makes a system that uses six or eight lasers to “see” defects on the part. The choice of six or eight depends on the part size. Both systems provide complete 360-degree inspection.
The larger system operates in the same ways as the two laser system, with parts feeding through the beams using a V-slot guide. The difference is the increase in inspection points and the decrease in the size of a detectable defect.
A six-laser system gives 12 points of inspection around the full periphery of the workpiece. Using the same example as in the two-laser machine, a 0.25 inch diameter part, the six-laser array provides an inspection point at 30 degree intervals around the part.
As the part passes down the V-track, maximum coverage of the part is possible, resulting in tighter measurement of critical dimensions. With is system, a defect must protrude only 0.004 inch to be detected by one of the lasers. This compares with 0.051 inch on a two-laser array.
If six is good, eight is better. By slicing the part into 16 points of inspection around the 360-degree circumference, the detectable defect on our 0.25 inch diameter part goes to 0.002 inch.
Of course not all inspection requirements are about defects detection and dimensional verification. On some critical parts, metallurgical defects can also wreak havoc with a supplier’s zero defect PPM.
Metallurgical Defects
In a single inspection unit, Mectron integrates and automates the capability of multi-laser inspection and a magnetic imagery instrument and coil. The idea is to combine both dimensional verification and metallurgical defect detection into a single machine, reducing the cost of detailed inspection.
Magnetic imagery is an advanced eddy current technique that makes on-the-fly metallurgical inspection possible and integratable with dimensional laser measurement. As each part passes down the machine’s V-track, the coil develops a magnetic profile to create a part’s signature.
The full signature provides the opportunity to detect most critical metallurgical defects including cracks, material mixes, conductive platings and coatings, and hardness using a visual deviation of the magnetic image. The percentage of deviation is displayed on the machine’s monitor screen, and acceptable limits can be quickly defined using touch screen programming inputs.
Mectron cites two advantages of its magnetic imagery system. The first is full part signature detects more defects than many other techniques. The second is the coil design used on this system is free from sensitivity to speed and temperature fluctuations.
Customer Driven Evolution
Continuous improvements in machine design, laser implementation and software modifications have all been driven by specific customer applications. Many existing Mectron users of the original six-laser machines are opting for an eight-laser upgrade. The need for more inspection points around the part is becoming more important due to automotive demands. The tolerable defect size shrinks by the week, and the eight-laser provides the most complete on-the-fly inspection.
Software advances are resulting in amazing defect detection capabilities. Previously difficult to inspect defects such as turned hexes on round flanged parts are now inspected quickly and easily on the fly. The laser array provides a relationship from laser to laser that allows for accurate measurement of flats and corners on the hex. The difference of the measurements from one laser to the next provides data to a new software feature that interprets these numbers and calculates the differences between a good hex and a good flat. Another technique in using existing laser technology has allowed Mectron to provide bent part sorting on the company’s QuAlifier machines with minor modifications. These are just a small sampling of R&D innovations driven by the needs of precision parts manufacturers.
Where Do We Go From Here?
Partial elimination of problems is not adequate in today’s market. Costs involved with shipping defective product are escalating daily. In the long run, economically, it makes sense to go with a product or service that produces ultimate cost savings (which means zero PPM) to both the precision parts manufacturer and the auto producer.
The combination of 360-degree laser inspection and metallurgical defect detection, in a continuous production system, is a step forward for precision parts producers striving to supply zero PPM defects. For Mectron customers, the ability to purchase the service of inspection or the system itself is a lower risk proposition than is usually available.
Related Content
Addressing Machining’s Necessary Evil
Many view quality control as such, but integrating new measurement technologies and approaches can ultimately minimize QC’s impact on throughput and a company’s bottom line.
Read MoreKeeping Watch on Small Parts
From watch parts to exotic medical applications, this shop takes on the world of micromachining.
Read MoreStreamlining Part Measurement, Data Collection Processes
When collecting measurement data automatically with a wireless data collection system, manual errors can be eliminated ensuring data accuracy and traceability.
Read MoreVideo Tech Brief: Quality Control is Using the Right Software
This machine shop’s mapping software program runs on its gaging system to increase the accuracy of the probe’s tolerance measurement on the thin-walled aluminum tube machined by the shop.
Read MoreRead Next
Do You Have Single Points of Failure?
Plans need to be in place before a catastrophic event occurs.
Read MoreA Tooling Workshop Worth a Visit
Marubeni Citizen-Cincom’s tooling and accessory workshop offers a chance to learn more about ancillary devices that can boost machining efficiency and capability.
Read More5 Aspects of PMTS I Appreciate
The three-day edition of the 2025 Precision Machining Technology Show kicks off at the start of April. I’ll be there, and here are some reasons why.
Read More


.jpg;maxWidth=300;quality=90)


