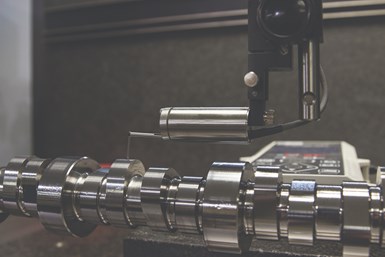
Comp Cams uses this skidless profilometer to measure the roughness of camshaft journal and lobe surfaces as well as their waviness. The device can determine actual surface topography to a resolution of 0.000002 inch.
Photo Credit: Comp Cams
When it comes to measuring the surface roughness, waviness and/or profile of machined parts using a profilometer, shops have two choices: skidded and skidless models.
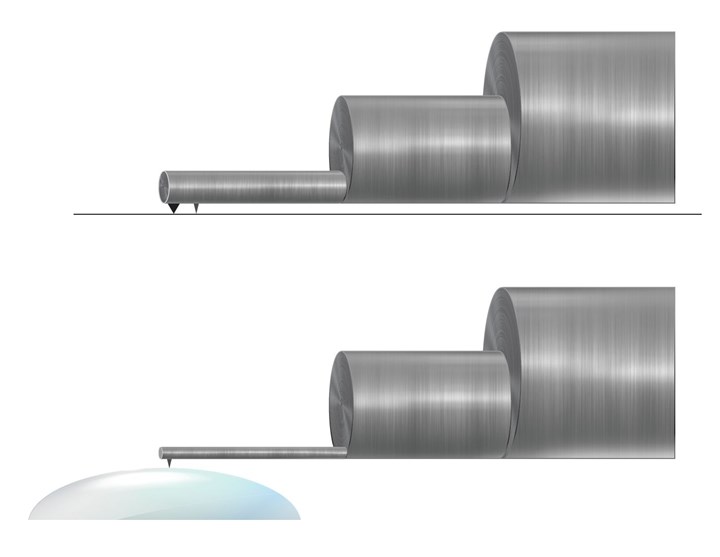
According to Zeiss Industrial Metrology, the primary principle of a “skidded” profilometer is that its diamond stylus and the skid datum are independent of each other and are in contact with the part surface when the trace is made. The surface texture is measured by the change in the diamond’s position relative to the plane of the skid that follows the surface. Because of this, any form or long wavelengths are filtered out and the remaining data is roughness only. Typical skidded profilometers are portable, inexpensive and incorporate short traverse movement. In addition, they are robust enough for shopfloor use, have good vibration damping characteristics and are generally easy to use.
As manufacturing techniques and surface analysis became more advanced, a more capable “skidless” profilometer was developed. The primary principle of a skidless trace is that the diamond stylus and datum are interdependent. The diamond tip is solely in contact with the part surface at the time of measurement and surface deviations are measured in reference to the diamond’s position against a straight datum built within the instrument’s drive guide. Skidless profilometers can analyze surface profile, waviness and roughness. These devices are said to be more accurate and repeatable than skidded models, but are also more expensive due to the precision datum guide, multispeed driver and higher resolution probe.

The top image shows a skidded profilometer; the bottom shows a skidless profilometer.
Comp Cams, a manufacturer of aftermarket camshafts and valvetrain components for race, show and street vehicles, uses a Zeiss Surfcom Flex 50A skidless profilometer to dial in the grinding wheel dressing process for select roller camshaft products. The Memphis, Tennessee, company grinds so many types of material and surface profiles in lobes that it has multiple different dress parameters it uses depending on what’s best suited for a given application.
The company tests ground camshafts at set integrals to check for lobe surface topography, lobe profile and burning. Using a carbide disk that emulates a roller lifter, it first uses an Adcole 911 camshaft inspection device to record the translating lifter motion for each lobe every 0.1 degree as it rotates the camshaft, meaning 3,600 data points are collected in a single rotation to a radial resolution of 1 micron. Comp Cams takes three measurements for each lobe (at the middle and on either side). This device records the motion of the lifter, determines if the lobe is convex or concave, and performs a fast Fourier transform (FFT) algorithm to check for grinding chatter.
Next, a Zeiss Surfcom Flex 50A skidless profilometer measures lobe profile and surface finish longitudinally (side-to-side) across each lobe’s surface. It does this using a pointed diamond stylus that drops into any valleys and moves over any peaks in the surface to determine actual surface topography to a resolution of 0.000002 inch.
The profilometer is also used to check for appropriate lobe crown on roller camshafts. Billy Godbold, Comp Cams’ valvetrain engineering group manager, says that the surface of the lobes for roller camshafts should be slightly convex (with a bit of a crown in the middle), because the rollers on the mating lifters are also slightly convex. By having both mating surfaces slightly convex, the pushrod load tends to cause each surface to flatten a bit. Comp Cams aims for a lobe crown of just a 0.0001 inch.
The company also uses Profile Master data analysis software from Digital Metrology Solutions to process and report the data gathered by the profilometer. According to Godbold, the software’s graphical interface is valuable in clearly communicating to manufacturing and quality control personnel how changes to the grinding process affect the end product.
Zeiss says its Surfcom Flex 50A skidless profilometer with high-performance pickup offering a measurement range of 1,000 μm can perform wide-ranging, high-resolution skidless measurement. The roughness or waviness on an undulating surface (such as a stepped or round surface) as well as flat surfaces can be evaluated with one trace.
Related Content
Does a Scanning Probe Make Sense on a Swiss-Type?
Swiss-types have limited tooling capacity, but there can be advantages to giving up some of that capacity to take advantage of a touch probe — in fact, a scanning probe — to enable in-process part measurements.
Read MoreIn-Machine Probing Possibilities for VTLs
A manufacturer of vertical turning centers uses a “push/pull” optoelectronic probe with custom bracket to enable its machines to perform effective, in-process measurement of shafts and related automotive components.
Read MoreShop Finds Value in Simple CMM Programming
Icon-driven programming enables all shopfloor personnel to perform CMM inspection, not just those in the quality department.
Read MoreThe Value of CMM Controller Retrofits
In this case, new controllers for two coordinate measuring machines — one 26 years old — with new programming software offers the possibility to enable multisensor inspection of critical, turned aerospace components.
Read MoreRead Next
Inspection System Helps Company Meet Short Lead Times
A digital video inspection system from Starrett is increasing this company’s inspection throughput and helping it get parts to its customer on time.
Read MoreFast Fixturing for Inspection and Laser Marking
The versatility of the Inspection Arsenal and Laser Arsenal modular fixture plate systems enables fixturing to be built on the individual grid plates. The plates can be easily removed from the magnetic docking rail when not needed.
Read MoreGaging’s Value for Effective Unattended CNC Machining
Process control is a bigger deal for high-volume CNC machining operations to eliminate scads of scrap/rework because a problem was not identified early on.
Read More


.jpg;maxWidth=300;quality=90)


