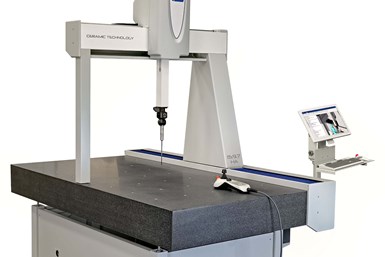
LK Metrology CMM Optimizes Measurement Cycles
Altera C HA ceramic-bridge CMMs provide volumetric accuracy from 1.3+L/350, repeatability from 0.0013 mm and scanning accuracy from 0.002 mm.
LK Metrology’s Altera C HA (high accuracy) ceramic-bridge CMM machines are optimized to provide high accuracy during a measurement cycle, with better repeatability and more accurate scanning. According to the company, the machines provide volumetric accuracy from 1.3+L/350, repeatability from 0.0013 mm and scanning accuracy from 0.002 mm.
The Altera C HA features an upgraded moving bridge, which is beneficial during high-speed movements. Measuring uncertainty at tight tolerances down to microns is significantly better, and the the bearing mountings have been further stiffened and their alignment improved. Due to the increased dynamic forces at play when measuring on the fly, the new design is especially helpful when using a scanning probe.
The pre-loaded, wrap-around air bearing configuration runs with a reduced-air film thickness for low energy consumption, and gives repeatable measurement results even at fast axis speeds. Friction drives provide smooth motion together with precise positioning at continuously varying speeds, as well as zero backlash and overload protection.
Multi-sensor capability is provided, with the Renishaw PH10M motorized probe head able to deploy a touch-trigger probe, scanning probe or laser scanner. LK’s proprietary, DMIS-based, multi-sensor Camio software enables programming and measurement based on 3D CAD data as well as comprehensive reporting.
The five sizes of Altera C HA have a measuring envelope above the granite table ranging from nominally 700 × 650 × 500 mm for the smallest CMM up to 1,500 × 850 × 650 mm for the largest. The machines are compact for the size of their respective measuring volumes and are also fast for high inspection efficiency. They are well suited for an inspection department or on the shop floor, especially as pneumatic anti-vibration mounts can be specified to isolate the CMM from nearby sources of low-frequency vibration, such as large machinery. All models carry a 10-year accuracy guarantee covering dimensional stability.
Related Content
-
Precision Machining Technology Review: November 2024
Production Machining’s November 2024 technology showcase includes some of the latest technology from Vericut, Hurco, the L.S. Starrett Co., LNS North America, Fryer Machine Systems and MachineMetrics.
-
Zoller Event Shines Lights on Shopfloor Connectivity
The company’s open house event highlighted smart manufacturing solutions from CAM to part.
-
PMTS 2023 Product Preview: Measurement
Learn about some of the latest measurement solutions that will be on display at PMTS 2023.


