Improving Quality Bit By Bit
Video measurement systems help this drill bit manufacturer keep a step ahead of the competition.
There is a cartoon that shows a king clad in armor in front of his tent on a hill, intent on the battle below between his knights and an opposing army. His attendants have just informed him that a salesman wishes to see him, and the king is complaining that he is too busy directing the battle to see the salesman—who in this case happens to be selling machine guns. The point, of course, is that we all get so accustomed to doing things a certain way that we often fail to recognize a better way when it comes along. Here’s a story about a company that recognized a good thing when it came along and is using it to mow down the competition.
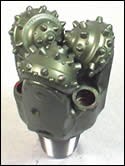
Smith Tool is a leading manufacturer of drill bits for the petroleum and mining industries. Drill bits are designed to drill through hundreds of feet of limestone, shale, granite, sand and tough materials to reach oil and gas formations. They must stand up under the weight of the drill rig, which can be as much as 100,000 pounds, and rotate at speeds from 200 to 300 rpm. Although drill bits cost anywhere from $2,000 to $50,000, they are a consumable item, good for from 20 to 300 hours of operation, depending on drilling conditions, before they must be replaced.
Companies that manufacture drill bits constantly work at improving the performance and reliability of their products to remain competitive—it’s a global industry. Smith Tool’s R&D, Design and Materials groups use customer applications as a starting point in their efforts to develop improved bearings, seals and cutting structures. As a result of those efforts, the company has introduced new drill bits designed to deliver performance that leaves the competition in the hole.
Impossible to Measure
One new design included a feature (a sealing surface for a bearing) that was at an angle that made it impossible to measure with conventional hand tools. Because the feature could not be measured directly, the QC department at Smith Tool’s Ponca City, Oklahoma, plant came up with an indirect measurement method. The procedure consists of sectioning a part containing the feature, damming two sides of the section with clay to form a mold, pouring molten ostalloy (a low-melting-point metal) into the dammed section, removing the cooled ostalloy mold and filing it down into a thin facsimile of the feature. The molded test piece, in particular a key 0.030-inch radius, is then measured using an optical comparator.
“We use optical comparators for many measurements, and we were confidant that we would be able to use them for the indirect measurement of the feature,” explains Ed Fields, quality assurance supervisor at the plant. “However, persons making the measurements were coming up with different values for the same test piece. Also, our optical comparators were 10× machines, and they were not accurate enough to keep us within the close tolerances required for the feature. We needed to find a more precise measuring method.”
A representative for Crescent Gage & Tool Sales, Rowlett, Texas, a distributor of dimensional inspection and gaging equipment, learned about the problem and called Mr. Fields to ask if he would like to see a demo measuring the test piece on a video-based measuring system. Mr. Fields agreed, and the rep brought in a SmartScope ZIP 300 video measuring system made by Optical Gaging Products (OGP), Rochester, New York.
Using the video-based system, the representative was able to completely measure the mold in a fraction of the time required with the optical comparator. As important, measurement variations resulting from factors related to the operator (experience, skill, fatigue, distractions and so forth) were eliminated. Repeated measurements of the sample produced the same readings. Smith Tool was so impressed by the demonstration that it purchased the unit.
At Smith Tool, operators of the production equipment are responsible for inspecting their own work. Most of the company’s machinists are Certified Mechanical Inspectors. “We have an in-plant program in which employees are taught ASQ’s CMI,” explains Mr. Fields. “Today, more than 100 of our operators are CMIs. Our operators had no trouble learning to use and program the OGP system. We obtain more reliable measurements with the video-based system, and although we’re still measuring some part features using the indirect method (ostalloy molds), we slashed inspection time for molded test pieces by as much as 75 percent.”
That might have been the end of the story, except that Smith Tool began to explore using the video-based system instead of optical comparators to directly measure other drill bit components. Smith is a major producer of three-cone rock bits, which are assembled from machined, forged steel components. The three-cone rock bit gets its name from three cones that provide the drill bit’s cutting action at the bottom and side wall of the shaft. Essentially, there are two types of cones: cones that are forged with rows of integral, pointed teeth; and cones that are fitted with multiple tungsten carbide or diamond inserts. “Each of the three cones has a different, complementary configuration designed to improve the performance and longevity of the rock bit assembly,” explains Terry Woodruff, manager of quality assurance for Smith Tool. “We have numerous drill bit families, each designed for drilling different formations—from granite to sand—and each made in sizes ranging from about 4 inches to 18 inches in diameter.
“Most of our rock bits are insert-type bits,” Mr. Woodruff continues. “Cones designed to receive the inserts are profiled on CNC lathes. One of the more critical operations is drilling of numerous round holes in the cone, into which cylindrical inserts are press fitted. It is very important for the cone profiles to be correct so that when we drill the holes for the inserts, they’re correctly located and have the proper orientation.”
Operators Do The Inspection
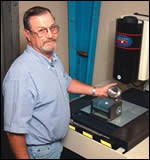
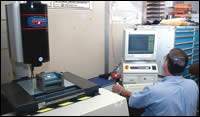
To make certain that the cone profiles are correctly machined, Smith Tool operators use the OGP SmartScope ZIP 300 to do a first-part inspection to verify the accuracy of the machining program and to inspect key features of machined parts. The plant has three video inspection machines on the shop floor and one in the receiving inspection area.
A typical part inspection begins with fixturing a part to be inspected in a magnetic workholder on the stage glass of the video measuring machine. Using the edge-trace capability of OGP’s MeasureMind software, the entire outside geometry of the part is traced automatically. The software also verifies that all heights, radii and key feature locations are within tolerances.
Slashes Inspection Time
A time study was made of a profile measurement using the video measuring system versus an optical comparator. The comparator took 45 minutes to perform the measurement, compared to only 18 minutes for the video measuring system. “The measurement time for the video system included the time required to create the inspection routine, measure the part and compare the results to a downloaded CAD file,” notes Mr. Fields. “Once the inspection routine has been created, inspection time per part is only 4 minutes for repeat runs of the same part. The system performs a high speed scan of the part with extreme accuracy and with minimal effort on the part of the operator.”
The fast inspection time has been an important factor in helping Smith Tool streamline its production operation. “With our kanban system, we have smaller orders than before,” Mr. Woodruff explains. “Years ago, our order size averaged about 250 pieces. Today, it’s more like 15. If our operators were still using optical comparators to measure the parts, they’d be on them all day long. Being able to measure faster enables us to get the job done faster and to get on to the next job.”
The greater measuring accuracy of the video measuring system also enabled Smith Tool to identify and eliminate minor problems in existing machining programs. “With the new technology, we were able to measure part features that, until now, defied measurement,” Mr. Woodruff explains. “By resolving the programming problems we discovered with the video measurement system, we were able to achieve significant improvements in the quality of our products.
Smith Tool’s Web site explains that the company is “ . . . focused on developing a comprehensive toolset to help our design and manufacturing staff get the best product into the field. These tools have enabled new designs to be introduced into the field that have given a step change in performance compared to established competitor designs.”
Tip Of The Iceberg
“We’ve been recognized for leadership in product performance for 6 years in a row now, and we’re continuing to improve on our quality,” Mr. Woodruff emphasizes. The video measuring system has already proved to be a valuable addition to that toolset, but Mr. Fields believes that the company has only just touched the tip of the iceberg in terms of exploiting the full potential of the machines.
“We’re starting to use the video measurement machines to inspect deliveries from our suppliers to make certain that products such as carbide inserts are within required tolerances,” Mr. Field notes. “We’ve even used the machines to reverse engineer worn or broken parts for our production equipment in cases where we were unable to find a replacement part or the leadtime quoted by the supplier was too long. Also, our video machines have the capability to use a probe system. We’ve not taken advantage of that capability yet, but we are looking at ways that it might be used to increase the number of part inspections that we can do in a given period.”
To date, Smith Tool has purchased four such machines. There has not been much resistance to the buys because the QA department has been able to demonstrate a payback of less than 12 months in every case.
Related Content
Automated Inspection Transforms Medical Manufacturer’s Quality Control
Manual steps for part inspection have been eliminated with a new CMM process using more advanced software and strategies such as using a combined scanning/touch-trigger probe.
Read MorePMTS 2023 Product Preview: Measurement
Learn about some of the latest measurement solutions that will be on display at PMTS 2023.
Read MoreIn-Machine Probing Possibilities for VTLs
A manufacturer of vertical turning centers uses a “push/pull” optoelectronic probe with custom bracket to enable its machines to perform effective, in-process measurement of shafts and related automotive components.
Read MorePrecision Machining Technology Review: December 2023
Production Machining’s December 2023 technology showcase includes some of the latest technology from Sandvik Coromant, Nikon Metrology, The L.S. Starrett Co., Walter USA, Kennametal and SolidCAM.
Read MoreRead Next
Do You Have Single Points of Failure?
Plans need to be in place before a catastrophic event occurs.
Read More5 Aspects of PMTS I Appreciate
The three-day edition of the 2025 Precision Machining Technology Show kicks off at the start of April. I’ll be there, and here are some reasons why.
Read MoreA Tooling Workshop Worth a Visit
Marubeni Citizen-Cincom’s tooling and accessory workshop offers a chance to learn more about ancillary devices that can boost machining efficiency and capability.
Read More





.jpg;maxWidth=300;quality=90)



.jpg;maxWidth=970;quality=90)