Project Puts Metrology Company on the 3D Map
High precision 3D mapping supports installation of a new beam transport line for scientific research.
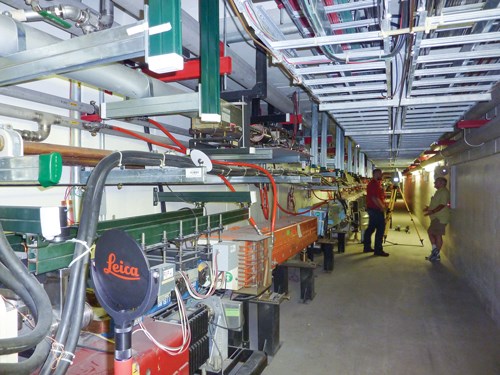
Last year, Fermi National Accelerator Laboratory (Fermilab) contracted Exact Metrology to work on a project known by its location as “Main Injector Ring Section MI-10.” Horst Friedsam, head of the alignment and metrology department at Fermilab, led the week-long project with Exact, which involved 3D mapping of existing equipment in order to yield data to support the placement and installation of an additional beam transport line.
Fermilab, a high-energy particle accelerator laboratory, in Batavia, Illinois, collaborates with more than 5,000 scientists from around the world annually to perform pioneering research, operate particle accelerators, plus experiment and develop technologies for science supporting U.S. industry. It has a long-existing relationship with Exact, having purchased and rented equipment from the supplier’s instrument pool, plus contracted for metrology services as onsite work, such as this scanning project.
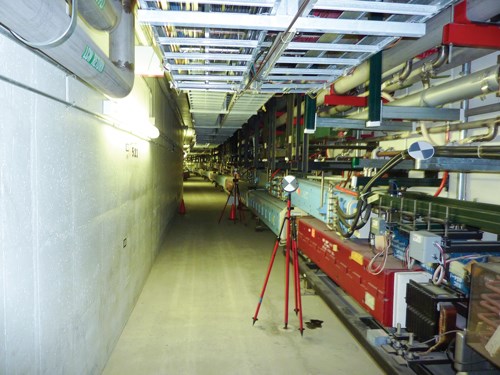
Exact Metrology performed the scanning in Section 10 of the main injector accelerator, which is situated in a tunnel about 33 feet below ground with a circumference of approximately 2 miles. The main injector accelerates a proton particle beam, arriving from the 8 GeV (giga-electron-volts) booster, to 120 GeV and subsequently blasts it into a stationary target to generate the world’s highest intensity neutrino beams.
Recently, Fermilab has been working on a new deep underground neutrino experiment (DUNE) to provide a neutrino beam through the earth’s mantle to the Homestake Mine in Lead, South Dakota, approximately 800 miles away. This project features access to research facilities 2 miles below ground, which is especially useful for neutrino experiments requiring shielding from cosmic ray events.
DUNE is an experiment for neutrino science and proton decay studies, drawing upon formerly independent worldwide efforts to use the megawatt neutrino beam facility at Fermilab, in conjunction with the Sanford Underground Research Facility (SURF) in Lead, South Dakota. DUNE’s goal is to achieve transformative discoveries about neutrinos, making definitive determinations of neutrino properties, the dynamics of the supernovae that produced the heavy elements necessary for life and the possibility of proton decay.
In order to deliver a neutrino blast to the DUNE collector, a new beam transport line that fits within the existing beam line infrastructure was required. As a result, a large section of the main injector installed equipment needed to be scanned, including a large number of machined mechanical structures used to support the transport line and other components along the beam path. The data would be critical to the design and positioning of the new beam elements and for visualizing potential interferences with the existing components. Suppliers of the mechanical and process components would be given access to the data for the initial phases of their engineering work.
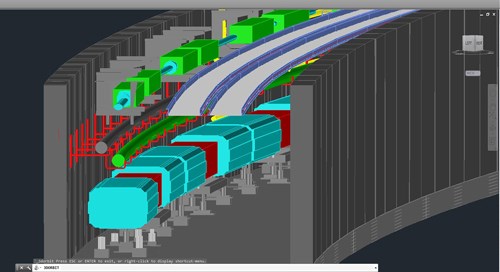
To accomplish this task, 3D point cloud collection, full CAD modeling and photo overlays of a large section of the currently installed main injector equipment was needed.
Fermilab’s alignment and metrology department maintains a high precision control network throughout the laboratory complex. For the scanning process, a Leica ScanStation P20 ultra-high speed 3D scanner was used in conjunction with special laser scanner targets, modified to fit within the existing control network points. Exact Metrology’s Leica ScanStation P20 was chosen for its combination of high accuracy and low scan noise, plus its environmental specifications. The IP54 enclosure is especially useful for harsh industrial environments.
RSL300 laser scanner target markers from Bernsten International were mounted concentric to 1.5-inch radius steel half spheres, interfacing with Exact Metrology laser tracker nests. The coordinates of the control network, determined at the sub-millimeter level, were provided to Exact Metrology to globally register all scans relative to the Fermilab system. The end product output thus provided information for all scanned objects in the common coordinate system used for the entire site.
The software chosen to aid the process was Leica Cyclone, producing equipment modeling and TruView—a web-enabled panoramic point viewer allowing the user to view, pan, zoom, measure and mark up point cloud data over the web.
To take the scans, dual units were positioned, high and low, using measuring magnets at 50-foot intervals along the beam path. The scans were typically 3 to 4 minutes long, and the work continued for 1 week to scan a single half-mile section. Overall, the project lasted almost 2 months, with scanning, imaging and data analysis prior to final presentation to the Fermilab team. Exact Metrology team member Michael Trudeau was responsible for the scheduling and execution, while Jacob Willis was a lead application engineer on the project.
Owing to the physical distances involved on this project, Fermilab provided actual surveyor coordinate points to the Exact team, as such distances involve compensation for the curvature of the earth.
The 800-mile separation between the neutrino source and the far detector is optimal for the symmetry violation studies planned for DUNE and measuring other neutrino properties that may shed light on the origins of the universe.
— JobBOSS
Related Content
Addressing Machining’s Necessary Evil
Many view quality control as such, but integrating new measurement technologies and approaches can ultimately minimize QC’s impact on throughput and a company’s bottom line.
Read MoreAutomated Inspection Transforms Medical Manufacturer’s Quality Control
Manual steps for part inspection have been eliminated with a new CMM process using more advanced software and strategies such as using a combined scanning/touch-trigger probe.
Read MoreZoller Event Shines Lights on Shopfloor Connectivity
The company’s open house event highlighted smart manufacturing solutions from CAM to part.
Read MorePMTS 2023 Product Preview: Measurement
Learn about some of the latest measurement solutions that will be on display at PMTS 2023.
Read MoreRead Next
Do You Have Single Points of Failure?
Plans need to be in place before a catastrophic event occurs.
Read More5 Aspects of PMTS I Appreciate
The three-day edition of the 2025 Precision Machining Technology Show kicks off at the start of April. I’ll be there, and here are some reasons why.
Read MoreA Tooling Workshop Worth a Visit
Marubeni Citizen-Cincom’s tooling and accessory workshop offers a chance to learn more about ancillary devices that can boost machining efficiency and capability.
Read More


