The Process Control Imperative
Tough economic times force manufacturers to look for ways to improve efficiency while reducing costs.
Tough economic times force manufacturers to look for ways to improve efficiency while reducing costs. Automating process control, through on-machine probing, can be critical to reducing manning levels, machine downtime, scrap and rework, and even inspection costs.
Lean manufacturing strategies for cutting leadtimes and work-in-process only work well if the machining process itself is predictable, repeatable and reliably producing conforming parts. The key to predictable productivity is to tackle variation at the source, isolating the root causes and addressing them individually. On-machine probing brings that capability to turning operations.
Much of the non-conformance in many processes arises from human intervention. Automation can make possible intelligent process control to minimize staffing levels, human error, cost burdens and the drags on machine uses/equipment efficiency from manual intervention.
Process control can be viewed as a four-layer pyramid constructed of a foundation level, process setting, in-process control and post-process monitoring. The foundation level requires a stable manufacturing environment and repeatable machines capable of delivering the specified part tolerances.
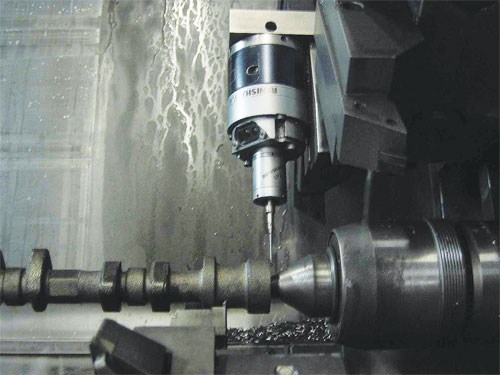
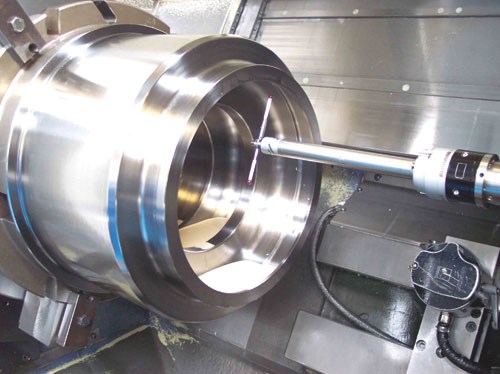
Building on step one, process-setting controls help eliminate human error by automating manual processes. Probing automatically detects error sources in setup of the machine, part and tooling. Probes are designed for harsh machine environments and are intended to permanently reside in the turret or be transferred into a live spindle. Probes can be programmed to locate and orient the workpiece and align the machining program, as well as to later locate specific part features for secondary milling, drilling, tapping operations, and so on. The probe can verify tool dimension and condition to avoid machining errors, rework and scrap.
The in-process control step uses probes to check against obvious variables such as temperature and tool wear that can affect machined dimensions. This step can be especially important on lengthy and high-volume part runs to control against process drift. If only a few tools are used in the process, there’s no need to probe every feature. A touch probe can be used to check a critical feature produced by each tool, and then the tool offset can be updated. Putting logic in the program lets the machine use probe feedback to call up new tools or repeat passes. In-process measurements and offset updates should be logged for traceability. In-process probing of features on first parts can validate tools and processes (and enable correction where necessary) before committing to batch production.
Post-process monitoring through probing of the finished part while it is still fixtured can allow rework if part material permits, as well as provide a process check before starting the next part in batch production. This strategy can be an especially effective on larger and high-volume parts where off-line inspection, as on a CMM, can put the turning center on hold awaiting results or risk starting the next part with a chance of having it scrapped. As with in-process inspection, probing could be limited to critical part features to minimize measurement time. For example, a Nissan engine plant does periodic inspection on cam shafts to check against process drift. A turret-mounted probe checks 17 defined features, automatically updating tool offsets based on any encountered variations.
Better Application Versatility
Renishaw has developed two highly compact, wireless lathe probes designed for better application versatility and more installation options. The new RLP40 and OLP40 lathe inspection probes offer a choice of signal transmission technologies—radio or optical—to make part setup and inspection on turning centers accurate, simple and reliable. Measuring only 40 mm (1.57 inches) in diameter and 58.3 mm (2.30 inches) long, the probes provide unidirectional repeatability of 1µm (0.00004 inch).
The RLP40 is designed for applications where line-of-sight communication between probe and receiver is not possible. It can be used inside full enclosure lathes and turning centers with the receiver remotely located outside. Renishaw’s frequency-hopping spread spectrum (FHSS) radio transmission pairs with the company’s standard radio machine interface (RMI) on the 2.4-GHz frequency band to operate in “noisy” RF, multi-machine environments. The probe and its interface continually hop from one transmission channel to another, delivering unrivalled signal robustness and flexibility through frequency switching, the manufacturer says.
The OLP40 uses modulated optical transmission for high resistance to light interference, and its 360-degree transmission systems allow the probe to operate in any orientation. OLP40 also supports Renishaw’s legacy transmission systems, making it fully backward compatible with existing optical probe systems. Through the use of the OMI-2T interface, two OLP40s can be used on a single turning center.
Both probes offer a range of shanks, including parallel and tapered designs, for maximum flexibility when mounting the probes in a lathe or turning center turret. RMP40M and OMP40M are also available as “transmission-only” modules. When paired with the company’s LP2 probe and accessories, a custom configured lathe gaging system allows machines to reach part features that would otherwise be inaccessible.
Probing for Full Traceability
Renishaw’s own manufacturing environment acts as an example of how lathe probing can help optimize manufacturing efficiency and process control. The company runs almost 30 sliding head lathes at its plant in the United Kingdom, producing turned and milled components for metrology products, including probes themselves.
Designers were specifying more milled profiles and complex part configurations with greater feature counts, forcing longer setups. Further, management set challenging cost and efficiency targets. Caught in between, manufacturing engineers created a new in-cycle gaging system. Traditionally, the plant would make a complete part, check it on a CMM, interpret the results and adjust process parameters. It could often take 5 to 10 attempts to get all features in tolerance.
The new process uses a probe with special “T” stylus configuration that enables measurement of all drilled, milled and turned features on main and secondary spindles—in process. Instead of machining the first part complete, each tool’s work is followed by a rapid probing routine that measures and updates tool offsets without operator intervention. Roughing and finishing tools are individually updated and optimized.
The in-process probing gives full traceability and the means to address problems at the source. Once production starts, the probe measures each tool/feature on a sample basis, the frequency determined by the tolerance. Processes are kept on center in the face of tool wear or thermal drift, improving process capability. With each source of variation under independent control of fully automated checking and feedback, genuine lights-out production is realized.
Related Content
In-Machine Probing Possibilities for VTLs
A manufacturer of vertical turning centers uses a “push/pull” optoelectronic probe with custom bracket to enable its machines to perform effective, in-process measurement of shafts and related automotive components.
Read MorePMTS 2023 Product Preview: Measurement
Learn about some of the latest measurement solutions that will be on display at PMTS 2023.
Read MoreStreamlining Part Measurement, Data Collection Processes
When collecting measurement data automatically with a wireless data collection system, manual errors can be eliminated ensuring data accuracy and traceability.
Read MoreAutomated Inspection Transforms Medical Manufacturer’s Quality Control
Manual steps for part inspection have been eliminated with a new CMM process using more advanced software and strategies such as using a combined scanning/touch-trigger probe.
Read MoreRead Next
Five-Axis Head for Touch-Trigger Inspection on CMMs
Utilizing technology developed for its Revo measurement system, Renishaw says its PH20 probe head offers “head touches” for rapid touch-trigger measurement and fast, infinite, five-axis positioning for optimal feature access.
Read MoreDo You Have Single Points of Failure?
Plans need to be in place before a catastrophic event occurs.
Read MoreA Tooling Workshop Worth a Visit
Marubeni Citizen-Cincom’s tooling and accessory workshop offers a chance to learn more about ancillary devices that can boost machining efficiency and capability.
Read More


